The structure of this meeting will be determined by team members, influenced by the thinking you have done in Section 7 with regards the 7S format and the Strengths, Weaknesses, Opportunities and Threats that you considered.
Ask yourselves:
what are the key issues that this meeting needs to address?
in what order will we tackle these issues?
In no particular order . . .
The meeting should include discussion of and recommendations about:
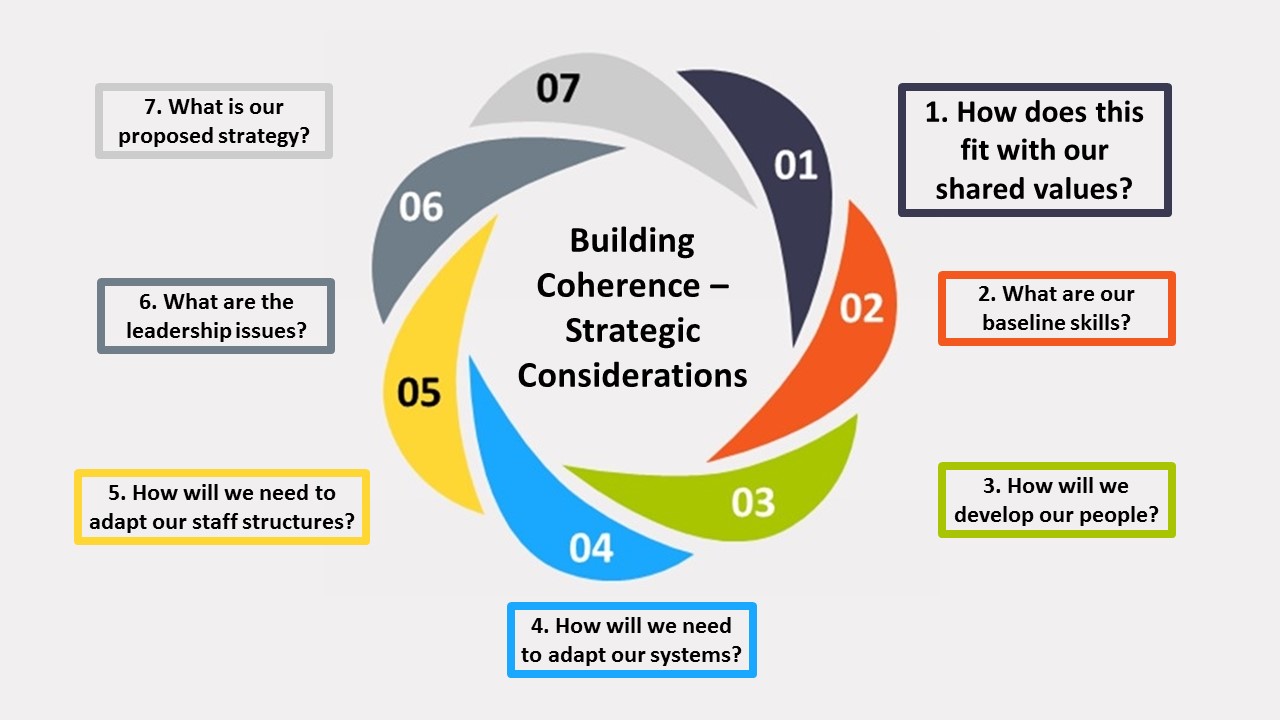
How the school will need to adapt its current systems.
Think about the annual cycle of keeping profiles up to date once profiles have been created for all students.
Ask yourselves:
when in the school year will we first create learning profiles for all students?
once created, when and how frequently will we update learning profiles?
what are the directed time implications, how can this be enabled, will we need to devote INSET time or meeting time?
Staffing implications
Think about what this means for classroom teachers.
Ask yourselves:
what support will teachers need?
who will offer this support?
how will we ensure that all teachers adopt a consistent approach?
how will we share what we are finding out about our students’ profiles?
Staffing implications
Think about what this means for the management of the creation / updating of learning profiles.
Ask yourselves:
who will manage the creation of profiles?
who will be responsible for maintaining records at the whole school level?
should we / can we use our school management system to maintain central records?
Staffing implications
Think about the leadership issues.
Ask yourselves:
who will take the lead on this?
how will we maintain interest in this long-term project?
who will be responsible for analysing students’ learning profiles and for developing / testing hypotheses?
who will be responsible for identifying and implementing any ongoing opportunities that may arise from the profiles?
And finally . . .
Pulling it all together
Think about how you will capture your recommendations.
Ask yourselves:
how will we build these ideas into a proposed strategy for implementing learning profiles across the school?
will we use our existing school improvement / development plan format? If not, what will we use?
Unit 3. The big picture of progression in learning
Unit 3 explores what getting better at learning looks like.
What are the key aspects of progression in learning behaviours? (Essential Read about 1)
How do the progression charts work? (Find out 1)
How do groups of my students differ in that progression? (Find out 2)
Where are my students strengths and weaknesses in four key behaviours? (Try out 1 to 4)
Structuring and using the ideas below with your students over the next month or so is your third step in becoming a skilled learning power practitioner.
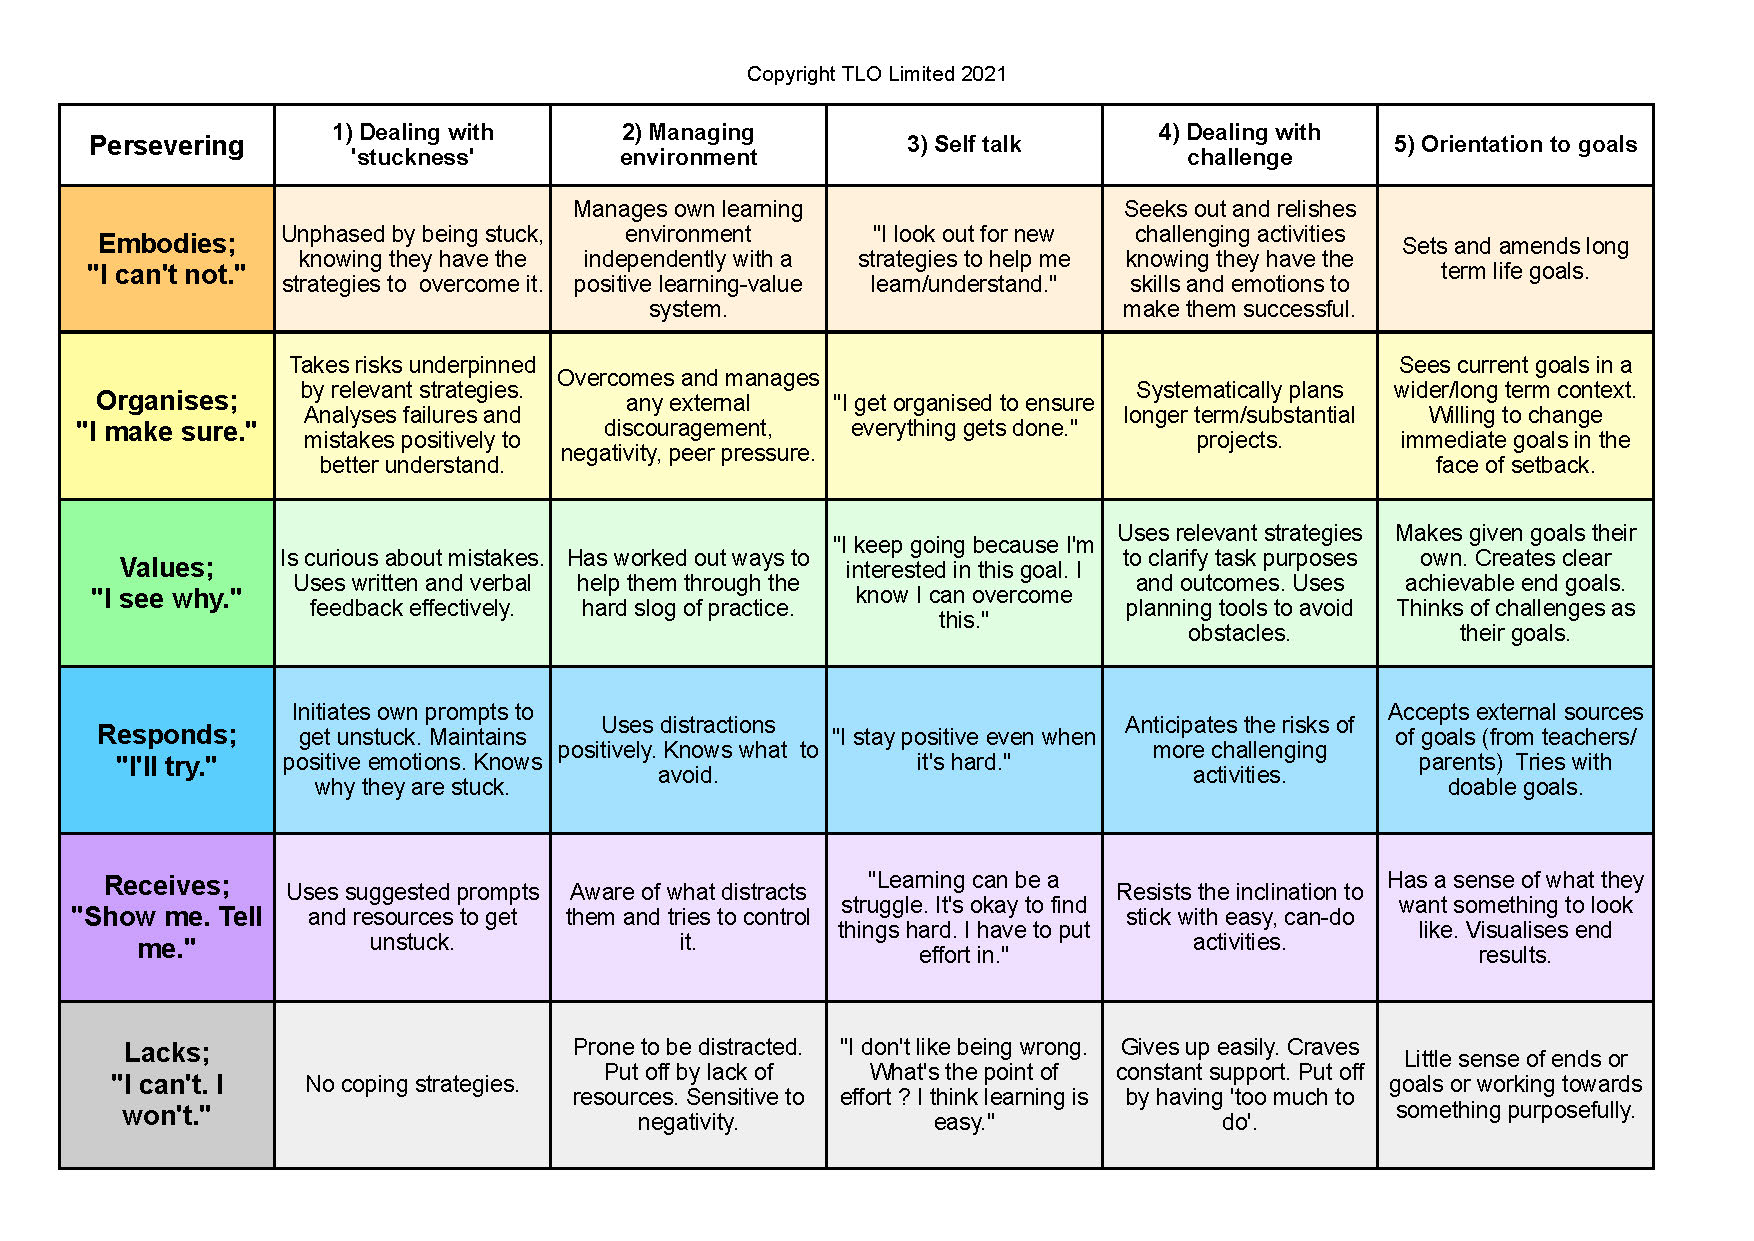
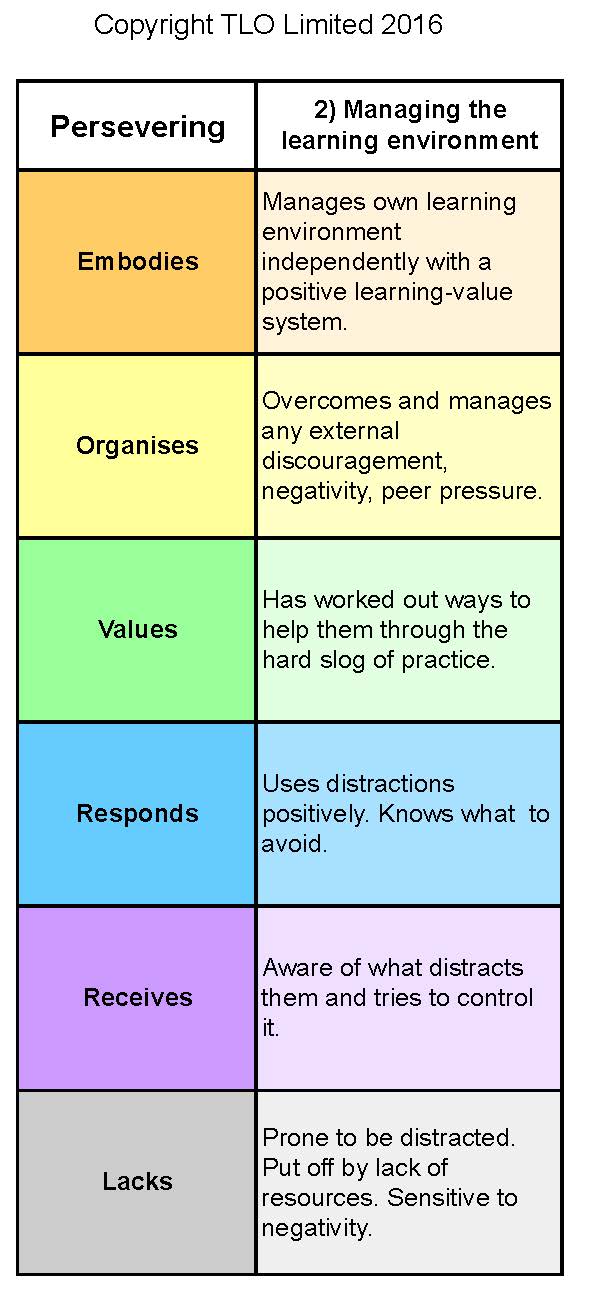
The idea of growth in learning behaviours
Essential Read about 1
A framework for the growth of learning behaviours
Building the powers to learn
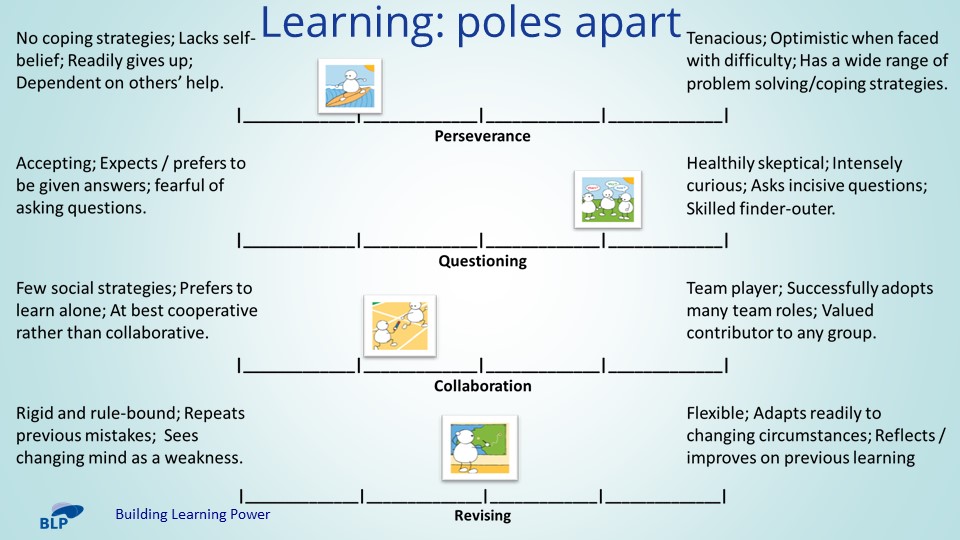
The whole point of building better learners is to do just that, to build the learning behaviours, not just name them. The diagram alongside – Learning: Poles Apart – offers an outline view of this journey showing the reluctant learner on the left and the learning powered learner on the right. It’s a long but exciting journey from what can sometimes be negative behaviours on the left to rich, skilled and positive attitudes on the right. This journey covers students’ emotional learning habits, their cognitive/thinking habits, their social learning habits and their ability to manage the learning process itself.
There are three key facets to the progression of learning behaviours;
the frequency/how often the behaviour is being used (How much)
the range/scope of contexts in which it is used (Wheres)
the skilfulness with which it is employed. (How well)
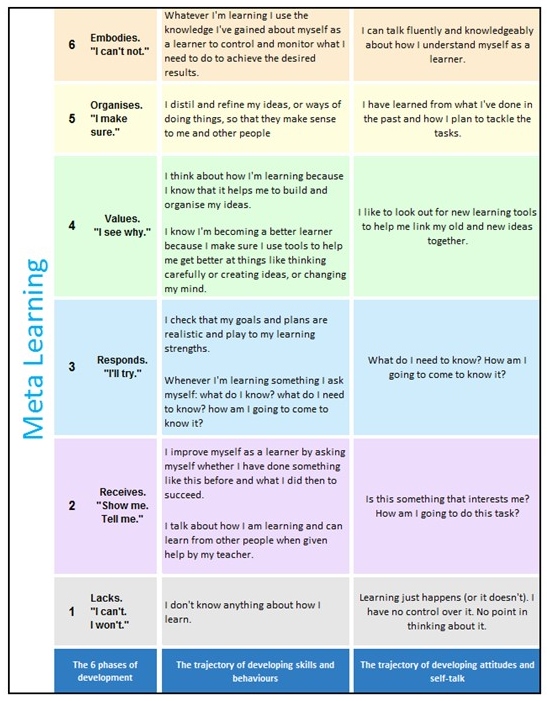
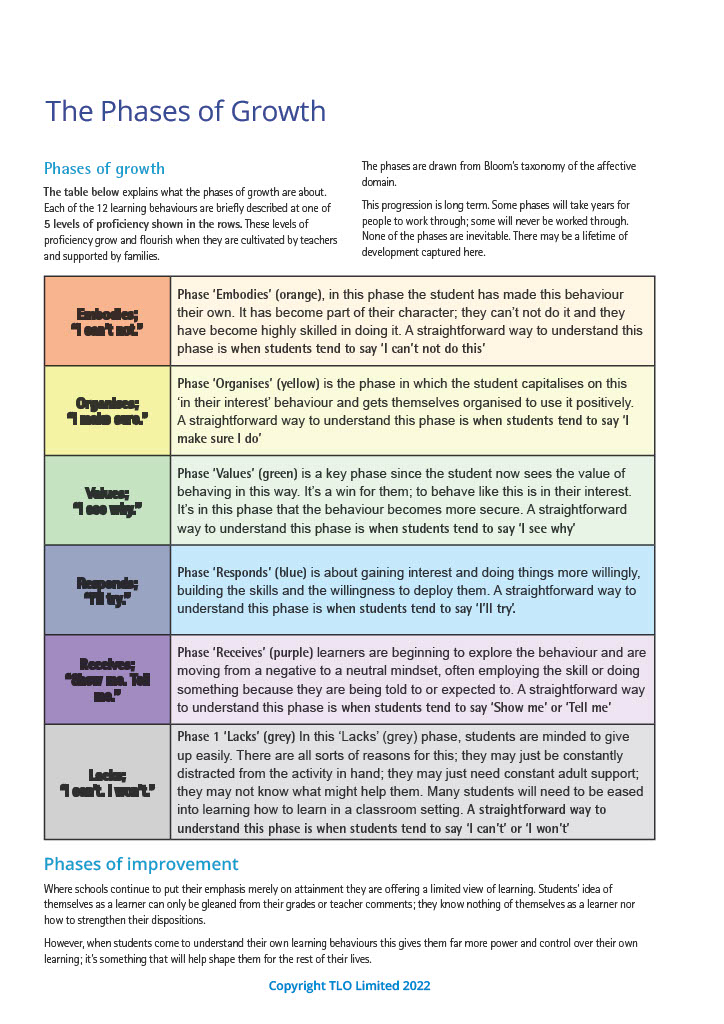
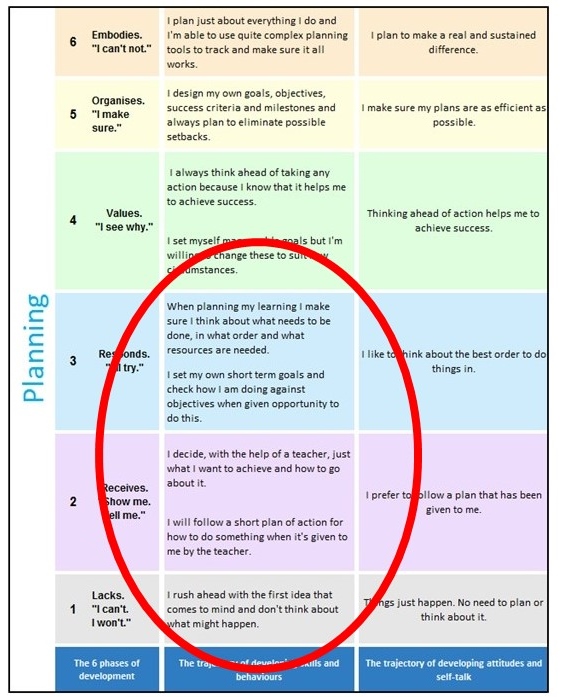
Our understanding of what the journey might look like in practice has emerged and taken shape over the past seven years. The stages of the journey are ‘borrowed’ from Bloom’s taxonomy of the affective domain of learning. It is this scaling of the learning dispositions that will help you make sense of the journey as you track, and influence, your learners’ progress over time.
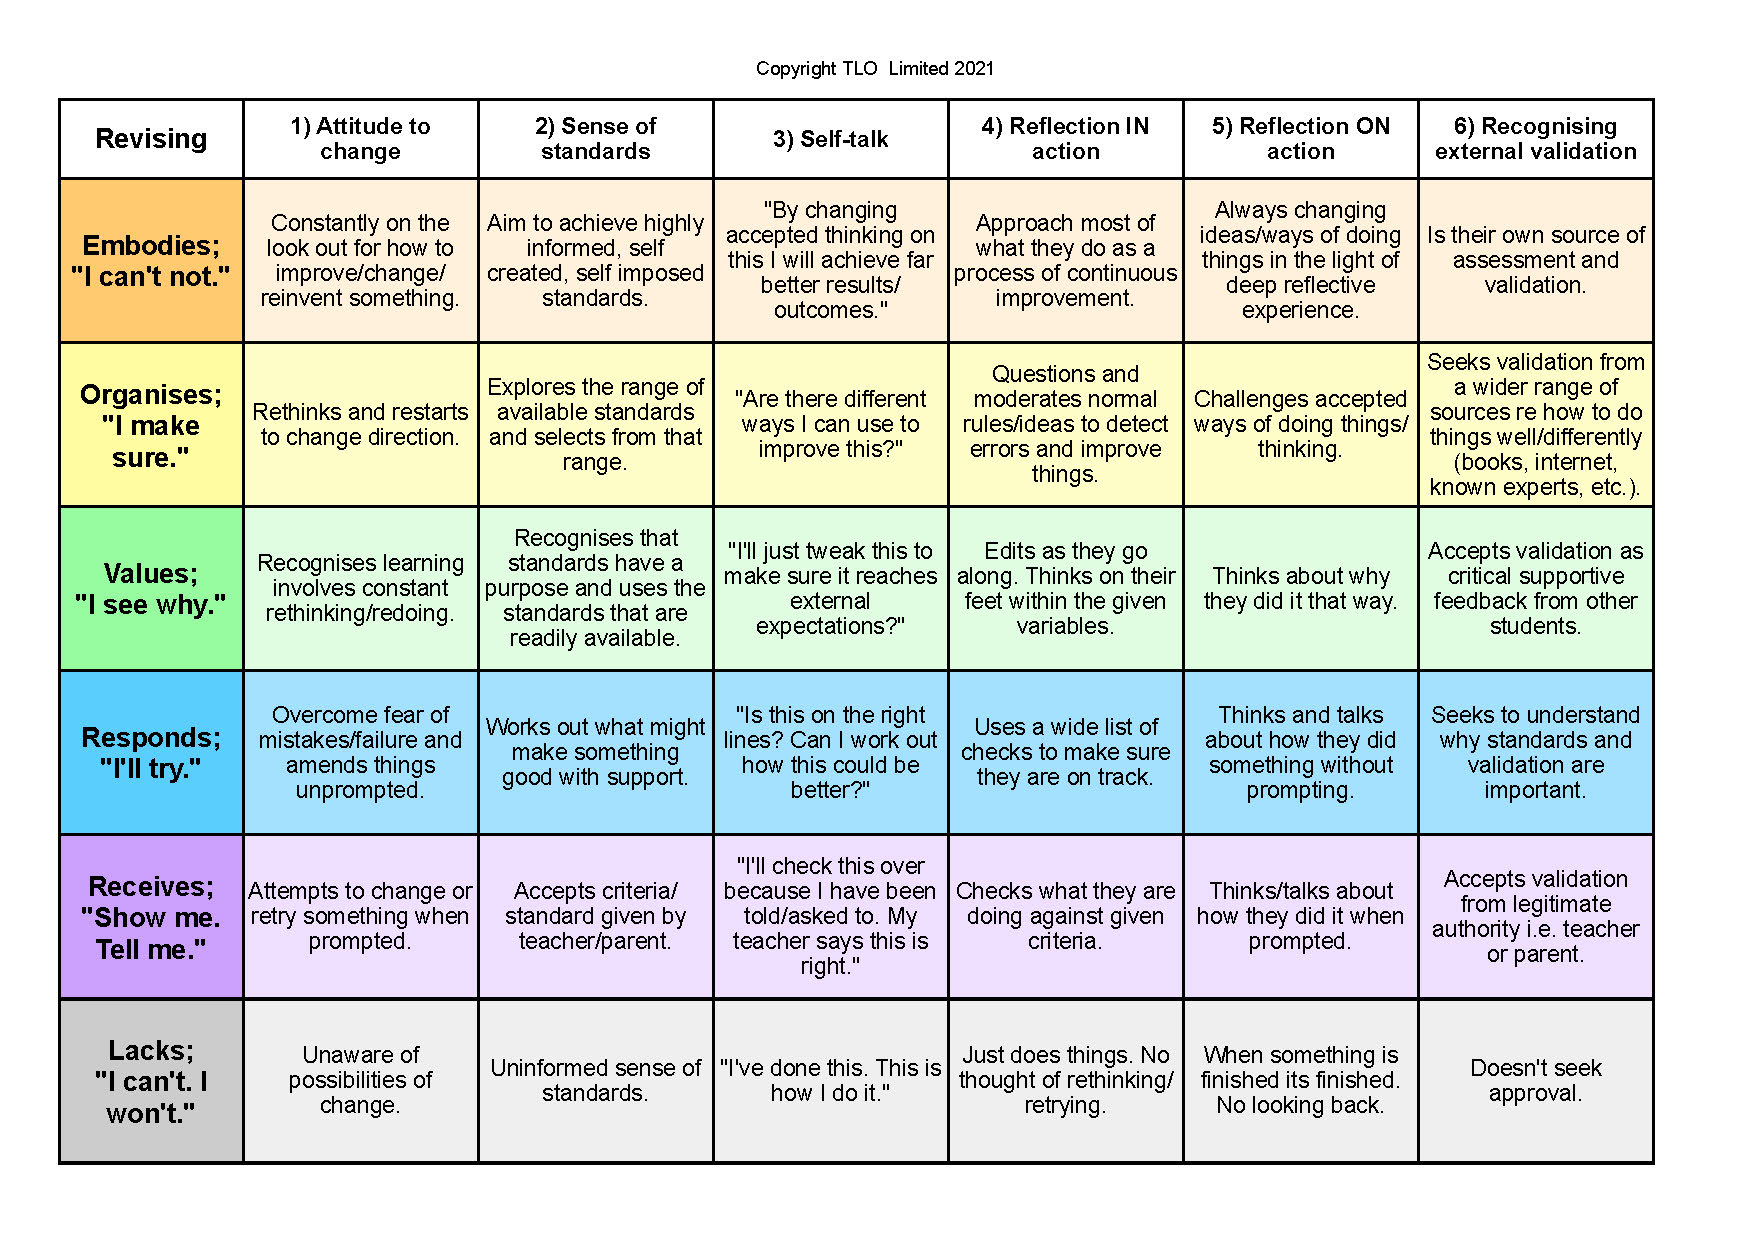
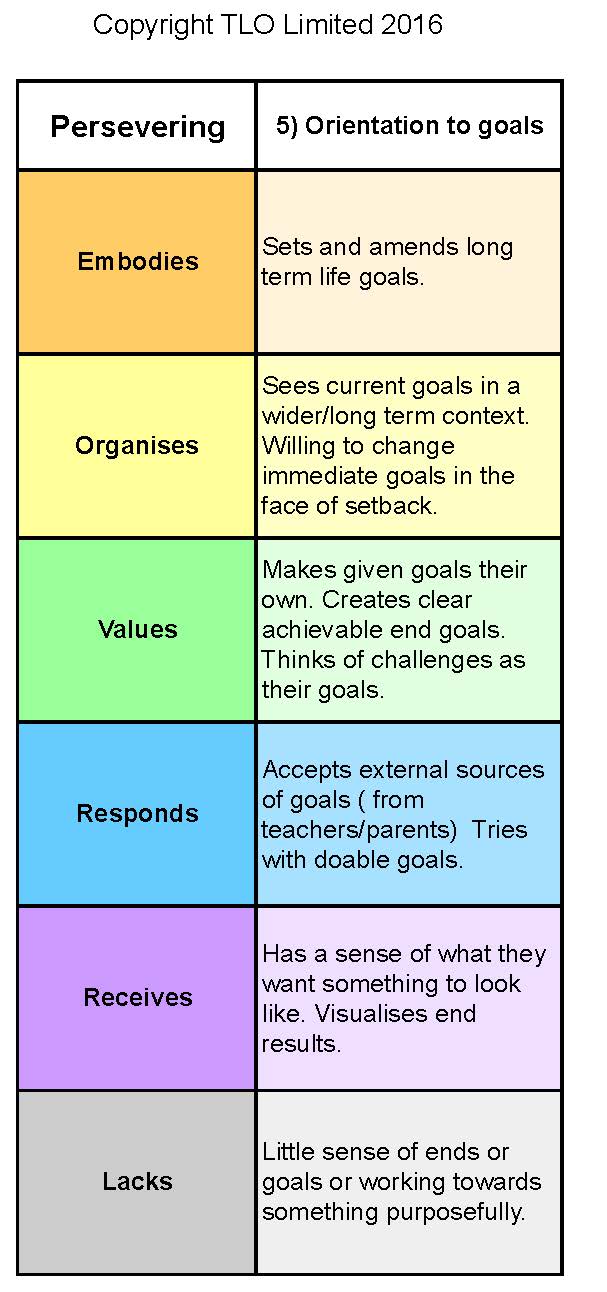
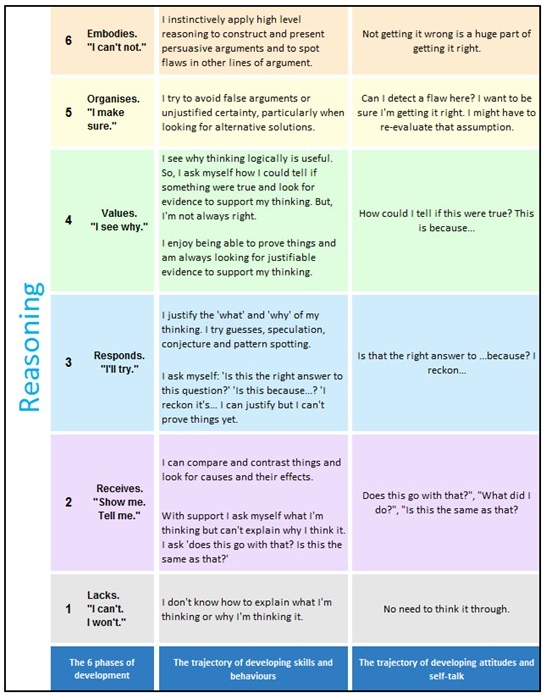
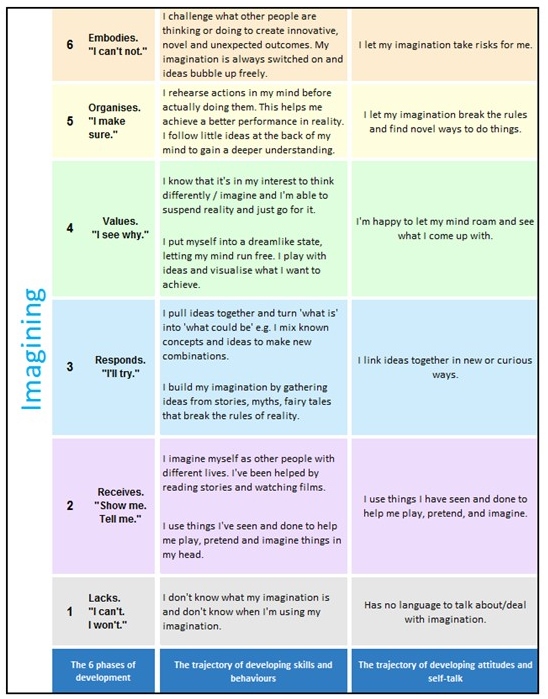
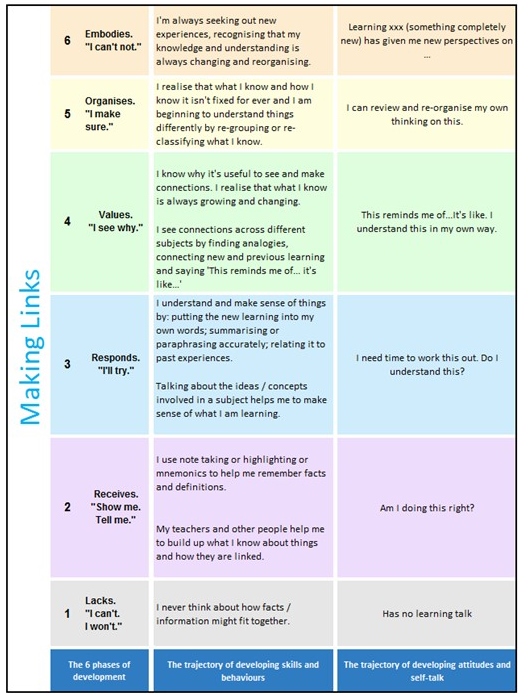
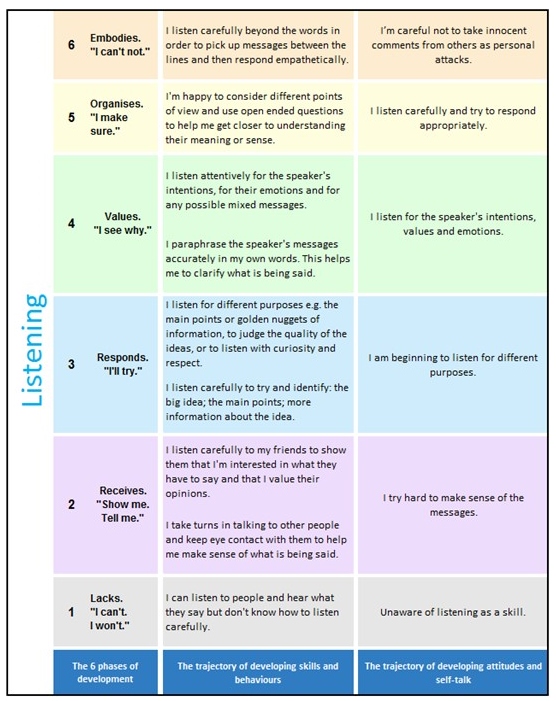
We’ve borrowed ideas from Benjamin Bloom’s Taxonomy of Objectives of the Affective Domain to generate a very condensed version of the five main phases of growth, namely;
Receiving. (purple)…which involves giving attention to something; becoming aware, not avoiding or rejecting it; being alert to something.
Responding.(blue)…which involves going beyond merely attending to actively attending; complying; taking more responsibility for and enjoyment in initiating action.
Valuing. (green)…which involves accepting the worth of something; preferring something; being committed to the value of something.
Organisation. (yellow)…which involves adding to, formulating and organising their values into how they live their life.
Embodies. (Characterisation in the original)(orange)…which involves behaving consistently in accordance with their values, living what they stand for.
We’ve added a negative phase labelled Lacks (grey) where learners are unaware, show no interest in or avoid or reject the learning behaviour.
We have simplified and applied these ideas to the affective development (emotional) of learning behaviours.
Take a look at the phases shown above, but start at the bottom and work up
We urge you to see this progression as long term.
Some phases will take years for people to work through.
Some will never be worked through or achieved.
None of the phases are inevitable.
There is a lifetime of development captured here.
Nevertheless your role as a teacher or parent should surely be to encourage and enable this journey.
It’s worth getting your head around the outline of these phases of development. They apply to any of the learning behaviours as we show in the toggle boxes as you scroll down.
Essential Read about 2
Growth in the big four learning behaviours
It’s useful to remember the essentials of building powerful learners include:
recognising that learning is a learnable craft; you can get better at it.
learning how to learn involves attitudes, values, interests and beliefs.
developing better learners is done with and by learners rather than to learners;
it involves cultivating dispositions and values rather than training skills;
it is not an inevitable by-product of ‘traditional effective teaching’;
it is about making students ready and willing as well as able to learn.
So now ask yourself…
What sort of learning characteristics do my learners have?
What sort of learning characteristics do my more successful learners have?
Which characteristics or behaviours do my struggling learners have?
Which learning behaviour contributes to the success of most of my learners?
Which learning behaviour is used less than any of the others?
How do the answers to these, and similar questions, apply to my teaching and the curriculum?
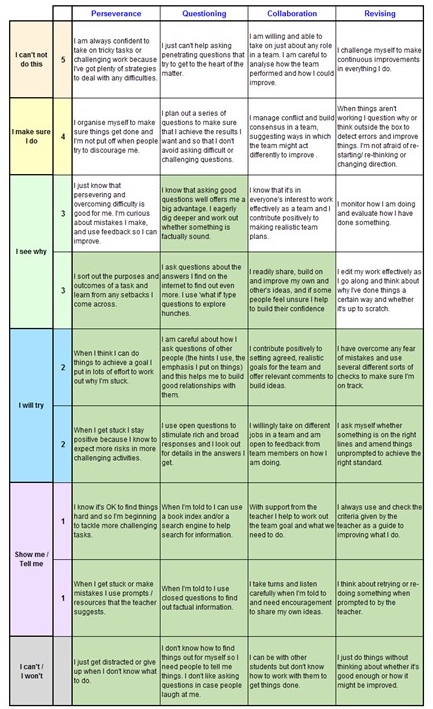
Learning development stages behaviour by behaviour
To get a better sense of the growth of these learning behaviours use the chart to think about yourself as a learner. Start slowly and think:
where would I place myself on each of these 4 trajectories?
do I understand the statements well enough to answer? Any I need to check?
can I really say that the statement is secure? [By secure, we mean that these are behaviours that you exhibit in a range of different circumstances.]
does it actually describe what I do most of the time, or does it describe something I can do but tend not to? (what I do do, rather than what I can do).
have I ever thought about myself like this before?
would my partner or colleagues see me in the same way?
colour in your secure statements on the chart.
This has now become your Learning Behaviour Profile.
Now ask...
which learning behaviour is particularly strong, or weak?
am I substantially lower or higher in some? Which?
are there any surprises or disappointments?
what questions is this raising for me?
where would I like to improve?
what may have shaped my current learning characteristics?
if I hadn’t used this chart how would I have described myself as a learner?
What do learning profiles reveal about my learners?
Your students as learners
Now turn your attention to some of the learners in your class just to get an idea of how useful such profiles can be.
Begin by identifying 4 students you wish to focus on. Choose 1 lower achieving boy, 1 higher achieving boy, 1 lower achieving girl, and 1 higher achieving girl.
Download and print 4 copies of the behaviour chart opposite.
Using your knowledge of these 4 students, colour in and create a learning profile for each student.
Now ask...
which learning behaviours are particularly strong or weak?
are the profiles of the girls different from the boys?
are the profiles of the higher attainers different from the profiles of the lower attainers?
what questions is this raising for me?
has this exercise changed or sharpened your understanding of these students as learners.
If this activity has piqued your interest and you want to find out more about your students as learners, have a go at the Extended Find Out that follows.
1) Sharing your experiences of creating student learning profiles [10 mins]
Creating student learning profiles from scratch the first time round is a significant amount of work. Take 10 minutes to share your experiences.
Ask yourselves:
how difficult was it to generate profiles for every student in your class?
were the profiles of some students harder to create than others – why might this be?
were some of the learning behaviours harder to assess than others – why might this be?
did it get quicker as you became more familiar with the layout of the profile?
how long did it take to complete them all?
2) Exploring similarities and differences [15 mins]
Compare and contrast. Can you identify a couple of key similarities across all of the profiles, and also a couple of key differences. Take a little time to explore why these similarities / differences might exist.
Ask yourselves:
how are my profiles similar to my colleagues’ profiles?
are there any features that appear consistent across all profiles?
how do my profiles differ from my colleagues’ profiles?
why might these differences be occurring?
is there any evidence that the first 4 foundation behaviours are stronger than the new 8 behaviours?
are any behaviours consistently stronger across all profiles?
are any behaviours consistently weaker across all profiles?
3) Framing some possible hypotheses about what the profiles reveal [10 mins]
As you completed your own profiles you might have been beginning to wonder about possibilities, to think about why some things appear to be happening. This may relate to little ‘inklings’ that were developing – how are my girls’ profiles different from my boys’ profiles? do my more able students appear to be strong in particular behaviours? do my underachieving students have consistent learning behaviour weaknesses?
Share these thoughts with your colleagues.
Ask yourselves:
how do my first impressions and ‘inklings’ compare with my colleagues’ ideas?
are there any emerging thoughts / hypotheses that all / most of us share?
are there any first impressions that merit further investigation?
4) Considering whether the completed profiles offer any evidence that learning behaviours are progressing as students move through the school [10 mins]
Take a look over your profiles, comparing the profiles of the oldest learners with those of the youngest learners. Both groups will have experienced at least one year focussing on the big 4 behaviours, and a few months working on the next 8 behaviours.
Ask yourselves:
are there any significant differences?
what might account for these differences / or lack of differences?
to what extent are we seeing differences that are simply age related – ie some behaviours are just not accessible to younger learners?
and 2 big questions:
what do you think / hope the learning profiles of your youngest students could / will be like in a few years time, as they reach year 6 and after they have experienced 4 or 5 years learning in classrooms that intentionally address their learning behaviour development?
what would be a realistic medium term goal in terms of learning behaviours for our future year 6 learners?
5) Beginning to think about how student learning profiles might be integrated into whole school practices [15 mins]
Because you are just a small team, you will only have learning profiles for your own students. As yet, you cannot build a complete view of all the learners in your school. Your learners’ profiles may, or may not, be representative of the whole school – but at this stage you cannot know for certain.
Hopefully you are beginning to sense how individual student learning profiles, created for every student, updated annually to record learning growth, might become a rich whole-school resource that can underpin your efforts to build a learning-focussed school culture.
Your next activity as team members will be to begin to reflect on how this might be implemented across the whole school, but before you leave this meeting, spend a few minutes discussing what the way ahead might look like.
Ask yourselves:
how hard will doing this across the whole school be?
will it be worth doing?
how would we all have to change to make this happen?
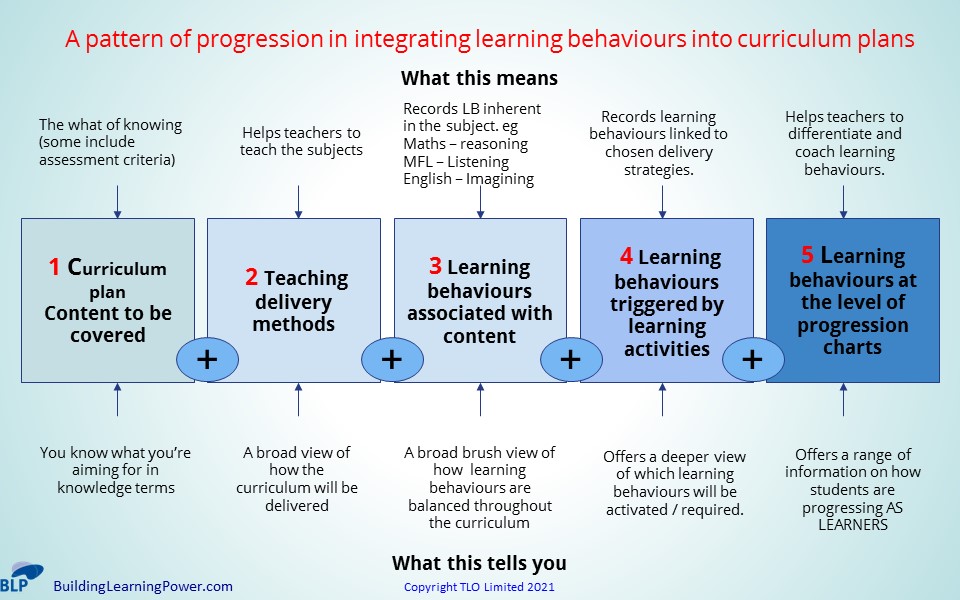
…alert you to the transition from content-only planning, through to planning that weaves together the content to be acquired, the planned activities and the learning behaviours that are being developed and grown. Ultimately it is about the content being the vehicle for growing learning behaviours, while the developing learning behaviours aid and speed the content acquisition.
B. The best way of tackling this section is to..
…read it through, thinking about your own curriculum planning and where it fits in this pattern of progression in integrating learning behaviours into curriculum plans.
C. As a result it should have the following impact.
In the longer-term there are implications for how you plan your curriculum, medium term plans, and individual lessons as you become increasingly aware of the learning behaviours needed to access the curriculum and/or activated by the planned activities.
Essentially you will come to a stark reality….that unless you plan as described by level 5 your curriculum will have little impact on students’ learning behaviours.
1. The whole picture
Traditionally curriculum planning has identified what is going to be taught, how it is going to be taught, and how success is going to be assessed. Such planning has traditionally been wholly content and teaching related, with no reference to the learning behaviours necessary for accessing the content.
In this section we consider the transitionfrom content-only planning through to curriculum planning that integrates progression in content with progression in learning behaviours.
Here’s an outline of the whole transitional journey.
Level 1. Knowledge you are aiming for.
Planning at this simplistic level describes what is to be taught, and in what order. The content is defined and sequenced. There’s little reference to how the curriculum might be delivered or how it might be assessed, and certainly no reference to the learning behaviours necessary for success.
In terms of the teachers’ palette diagram:
Outcomes for teaching…responsibility for learning lies exclusively with the teacher, talk is about content, lessons are constructed to ‘deliver’ the curriculum according to individual teacher’s preferred delivery styles, performance is celebrated.
Outcomes for learning…students are there to be taught what they need to know, students don’t think about or know how they learn, learning is about knowing stuff and getting it right.
Level 2. The ‘how’ of delivery
Adding the ‘how’ of delivery to the content to be delivered serves to guide teaching and maybe define the activities that will be undertaken. This level of planning ensures greater consistency of delivery across different teaching groups, but is still teaching-focused.
In terms of classroom culture, this level of planning creates a teacher-focused classroom, and depending on the nature of the planned activities, some limited elements of the learner-focused classroom.
Outcomes for teaching…responsibility still lies exclusively with the teacher, talk is still about content, lessons are constructed to ‘deliver’ the curriculum, but delivery is less dependent on individual teacher’s preferred delivery styles and activities are planned / agreed in advance of delivery, successful content acquisition is celebrated.
Outcomes for learning…learning is still focused on content, learners have no awareness of the learning behaviours they are exercising, learning activities are becoming more consistent and engaging.
Level 3. Linking subjects and learning behaviours
Linking subjects and learning behaviours can be seen as a step-change in terms of curriculum planning.
At this level, consideration is given in advance to how students will need to be as learners in order to access the prescribed content.
Mostly this is at the level of identifying the key learning behaviours necessary for or activated by different subjects. For example, Mathematics frequently requires students to employ their reasoning and their pattern seeking skills, but some maths topics may also require attentive noticing, or critical curiosity etc. Other subjects will have a different blend of learning behaviours that they exercise on a regular basis.
Still at an early stage, planning now links content with learning behaviours, but at a fairly simplistic level. Subject planning is beginning to include ‘go-to’ learning behaviours, but at least these behaviours are being identified in advance and as such it is now possible to alert students to the learning behaviours that they are expected to employ – it fosters the beginning of dual-focused teaching (sometimes called split-screen teaching), in which both the content to be studied and the learning behaviours to be employed can be built into lesson planning.
Learning is brought out of the shadows and made visible, to both students and teachers.
[A short lesson plan which is part of a unit on ‘Blood and the Circulatory System’ is shown opposite, with learning behaviours shown highlighted yellow.]
Outcomes for teaching…responsibility is beginning to shift towards the learner, talk is predominantly about content, but learning behaviours are beginning to figure in classroom discourse, lessons are constructed to help students to understand how they will be learning the content and learning behaviours are built into lesson objectives. There is a growing recognition that lessons have twin intentions – to learn content and to exercise specific learning behaviours. Successful learning behaviours are discussed and celebrated.
Outcomes for learning…learners are becoming aware of the learning behaviours they are expected to exercise and are coming to understand that there is more to learning than just ‘knowing stuff’. They are beginning to be able to talk about the process of learning, although in relatively simple terms at this stage. Their role is changing as they begin to understand that success is dependent on their learning behaviours.
Level 4. Learning behaviours linked to delivery strategies
Linking learning behaviours to delivery strategies takes planning beyond linking learning behaviours to the content that is to be delivered. It recognises that the way that the content is delivered also activates / requires learning behaviours that could / should be identified, planned for and made visible in advance.
Consider a Science curriculum that involves, at some stage, students undertaking a practical experiment.
The skills required to observe the teacher conduct the experiment and then faithfully recreate the experiment as an individual requires skills of observation, listening, attention to detail, following a prescribed plan etc.
Contrast that with the skills required when the teacher puts students into small groups and challenges them to work together to plan how to do the experiment, to identify and gather the resources needed, to conduct the experiment, and to reflect together on how they could have planned it more efficiently.
Same experiment – with different learning behaviours stimulated by how the teacher chooses to organise the activity.
At this phase, the learning behaviours identified will be drawn from a framework like the Supple Learning Mind.
[The same lesson, which is part of a unit on ‘Blood and the Circulatory System’, is shown opposite, with content related learning behaviours and activity related behaviours shown highlighted yellow.]
Outcomes for teaching…responsibility is becoming increasingly shared, teachers are expecting more of learners, direct teaching is diminishing, and teachers increasingly see their role as a learning coach, guiding both content acquisition and understanding of learning, talk is a balance between what is being learned and how it is being learned, and the learning language is becoming ever more sophisticated, lesson construction is dual-focused and makes both the content to be learned and the learning behaviours to be employed visible to learners. A wide range of learning behaviours are noticed, discussed and celebrated.
Outcomes for learning…learners have sensed a shift of focus, away from ‘being taught’, towards taking responsibility for their own learning, they are increasingly aware of their learning strengths and relative weaknesses, they are coming to understand the learning process and themselves as learners, and understand that learning about learning is at least as important as ‘knowing stuff’.
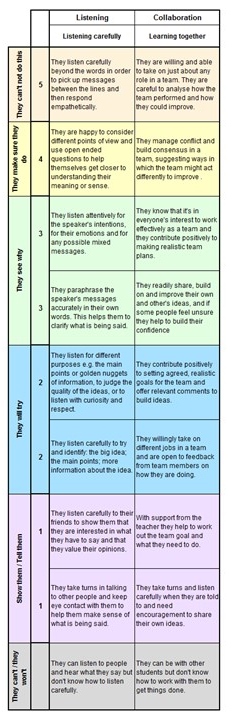
Learning behaviours of the supple learning mind
Level 5. Learning behaviours linked to their progress
The holy grail of curriculum planning is: carefully sequenced content related planning that ensures that students’ understanding of their growth as a learner is of equal importance as their progressive understanding of the content matter.
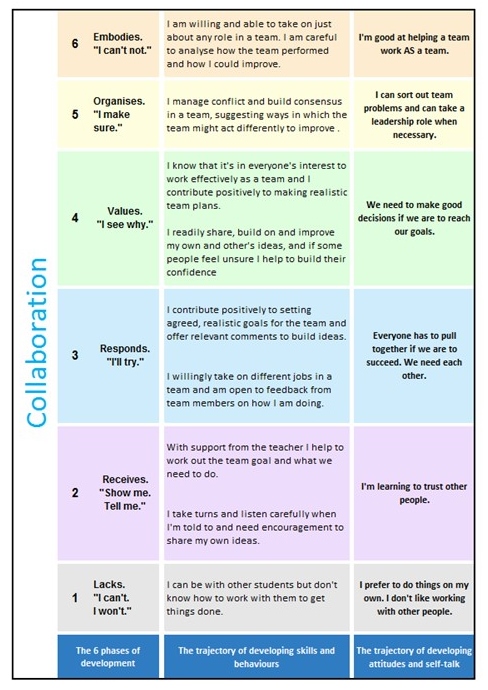
Consider the example of the science planning in 3A5, above. The second strategy included ‘working together’ [or Collaboration as we would call it in terms of the Supple Learning Mind].
But we have a much more elaborated understanding of ‘Collaboration’ through the collaboration progression chart. Depending on the collaboration skill levels of learners, ‘working together’ might become ‘listen carefully to others and share your own ideas’ or ‘contribute to creating and agreeing a realistic team plan’ etc.
At this depth of planning, both the content specific learning behaviours and the activity specific learning behaviours are differentiated by reference to learning behaviours drawn from the relevant progression trajectories.
In terms of making learning visible, planning has moved beyond ‘today you will need your reasoning skills’ to ‘today you will need to able explain your thinking to neighbour and offer evidence to support your thinking’. We have moved beyond simply naming the skill to identifying a particular aspect of the learning behaviour.
Where 3A5, above, was a little blunt-edged, here references to learning behaviours are specific and differentiated to support learner progress.
[The same lesson, which is part of a unit on ‘Blood and the Circulatory System’, is shown opposite, with content related learning behaviours and activity related behaviours drawn from progression charts shown highlighted yellow.]
Outcomes for teaching… learning is a shared responsibility, and has become a shared endeavour between teachers and learners. Teachers make learning and how to get better at learning visible to learners – through talk, feedback and display. Teachers ensure that the curriculum is constructed so that it stretches both content and learning behaviours. Teachers value the growth of learning behaviours equally alongside progress and attainment. The growth in a wide range of learning behaviours is noticed, discussed and celebrated.
Outcomes for learning…learners have taken control their own development as learners. They have a deep understanding of, and can talk fluently about, the process of learning. They are aware of their learning strengths and which aspects of learning behaviours they are seeking to improve, and understand how improving as a learner supports and strengthens their progress and attainment.
Whole school strategies are always a double edged sword – the advantages of creating a consistent approach across all teachers is counterbalanced by the possibility of stifling creativity in teachers keen to push the boundaries, to tweak practice, and so develop new and improved approaches.
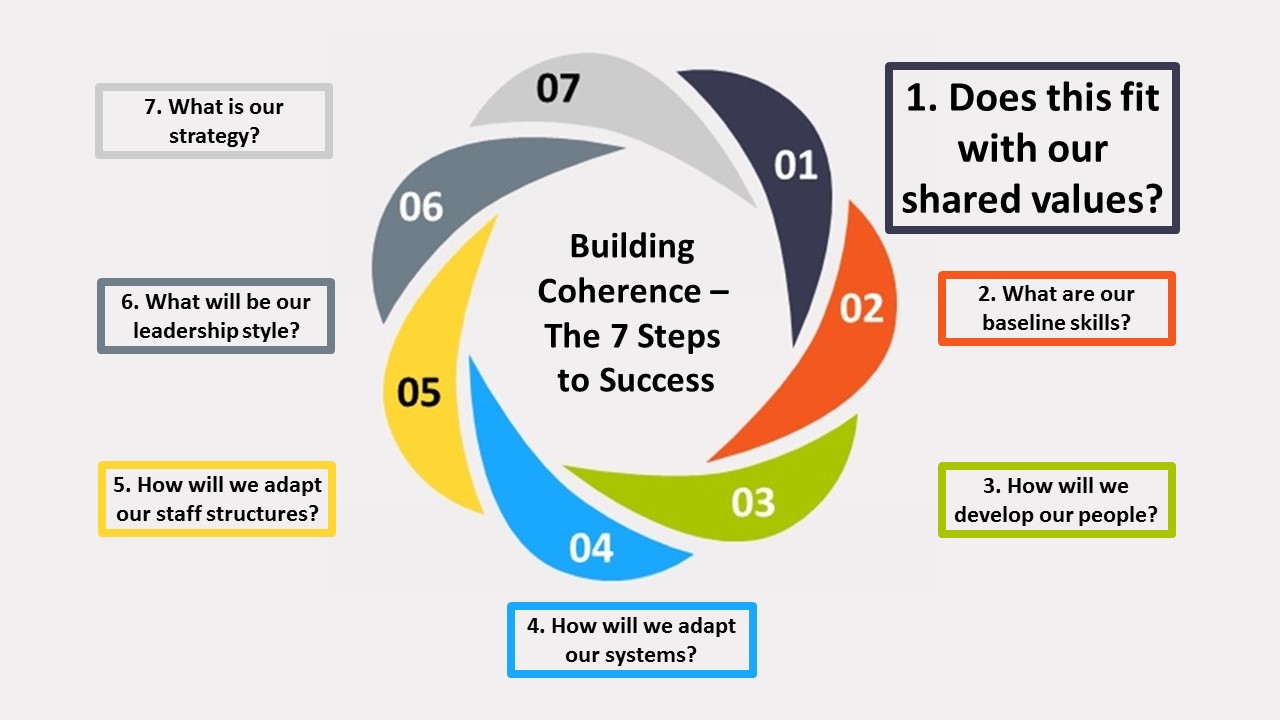
Given that the school has elected to follow the phase 3 route of Building Coherence, it is reasonable to assume that there is a will, at leadership level at the very least, to achieve a consistent approach to tracking student learning behaviours.
This is your chance, as the development team, to create a consistent approach that is sufficiently effective to stand the test of time. Student learning profiles, created during the reception year and revisited annually as student learning behaviours grow over time, will become an ongoing record of how your students are developing as learners. Think of it not as a one-hit issue, rather as something that will track your students’ learning as they move through your school, guiding practice and establishing development targets.
The creation of learning profiles from scratch for all students in all years is necessary at the outset, but thereafter new profiles will only need to be created for your intake year. All other teachers will be engaged in updating existing profiles, modifying them as learning behaviours mature and grow.
Is the school ready for this long-term development? With whom will it find favour? Who might be more resistant? What might the school need to do to achieve buy-in?
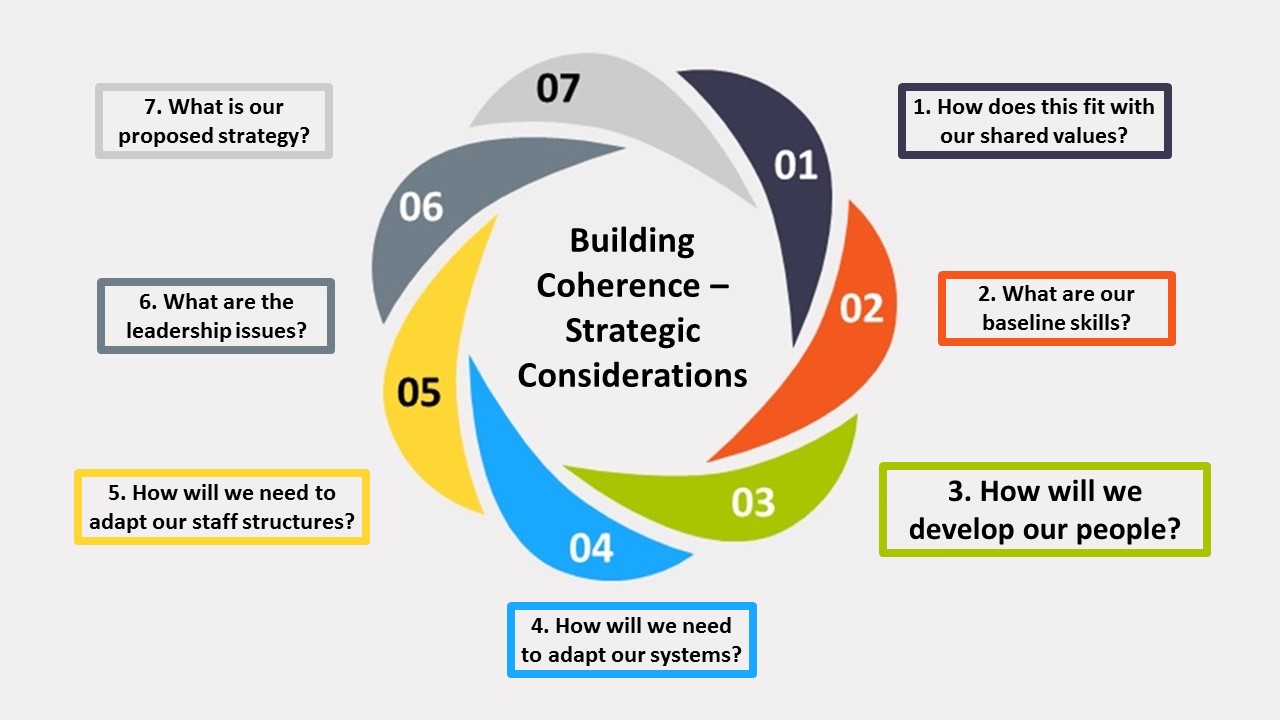
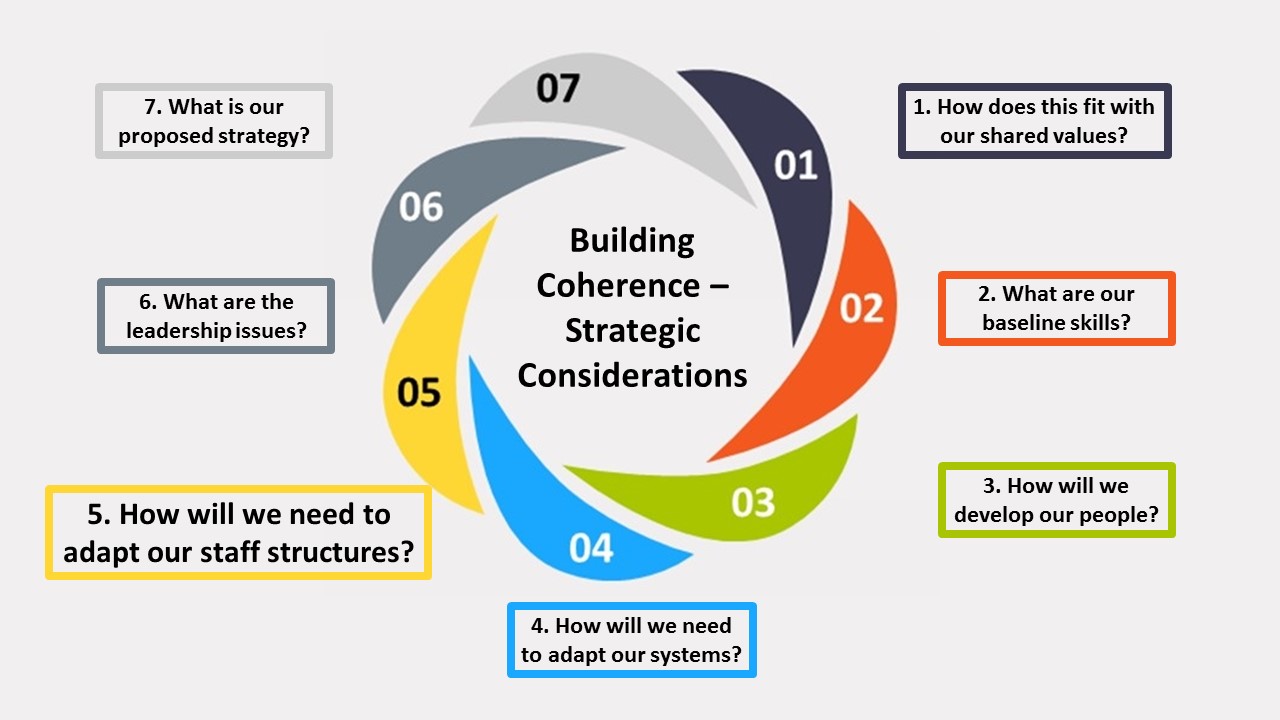
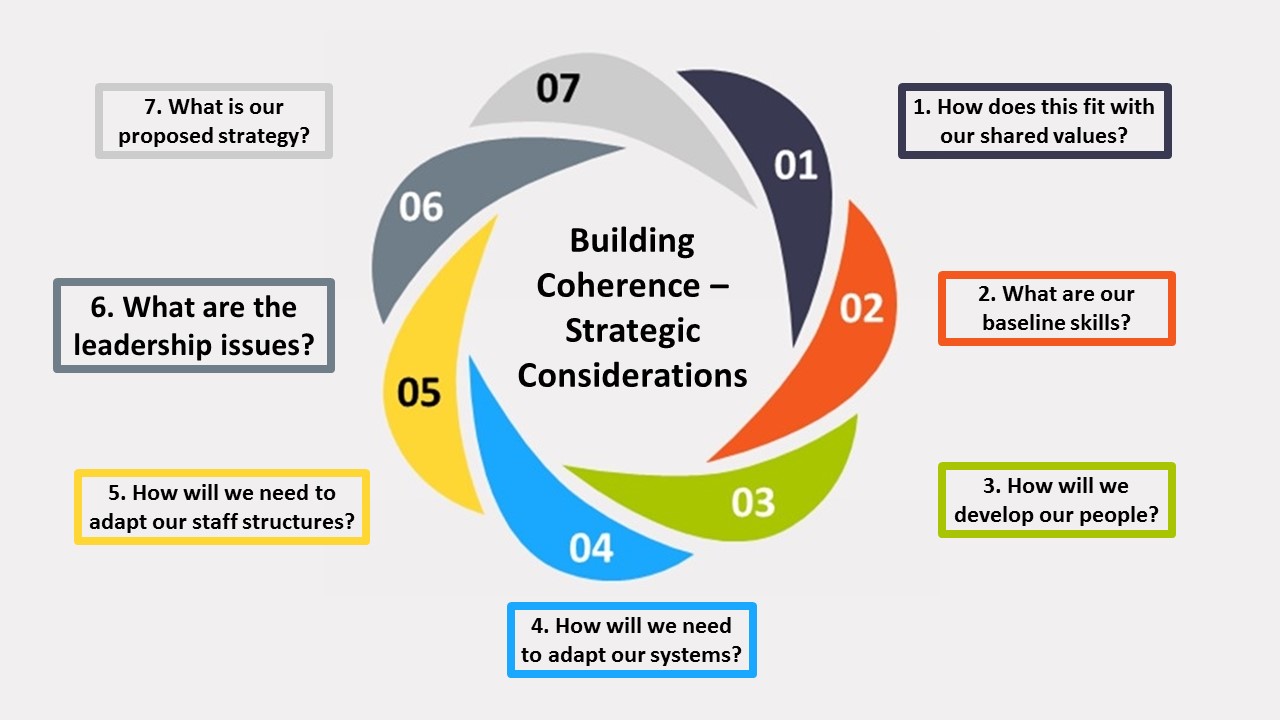
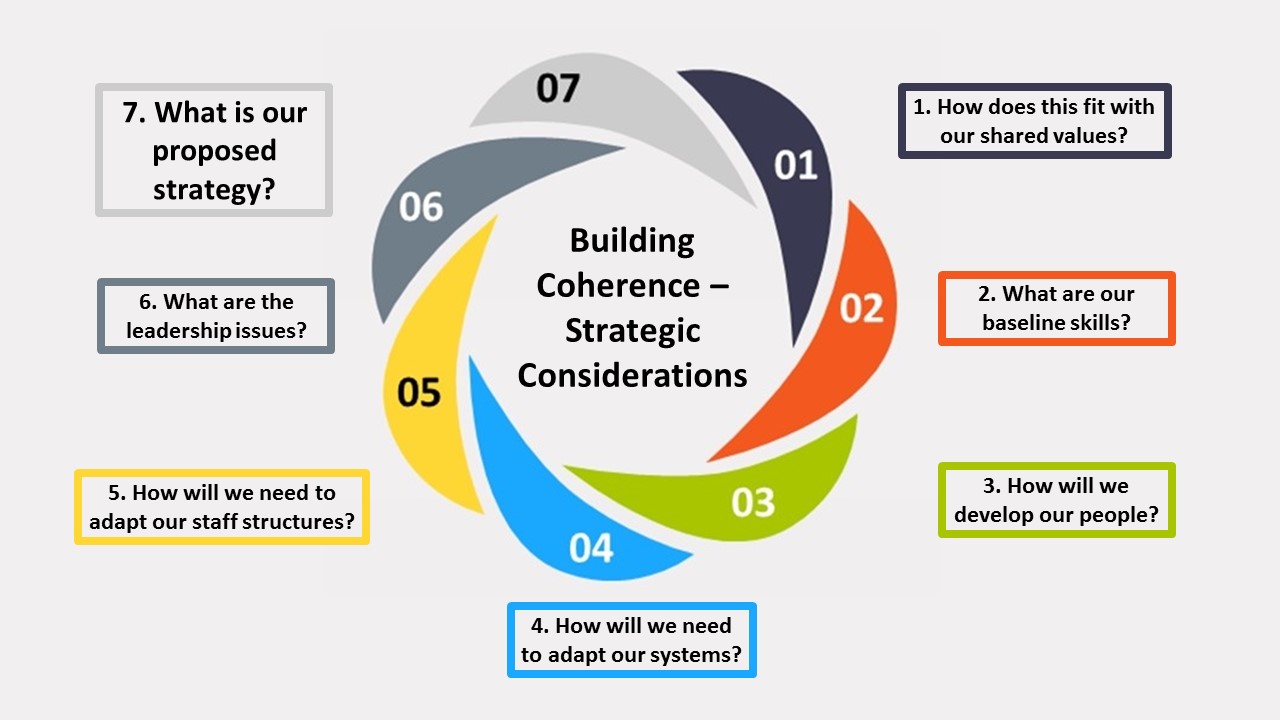
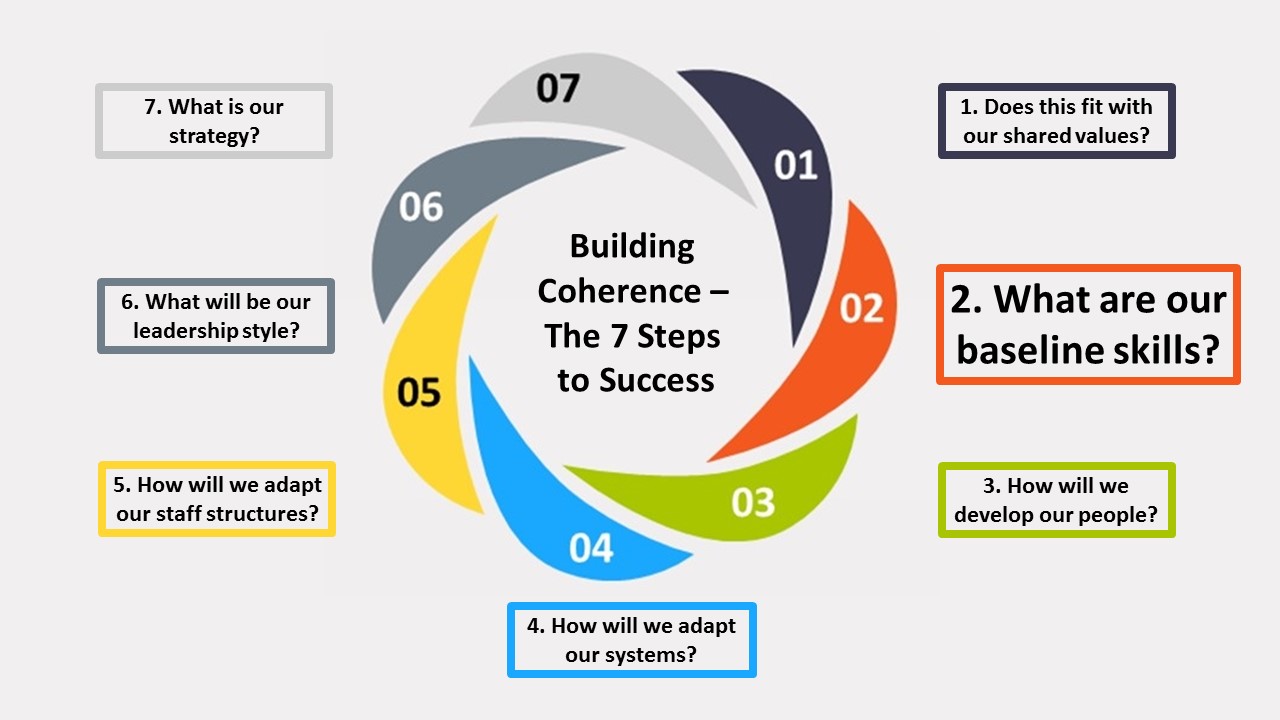
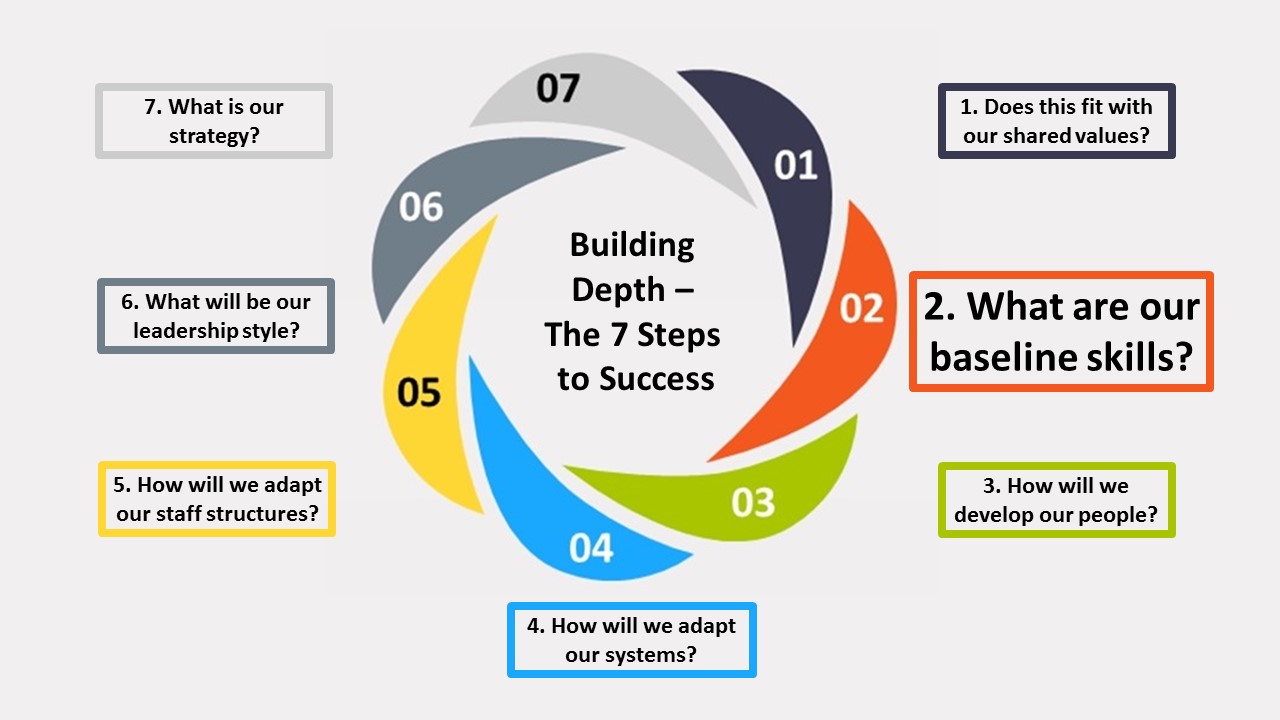
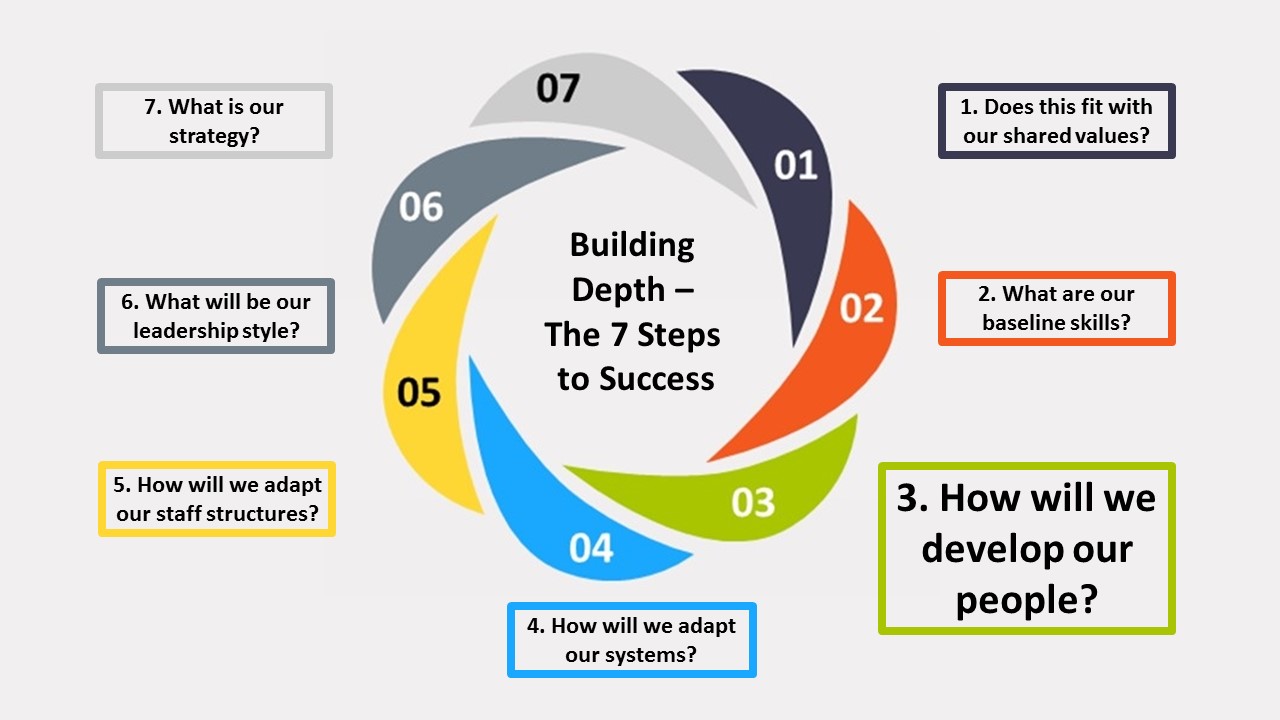
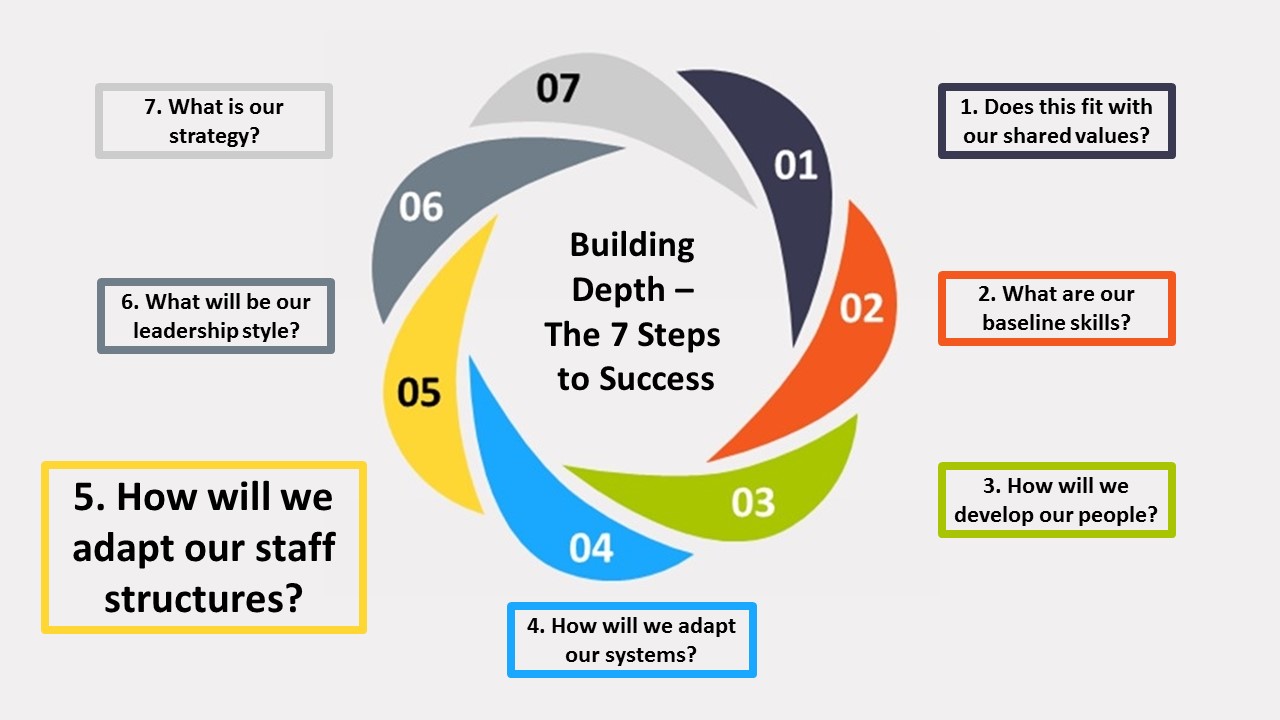
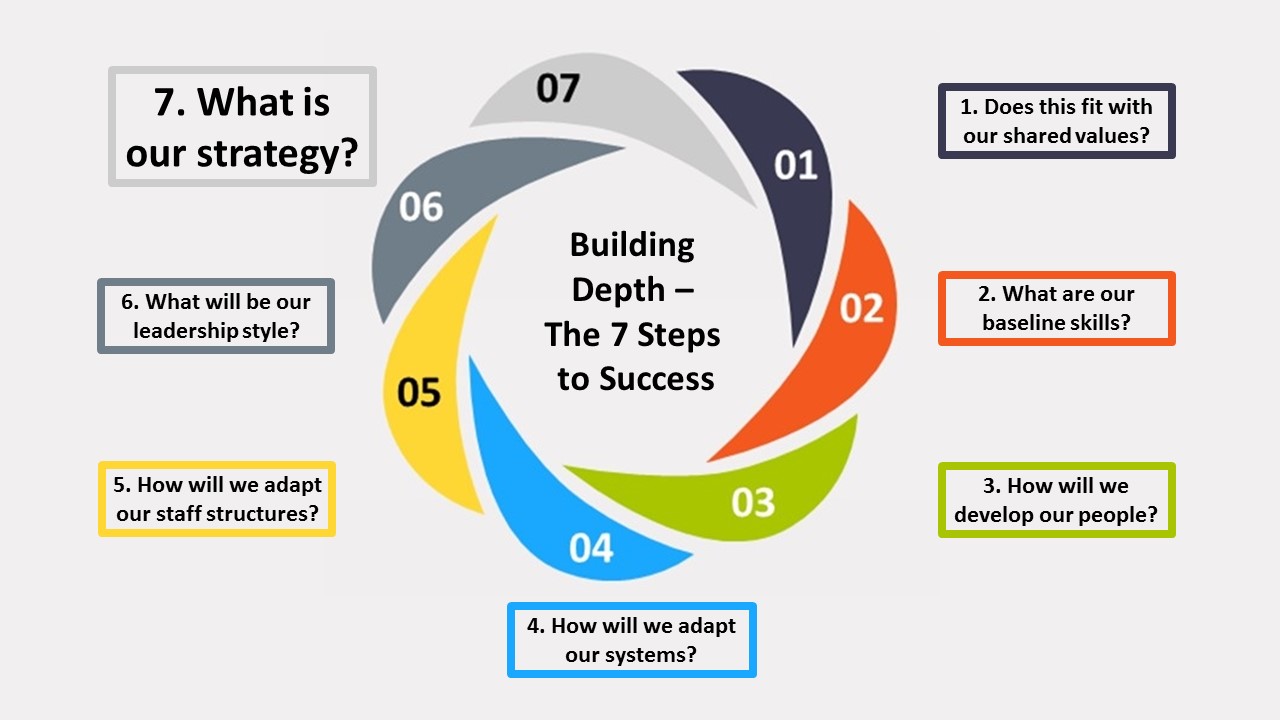
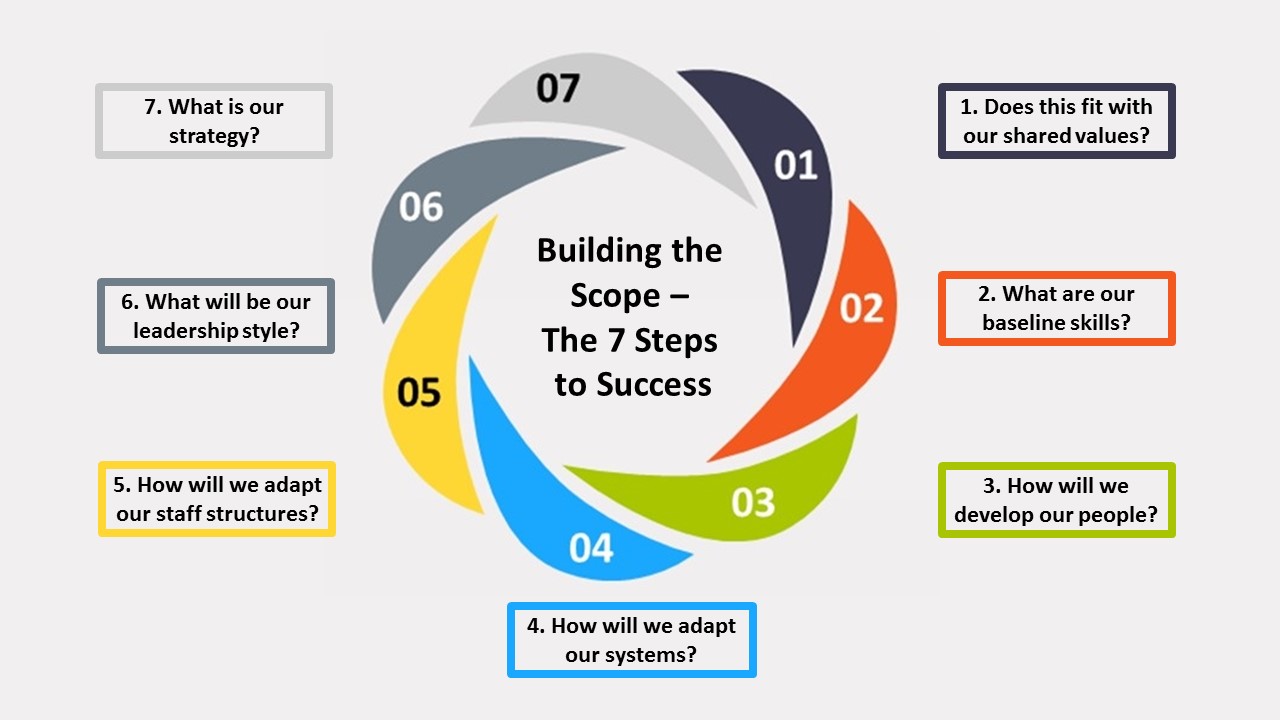
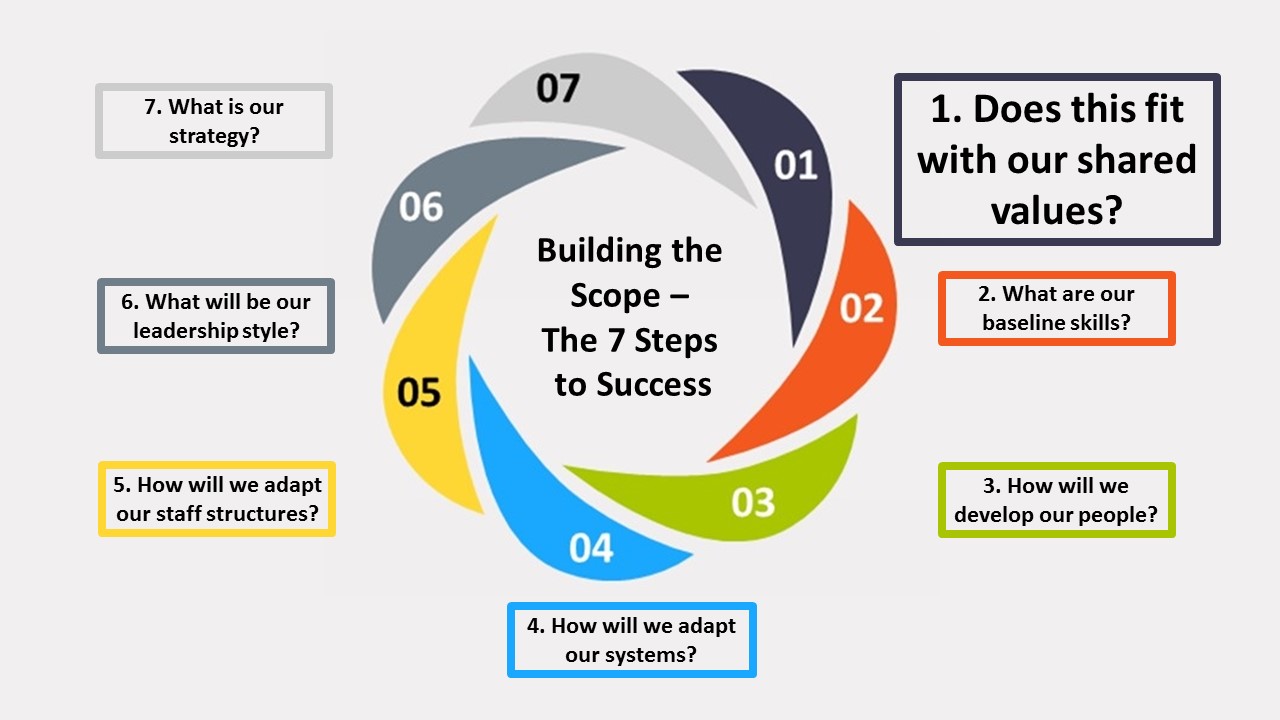
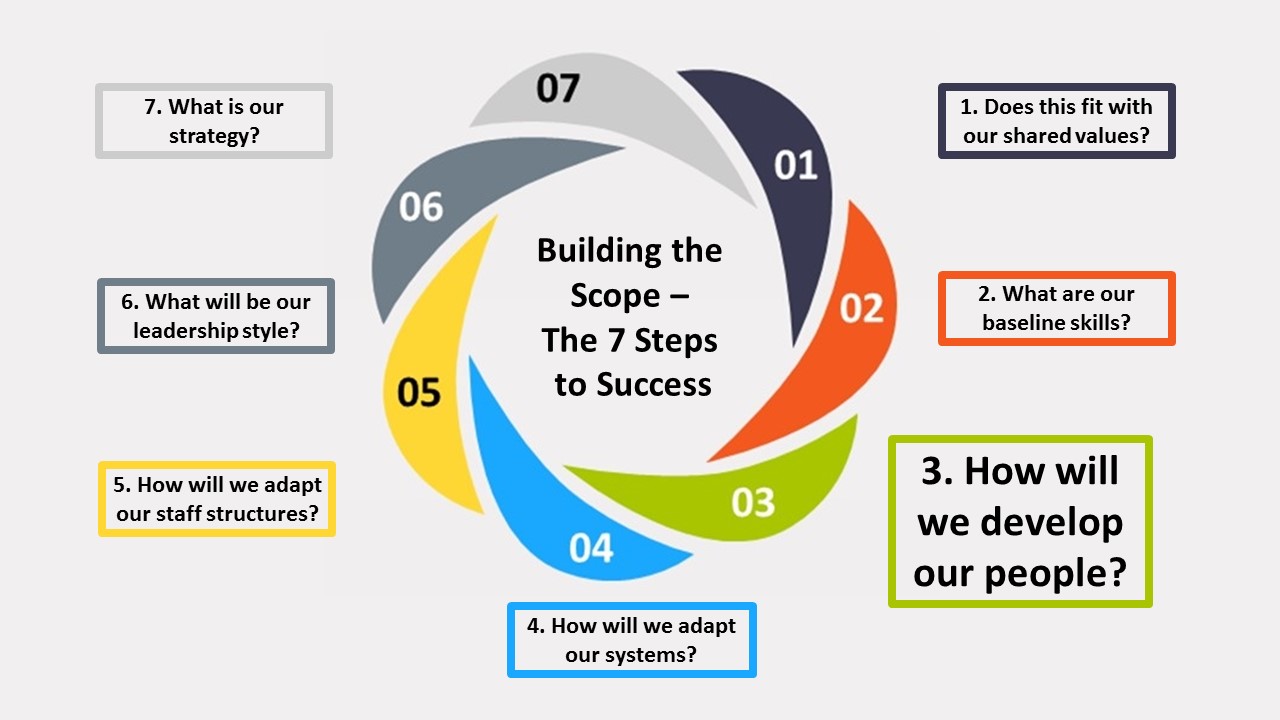
What are our baseline skills?
Given that most teachers have a new class of students each year, ask yourself if all colleagues know their students, as learners, sufficiently well to complete their students’ learning profiles.
This is particularly pertinent for inexperienced colleagues, especially those who have not already undertaken phase 1 and phase 2 of Building Powerful Learners, but also for experienced colleagues who have only recently joined the staff.
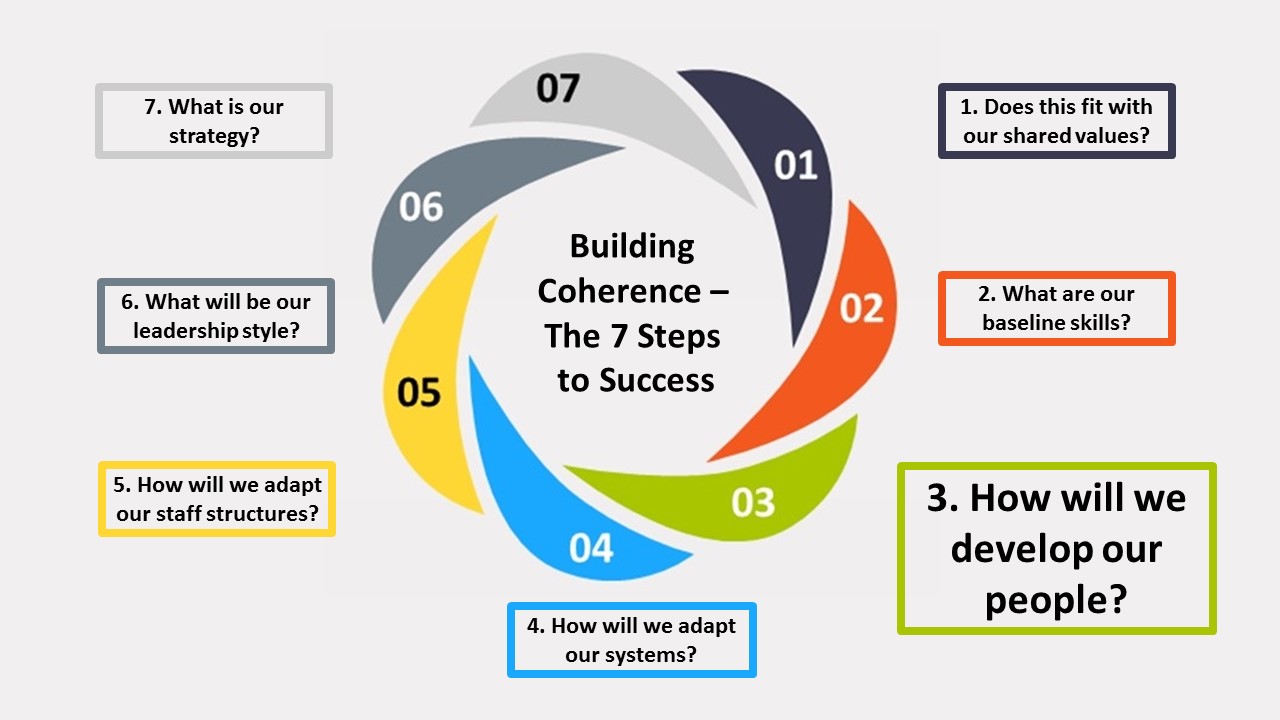
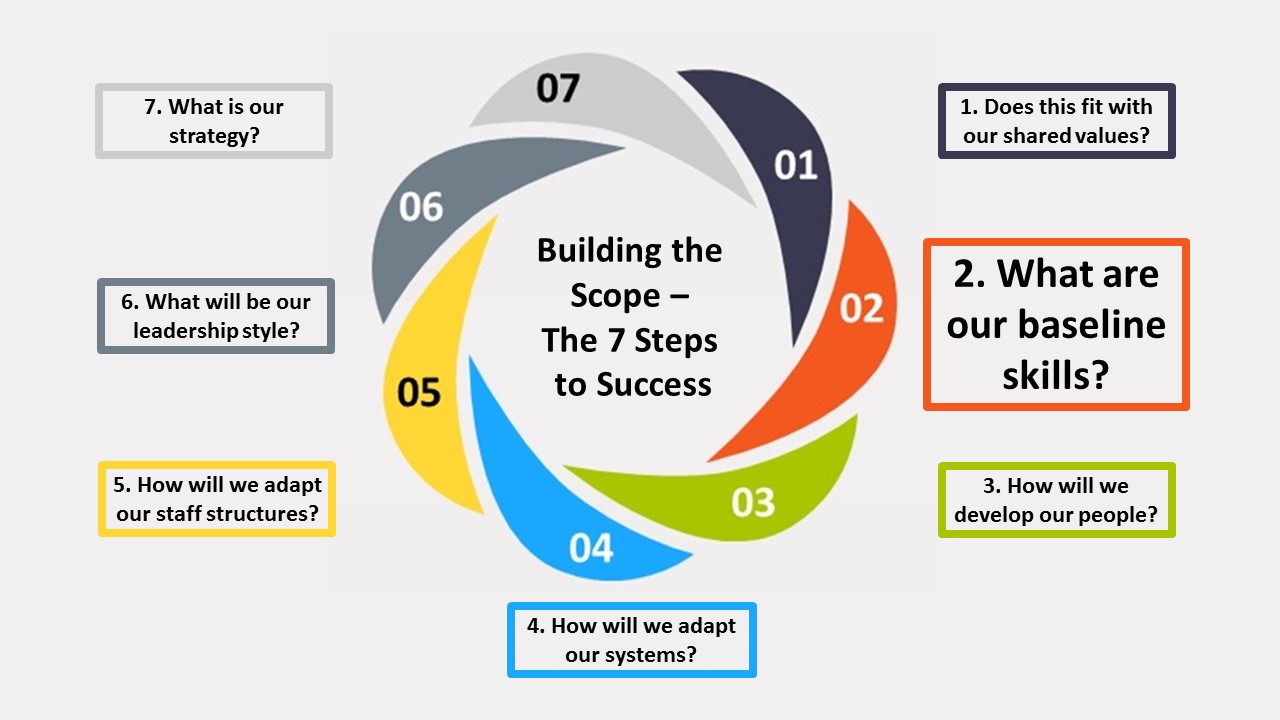
How will we develop our people?
Consider 2 questions:
Will we need a buddy or mentor system to support less experienced colleagues?
How will we share our own learning with each other annually as colleagues are creating/updating student learning profiles?
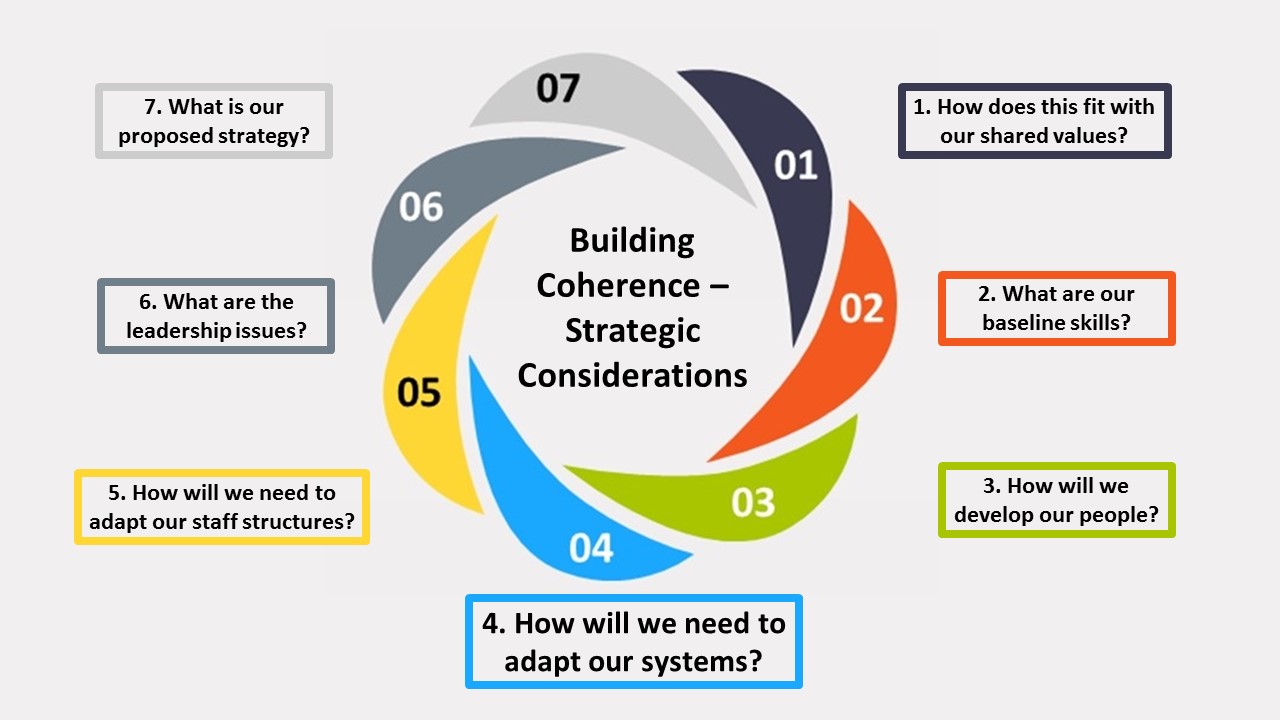
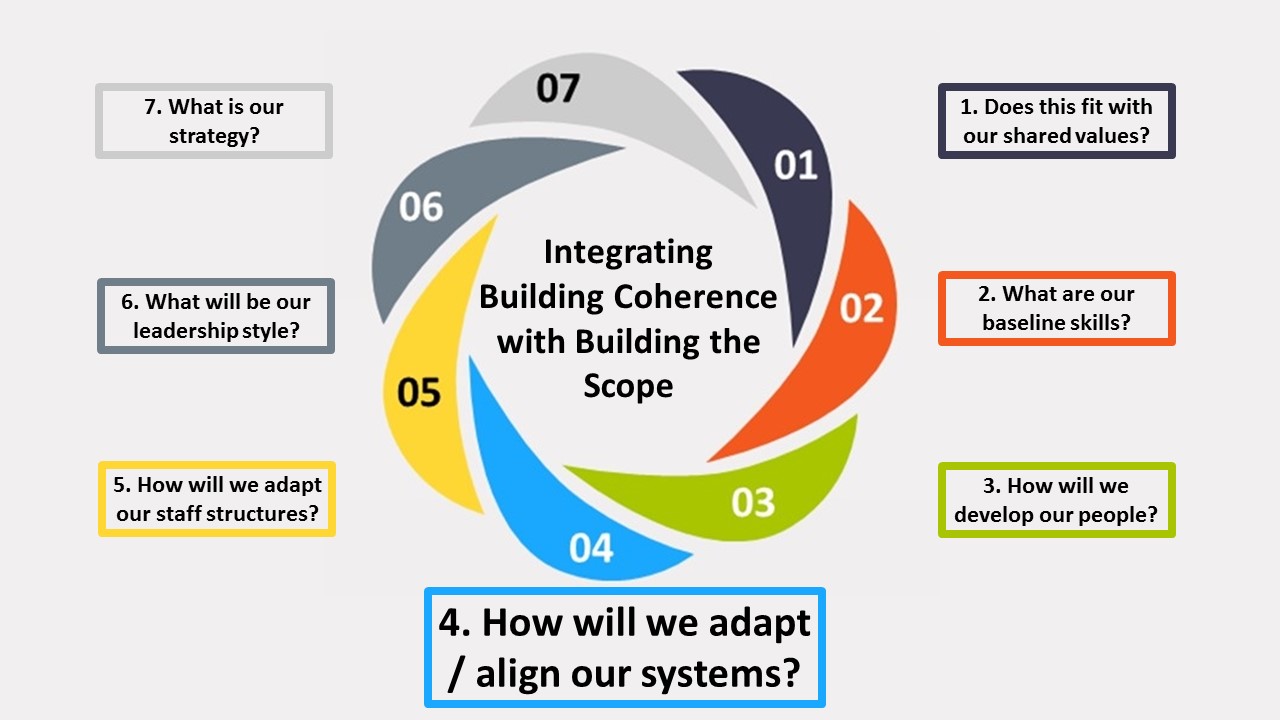
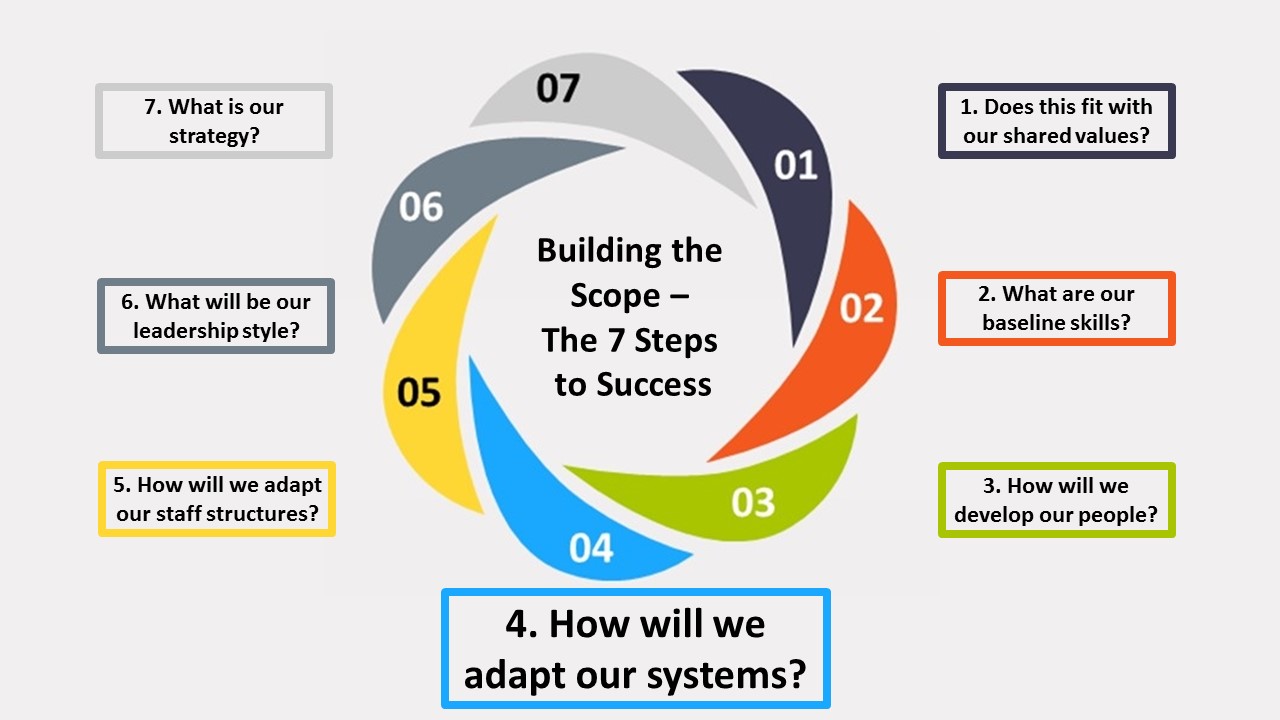
How will we need to adapt our systems?
This is a significant shift in the systems and rhythm of the school year and requires careful consideration. Issues to address are:
When in the school year will we all create/update student learning profiles? [It may be that the school will consider creating all student profiles for the first time late in the autumn term, but thereafter plan to update those profiles every July in readiness for the new school year.]
How this can be accommodated within the directed time budget.
How will the updated profiles be kept? Will this be the responsibility of individual teachers, or will they be kept centrally, perhaps in the school’s management system?
If they are not kept centrally, how will senior leaders maintain oversight and spot emerging patterns?
What information needs to be added to the individual profiles to support such ongoing monitoring? Obviously the name/class/age/gender of the student, but think about the other individual student characteristics that might be relevant – EAL; SEND; Pupil Premium; More Able; Ethnicity; anything else that the school wishes to explore.
How will the profiles inform a) learning behaviour target setting b) reporting to parents?
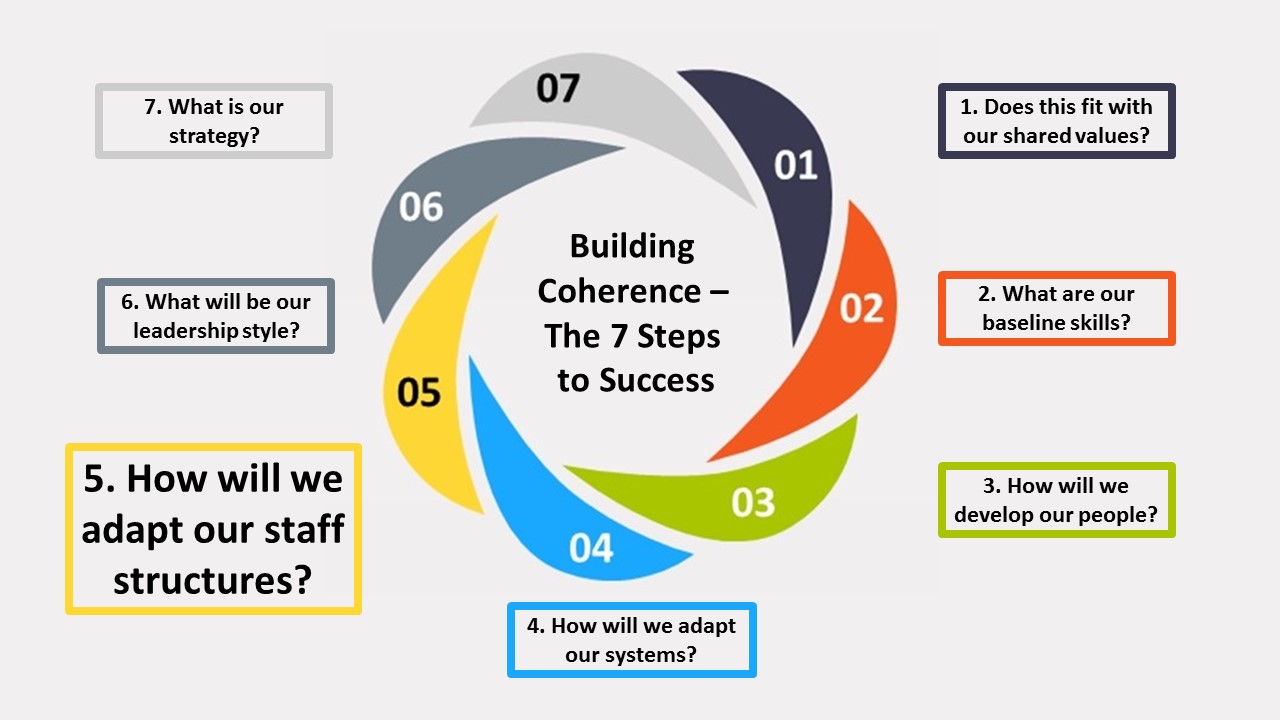
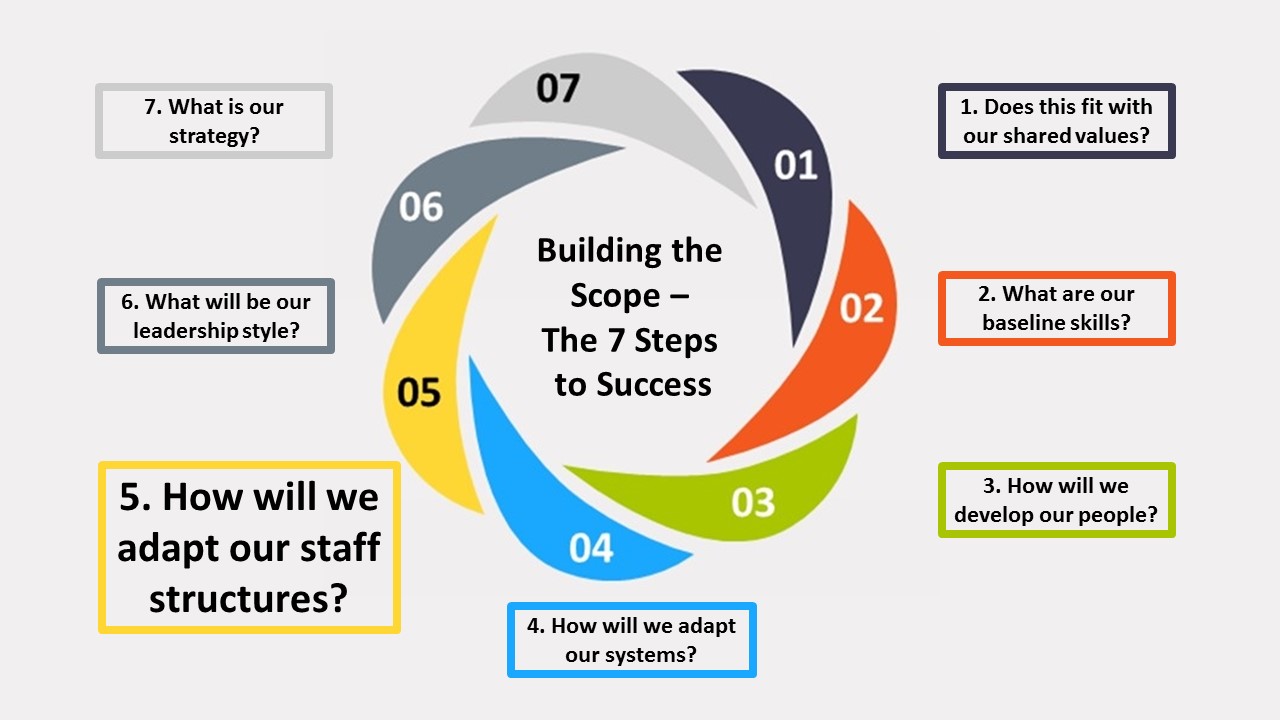
How will we need to adapt our staff structures?
It is likely that oversight of the annual creation/updating/collection of profiles and for the ongoing monitoring of the impact and identification of emerging trends will rest with a senior curriculum leader.
If not, the school will need to consider adding this role to someone outside of the core leadership team. Either way, oversight and coordination will need to be an ongoing management responsibility for at least one person in the school.
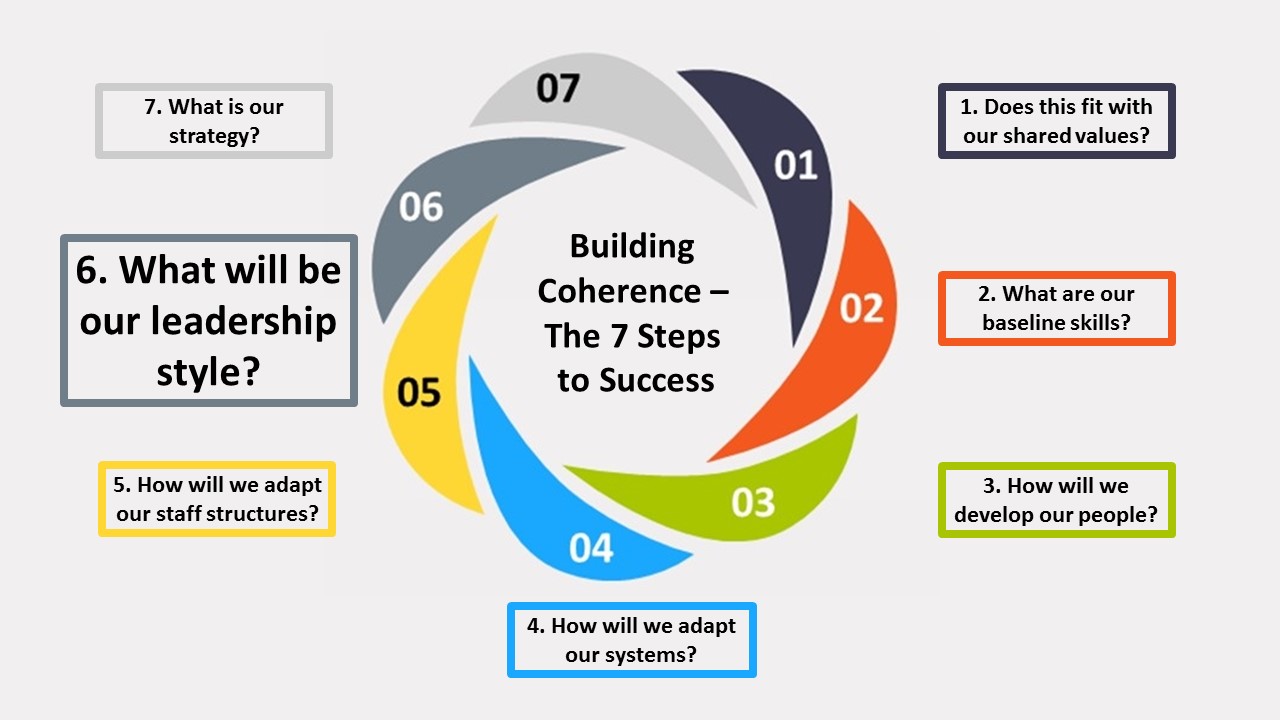
What are the leadership issues?
The school will need to decide if the person managing the process (above) will also be the one who identifies and leads on developing/exploiting the potential of all students having their own learning profiles.
These potential benefits may not yet be apparent, but will surely include:
gathering quality information of how learning behaviours are growing and what teachers are doing to achieve this;
modifying observation proformas to support this;
agreeing and setting learning targets for a) individual students and b) whole classes;
how responsibility for growing learning behaviours can be increasingly devolved to learners and include student voice;
the impact on reports to parents in terms of how learning behaviours are reported – can/should the text in the profile sheet be converted into a statement bank to support reporting, for example?
The question is about where responsibility for identifying and then weaving the potential benefits into school routines and practices will lie. What will your team recommend?
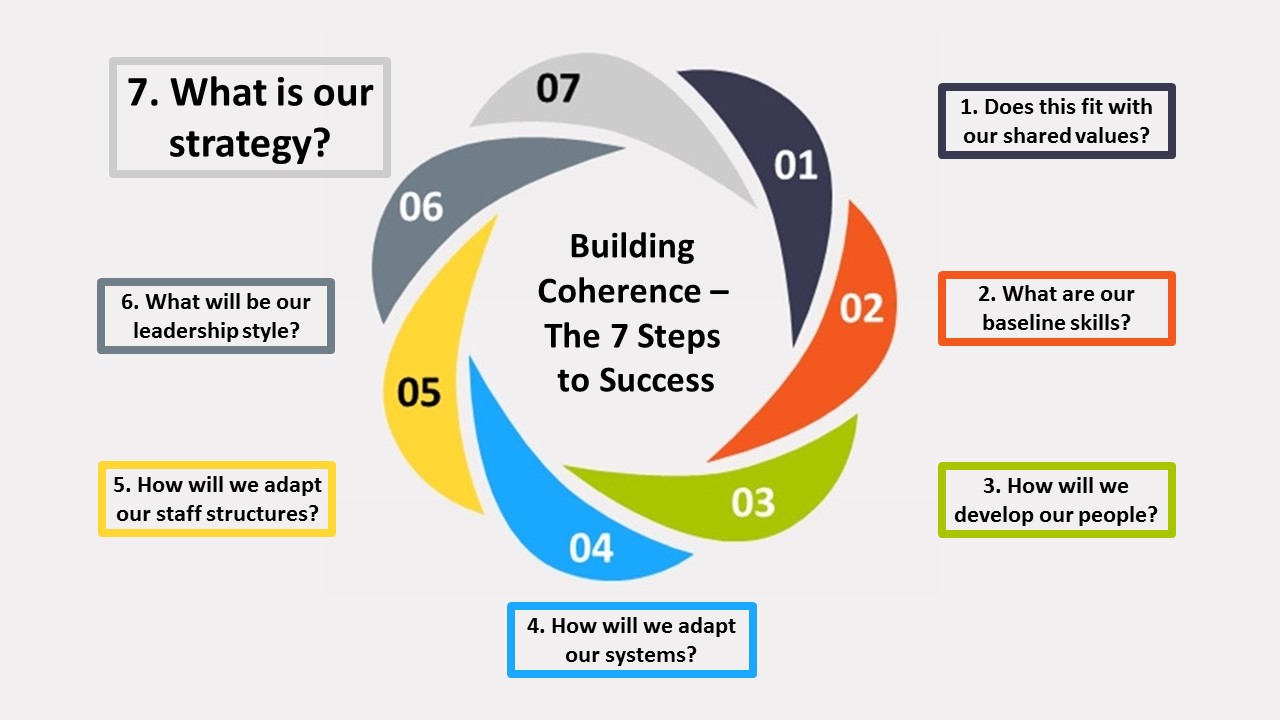
What is our proposed strategy?
As a team you have developed your understanding of the issues around creating learning profiles and have begun to consider the implications for doing this across the whole school.
Can you now contribute to your team as they put together a proposed strategy for implementation and for ongoing management/leadership, taking into account the issues raised in the 6 sections above?
This will be the focus of the upcoming team meeting.
Preparing your own thoughts in advance of the second team meeting
Asking yourself the hard questions:
You could begin with a quick SWOT analysis. In terms of developing student learning profiles:
What are the current strengths of our teaching team and existing school systems and how might we exploit them;
What are the current weaknesses and how might we overcome them;
What are the opportunities afforded by developing individual student learning profiles;
And what are the potential threats?
Take your thoughts to the final team meeting when together you will put together a proposed strategy for implementation.
Which learning characteristics do my students display?
A new type of data
In the previous section, you created your own learning profile and the profiles of a couple of students. Since you know yourself well, completing your own profile should have been relatively straightforward. But what of the profiles of your 2 students? Did you know them sufficiently well to be able to complete their profiles? Did you perhaps need to observe them to check out your initial perceptions? Or ask what your TA thinks? Did you even need to set up a situation where you could check out a skill you were unsure of with an individual student?
Moreover, some students stand out from the majority of your class – for better or for worse! Is it easier to describe the learning behaviours of your most successful and your least successful learners than it is to identify the individual learning strengths and weaknesses of the ‘silent majority’?
This is, of course, a function of how well you know your students and the extent to which you attend to how they learn. Completing profiles in September shortly after taking on a class might be considerably harder than doing so towards the end of the school year after you have had multiple opportunities to witness their learning in action.
However, it is now time to begin to complete learning profiles for all members of your class. Do not rush this – it may take a couple of weeks or more. Your aim should be to have time to complete all of your profiles and to look at any emerging patterns before you meet as a team to discuss your findings.
As you start colouring in individual profiles, keep an eye out for any emerging patterns;
for areas of learning strength
for areas of learning weakness
for fallow areas
for significant variations for some students or groups of students.
for things that just make you feel uneasy
Ask yourself – ‘What questions are bubbling up in my mind?’ as you work through your class one by one. You’ll find yourself beginning to form some tentative hypotheses about your students’ learning behaviours.
Generating data for each student
Download and print sufficient charts – one for each student in your group. You’ll need to think carefully about each student in relation to each of their 12 learning behaviours. Colour in the behaviours that you think are secure. By secure, we mean that these are behaviours that the student consistently exhibits in a range of different circumstances. BUT if they use a behaviour in, say, maths but not in other subject areas you cannot count it as secure. You might find it easier later if you use different colours for say, boys and girls etc.
Things to consider in gathering the data:
can / will I involve TA’s and other staff in order to gain other perspective(s)?
if so will we do it together or at different times
might I need to discuss these students with their previous or other teachers?
am I confident about what is ‘a secure behaviour’? How frequently, and in how many different circumstances, do I need to see a behaviour to consider it ‘secure’?
Download as pdf [When printing this pdf, it is best done on A3 paper, landscape (in the print settings)]
Interpreting individual student profiles
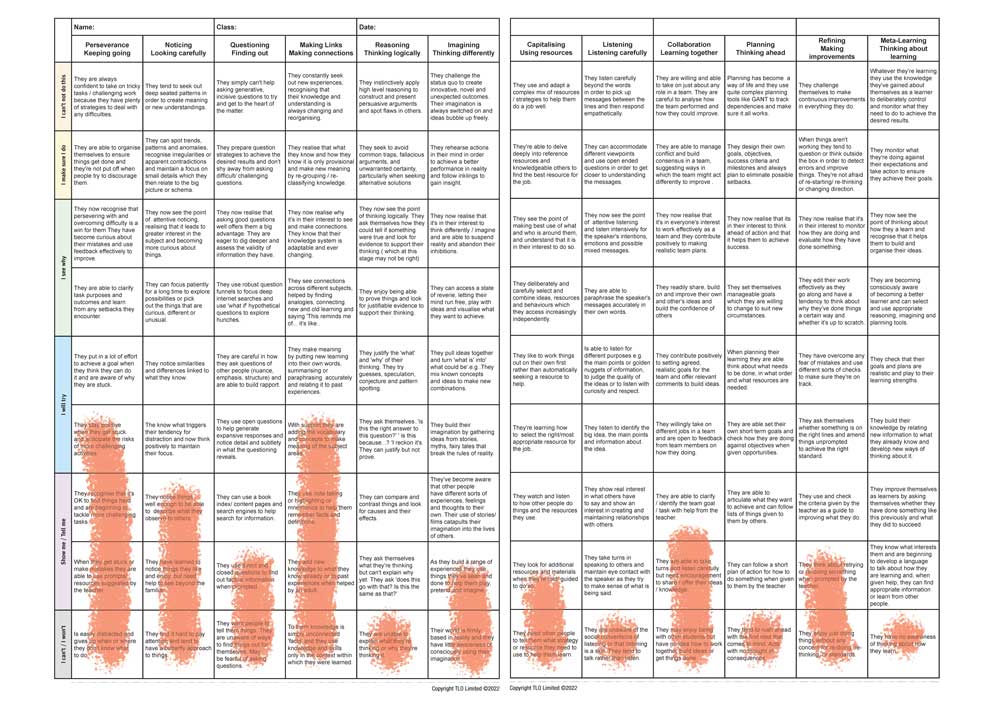
When completed the learning behaviour profiles for each of your students will look something like the one to the right – some cells identified as ‘this is a secure skill / behaviour’ with others left blank. (Here the ‘secure’ cells are coloured pink).
[You may even have some of the grey ‘Lacks’ cells coloured in where there are no secure positive behaviours. Where the ‘Lacks’ stage is not coloured in, it indicates that the student no longer behaves in this negative way.]
Ultimately you need to be able to answer the question:
What is this profile telling me about this student?
Explore each student profile and ask yourself:
Which behaviours appear relatively weaker/stronger? Well developed, hardly started?
Which behaviours might explain why this student is successful / unsuccessful, effective/ineffective?
Which are the weakest learning behaviours for this student?
What might I need to do to help this student to help themselves to become a more effective learner?
What does this profile tell me?
Beginning to notice and wonder about your class as a whole
Now that you have had a close look at each individual student you will have noticed several things, more of an inkling really, that seem to be showing up across the group. So before getting into a rigorous class analysis it will be useful to let your mind go into that receptive kind of imagination that’s a bit like daydreaming. Let the problem slip to the back of your mind and let your mind play with ideas and images about your class of students and their learning behaviours.
Play with what you have recorded and wonder:
are there any patterns that I’m picking up
what if I just think about girls and boys?
are there really any significant differences?
which column has scored lowest on many/most charts?
which colour (phase) is the most prevalent across the class?
what are my overall thoughts about the learning characteristics of the class?
In the next section we will help you build on this reverie and make a close interrogation of the patterns.
Interpreting your profiles for groups of students
Having been through the important stage of reverie it’s now time to take a hard look and jot a few things down. First, you’ll need to interrogate your data through the lens of different groups of students. It might be an idea to take your pile of charts and divide them firstly into girls and boys, then into high and low attainers (however you designate that label), then isolate, separately, groups like Pupil Premium. EAL, SEND, G&T, (if you still use this), and other groups that may have significance in your area.
Ultimately you need to be able to answer the question:
Can I discern any patterns across groups of learning profiles?
Ask yourself:
What questions would I want to ask myself about each of these groups?
What do I suspect might be happening?
What are the learning behaviours of successful learners that appear lacking in less successful learners?
You might be thinking:
How do my higher attaining learners differ from my lower attaining learners?
i.e. do they score higher in the columns? Is the range of higher scoring columns different in the 2 groups?
How do my boys’ learning behaviours seem to differ from my girls’?
use the same ways of looking as above.
Do my pupil premium learners’ behaviours differ from other students?
if so how? Is this more about progress in learning behaviours or using a different range of learning behaviours?
Move on to look at other groups if you are interested or think they may be relevant in your school
Do my EAL learners’ behaviours differ from others?
Do my SEND learners’ behaviours differ from others?
Do my G&T learners’ behaviours differ from others?
Are there any ethnicity related differences?
Do my summer-born learners differ from older learners?
Or you may want to explore another pattern that you suspect might be relevant to your class.
Whatever your area of interest, shuffle the profiles and look for common features in one group of profiles that are different from the other group of profiles.
What do these profiles tell me about a particular group of learners?
Do my pupil premium learners’ behaviours differ from other students?
What sort of learning patterns can I detect between high and low attainers?
Synthesising your thoughts . . .
Having spent an interesting hour or so looking at your students’ learning charts it would be well worth your while to try and capture some of your main findings. You will have discovered far more than you can capture in your short term memory so a quick synthesising exercise would be well worthwhile.
Summarise your findings about:
What you noticed about the individual learning profiles of your students? E.g. Which phase of behaviours appear to be more / less secure across the board? Which learning behaviour is the least well developed across the whole class?
What you have learned about groups of students. E.g. boys/girls, pupil premium, and others. Have you noticed any significant differences that merit further investigation? E.g. the differences in types and phases of learning behaviours used by high and low achieving students?
When you meet with colleagues, compare and contrast your findings. Ask yourself:
What are the main similarities between your impressions of student learning behaviours and those of your colleagues?
Ditto the main differences?
Are others sensing the same issues for groups of students as you are?
Are students becoming better learners as they move through the school? E.g.. are the phases of growth used by Yr 6 students higher that Yr 3?
What questions does this raise for you?
These are just a few questions to set you off. As you get going, your data and interest will stimulate an almost never ending stream of them.
See opposite for a completed example just to start you off.
Take your completed Summary to the team meeting so that you can share your impressions with colleagues.
Being an effective learner isn’t something that switches on on good days and off on bad days; it grows and builds when it’s nurtured and supported. Furthermore, being a learning powered learner involves gaining control of a range of linked dispositions and skills and emotions.
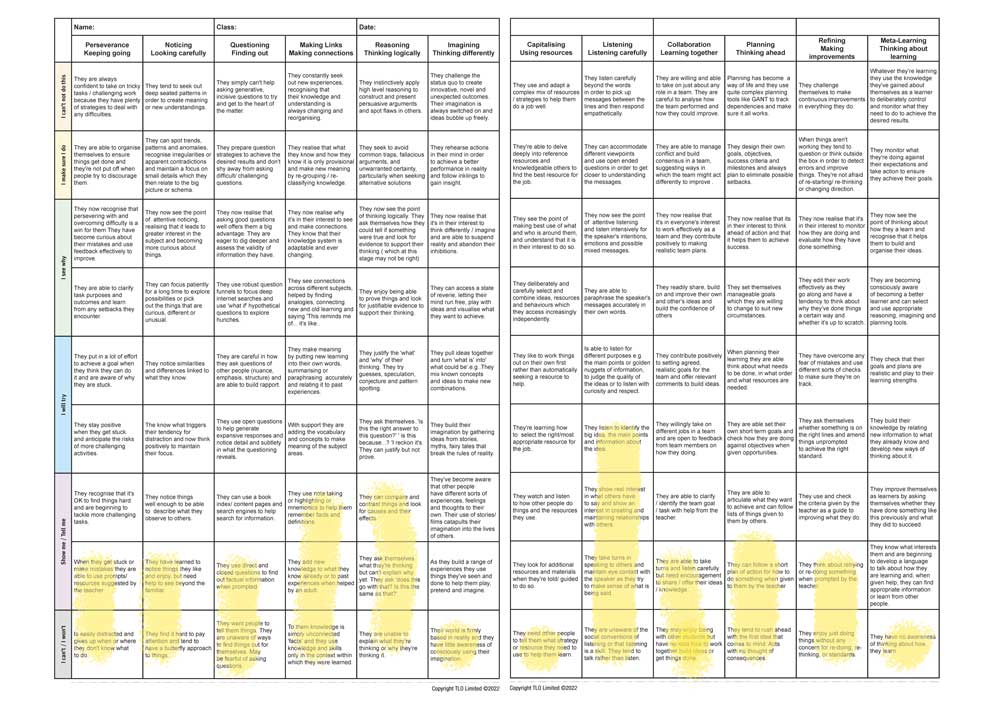
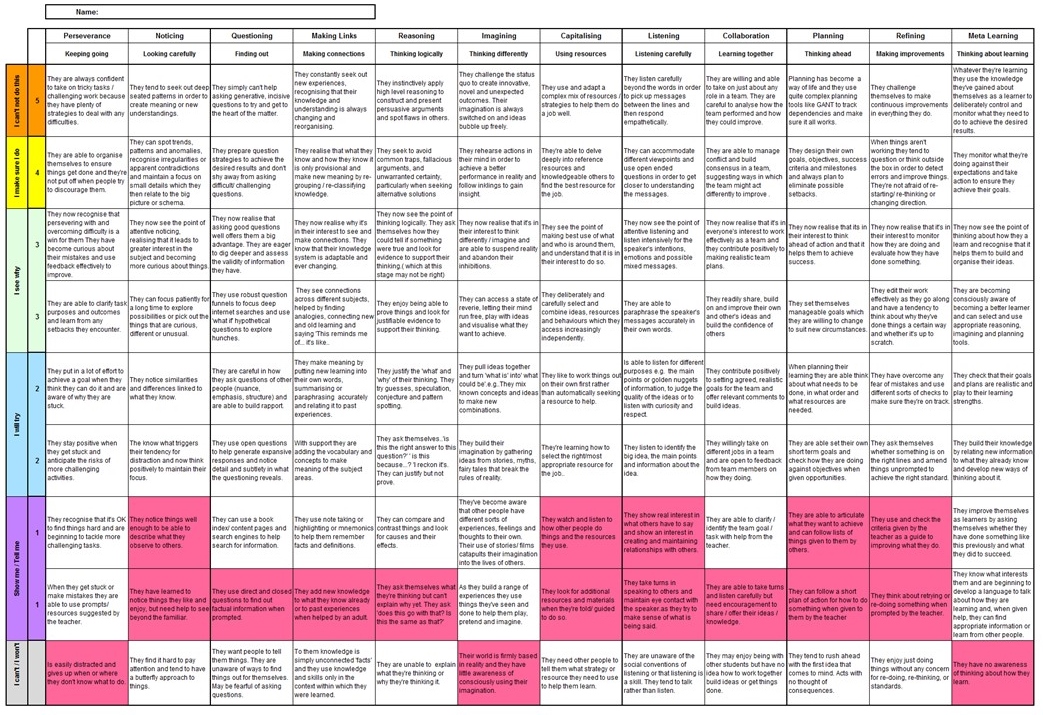
Over the last ten years we’ve tried to capture the essence of that growth and make it useful for teachers and learners. Take a look at the progressionchart alongside. Here you can see all 12 key learning behaviours together.
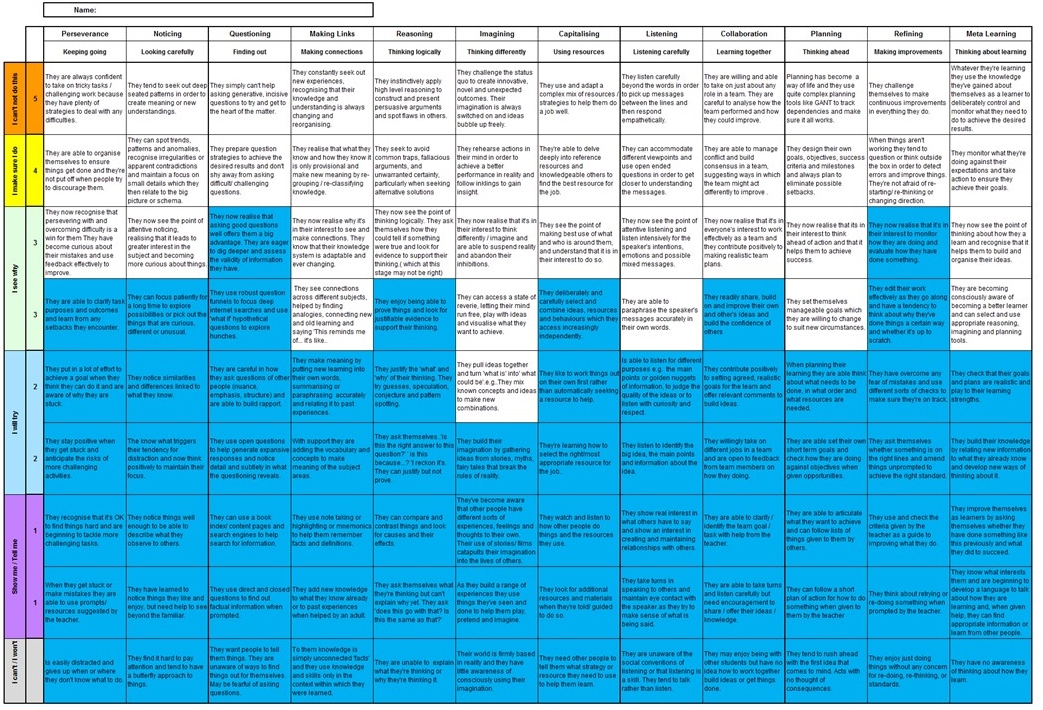
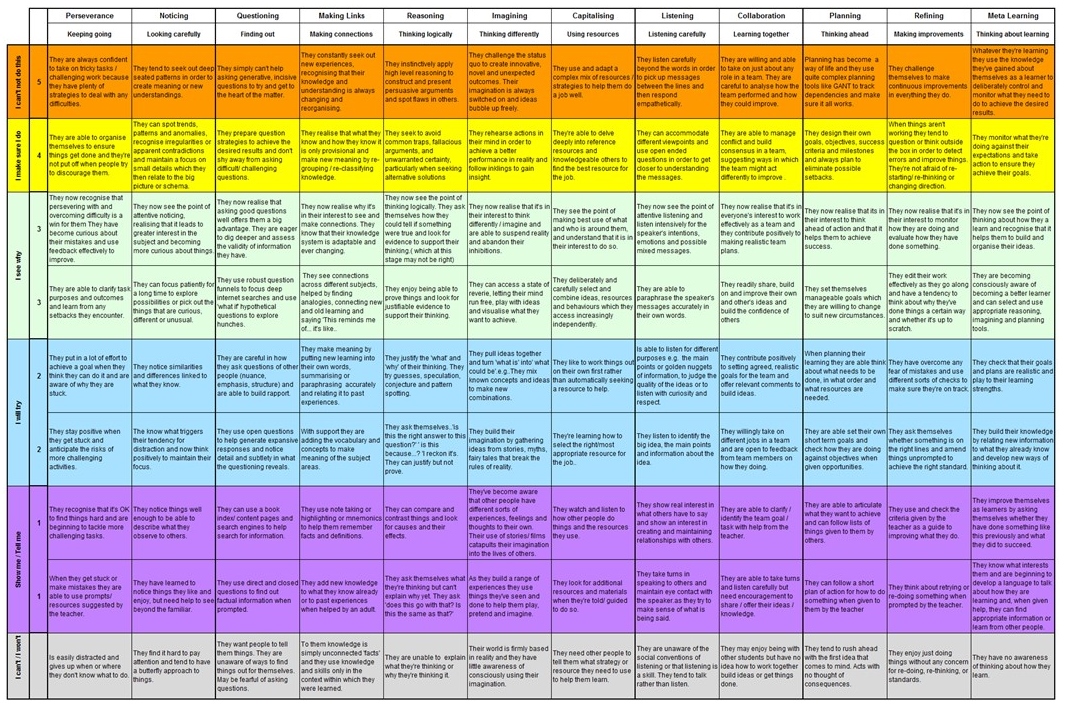
Each of the 12 learning behaviours are briefly described at one of 5 levels of proficiency shown in the rows. These levels of proficiency grow and flourish when they are cultivated by teachers in learning friendly classrooms and supported by families.
Download the chart and take a closer look at it. You’ve probably never considered yourself, let alone any students, in this way before. Take your time just absorbing what you see. Don’t think too hard about the progression levels at this stage, but rather try to absorb the nature of the descriptions of across learning behaviours and the different areas of learning.
Twelve learning behaviours with five levels of proficiency
Download as pdf [When printing this pdf, it is best done on A3 paper, landscape (in the print settings)]
Discover yourself as a learner
To get a better sense of these learning behaviours and their growth use the chart to think about yourself as a learner. Start slowly. Refer to the learning behaviour descriptions and progression notes in the previous section for help. Now just think:
where would I place myself on each of these 12 trajectories?
do I understand the statements well enough to answer? Which ones will I need to check?
can I really say that this/that statement is secure? Does it actually describe what I do most of the time, or does it describe something I can do but tend not to? (what I do do, rather than what I can do).
have I ever thought about myself like this before?
would my partner / colleagues see me in the same way?
colour in your secure statements on The Learning Behaviour Chart. This becomes your Learning Behaviour Profile. Now ask…
which learning domain is the strongest? (emotional, cognitive, social, strategic)
which learning domain is the weakest?
which particular learning behaviour is strong or weak?
am I substantially lower or higher in some? Which?
are there any surprises or disappointments?
what questions is this raising for me?
where would I like to improve?
what may have shaped my current learning characteristics?
Learning behaviour charts to learning behaviour profiles.
When you think you understand the progression charts well enough try using them to consider a couple of students.
Think of two students you know fairly well, but whose attainment differs.
Download two learning behaviour charts (describing 12 learning behaviours) and indicate which descriptors seem best to describe each student’s current secure behaviours.
Come back to them after a day or so and check them again to convince yourself that you’ve identified the most appropriate descriptors.
It might be useful to have a word with a colleague who also knows the student well, especially if you’re uncertain about your answers.
[The profiles opposite illustrate:
Pink… a relatively weak learner, still negative aspects of learning (perseverance, imagining, meta learning) and elsewhere in need of adult support (ie they are broadly just into the purple phase);
Blue…illustrates a well-rounded learner, secure at the purple and blue phases, and moving into the green phase for some behaviours. This might be typical of a well-rounded, high attaining learner who is disposed to behave in learning-positive ways. Do not expect to see much beyond the green phase, as the uppermost 2 phases require levels of maturity and independence rarely accessed by younger learners.]
Ask yourself:
what do these profiles tell me about these students as learners?
do the students appear to do things differently?
do any of the columns seem to show use of later phases growth for the higher achieving student?
which learning behaviours appear to make the higher attaining student more successful?
does any learning domain (emotional, cognitive, social, strategic) dominate for either student?
which learning behaviours appear to need boosting most for each student?
Learn more about learning behaviours – how they strengthen and grow.
Now that we have moved beyond seeing learning as a performance to it being an interesting process going on in our brains, we turn towards the growth of this supple learning mind. The whole point of building learning powers is to do just that, to build the learning behaviours, not simply to name them. The diagram alongside – Learning: Poles Apart – offers an outline view of this journey; building students’ emotional learning habits; building their cognitive/thinking habits; building their social learning habits and their ability to manage the process of their learning. The reluctant learner on the left and the learning powered learner on the right show the beginnings and ends of a long, exciting, but far from inevitable, learning journey.
Our understanding of what the journey might look like in practice has emerged and flowered over the past seven years. The stages of the journey are ‘borrowed’ from Bloom’s taxonomy of the affective domain of learning and summarised opposite. It is this scaling of the learning dispositions that will help you make sense of the journey as you document, and influence, your learners’ progress over time.
To help schools make the collection of learning data more manageable we have selected 12 of the original 17 characteristics for you to take a closer look at over time. In this section you can find out more about these fascinating learning characteristics and how they grow under the influence of a learning friendly environment. Understanding more about them will increase your confidence to collect valid data about how these characteristics are growing in your students.
We’ve borrowed ideas from Benjamin Bloom’s Taxonomy of Objectives of the Affective Domain to generate a very condensed version of the five main phases of growth, namely:
Receiving. (purple)..which involves giving attention to something; becoming aware, not avoiding or rejecting it; being alert to something.
Responding. (blue)…which involves going beyond merely attending to actively attending; complying; taking more responsibility for and enjoyment in initiating action.
Valuing. (green)..which involves accepting the worth of something; preferring something; being committed to the value of something.
Organisation.(yellow)..which involves adding to, formulating and organising their values into how they live their life.
Embodies. (Characterisation in the original)(orange)…which involves behaving consistently in accordance with their values, living what they stand for.
We have simplified and applied these highbrow ideas to the affective development (emotional) of learning behaviours. We’ve also added a negative phase labelled Lacks where learners are unaware, show no interest in or avoid or reject the learning behaviour.
Take a look at the phases shown above, but start at the bottom and work up.
We urge you to see this progression as long term.
Some phases will take years for people to work through.
Some will never be worked through or achieved.
None of the phases are inevitable.
There is a lifetime of development captured here.
Nevertheless your role as a teacher or parent should surely be to encourage and enable this journey.
It’s worth getting your head around the outline of these phases of development. They apply to any of the learning behaviours as we show in the toggle boxes as you scroll down.
The emotional aspects of learning
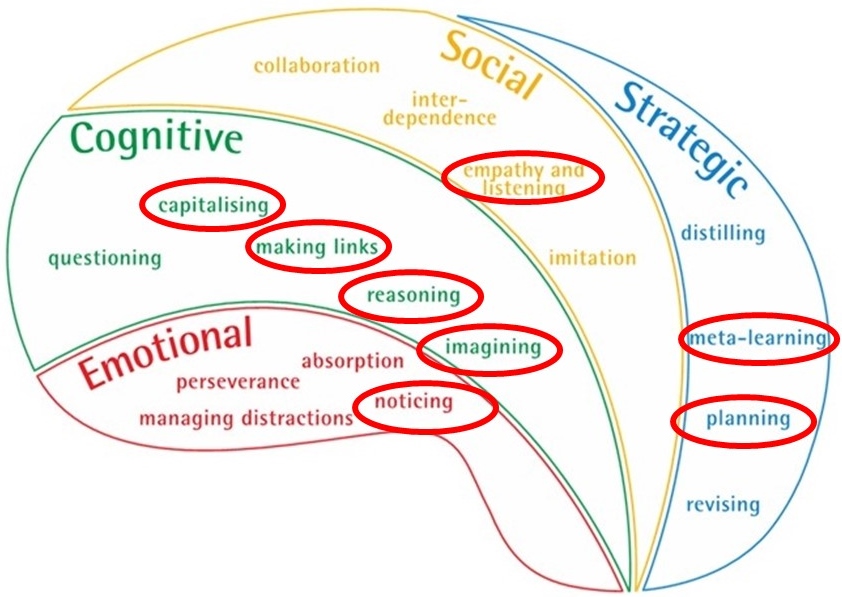
Perseverance – Keeping going
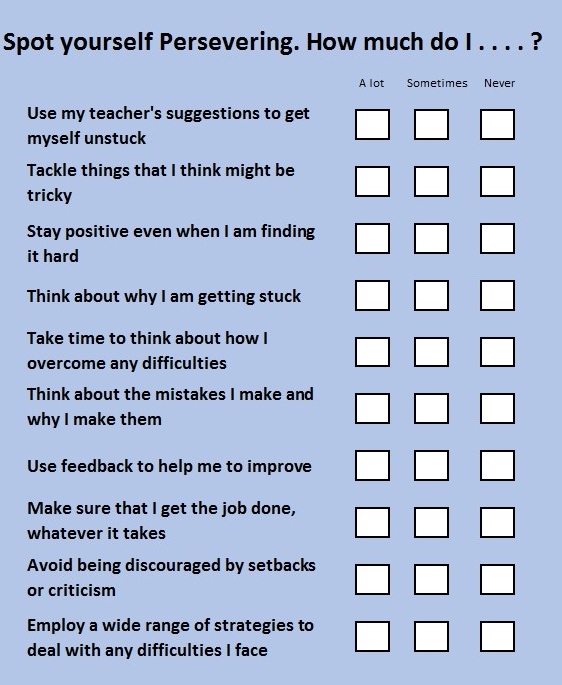
Attention can be broken when learning gets blocked, but good learners have learnt the knack of maintaining or quickly re-establishing their concentration when they get stuck or frustrated. Perseverance is often undermined by two common and erroneous beliefs. Firstly, learning ought to be easy. If learners think that they will either understand something straight away, or not at all, then there is simply no point in persisting and struggling. Secondly, bright people pick things up easily, so if you have to try it means you’re not very bright. Clearly the idea that effort must be symptomatic of a lack of ability makes persevering an unpleasant experience. Good learners develop perseverance when their parents and teachers avoid conveying these messages, even unwittingly. Perseverance is about:
Keeping going in the face of difficulties; channelling the energy of frustration productively; knowing what a slow and uncertain process learning often is.
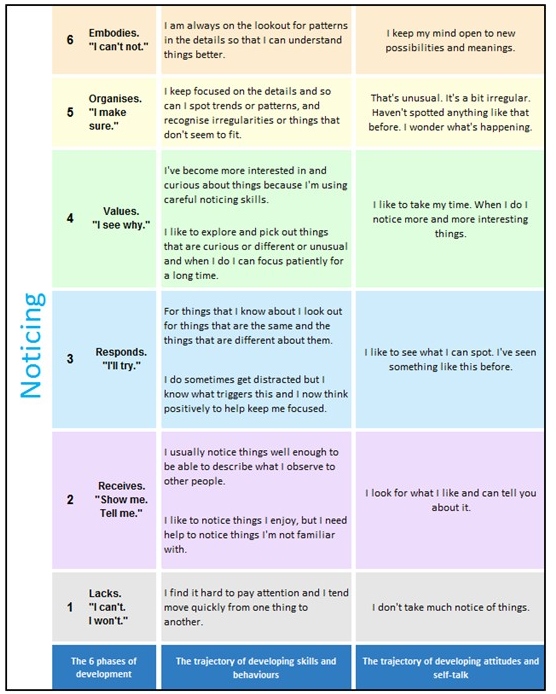
Noticing – Looking carefully
Noticing involves being ready, willing, and able to: be attentive to details and subtleties in seeking to understand things; seek underlying patterns patiently, understanding that connections may take time to emerge; actively use all the senses to gather information to build understanding of the world around; gain a clear sense of the ‘what’ of something before considering the ‘why’ and ‘how’; recognise that learning is often complex and difficult and takes time and effort to accomplish. So students need to learn how to focus their attention; to look patiently beyond the obvious to see detail and subtlety; to be able to identify the relative importance of what they are observing; to develop the ability to see detail in the context of the bigger picture; and to develop the ability to explain, hypothesise about and explore what is being noticed. When looked at from these diverse angles, growing noticing moves well beyond encouraging a student to ‘look carefully’.
Mersaleashwaran, CC BY-SA 4.0 , via Wikimedia Commons
How these emotional domain learning behaviours grow
Growing perseverance and noticing
These two complex learning behaviours are part of the emotional domain of learning. Each has been reduced to a single column which attempts to capture enough detail for you to recognise the behaviours as you witness them in your classroom. They follow the pattern of development described in the Phases of growth toggle box above.
Note also that the actions going up the columns become more skilled and sophisticated. Purple, blue and green phases have two descriptions which belong to the same phase but the lower ones in each colour tend to happen first.
Perseverance involves a great deal of emotional involvement and its growth will rely heavily on an emotionally supportive classroom culture. Much of this behaviour relies on students’ feelings, how ‘failure’ is handled and how they are supported through difficulty and challenge
Noticing. This column of development focuses on the ‘how’ of noticing. It is a behaviour that’s often taken for granted and left to its own devices. This column gives teachers hints about what learners need help with if they are to make the most of this behaviour.
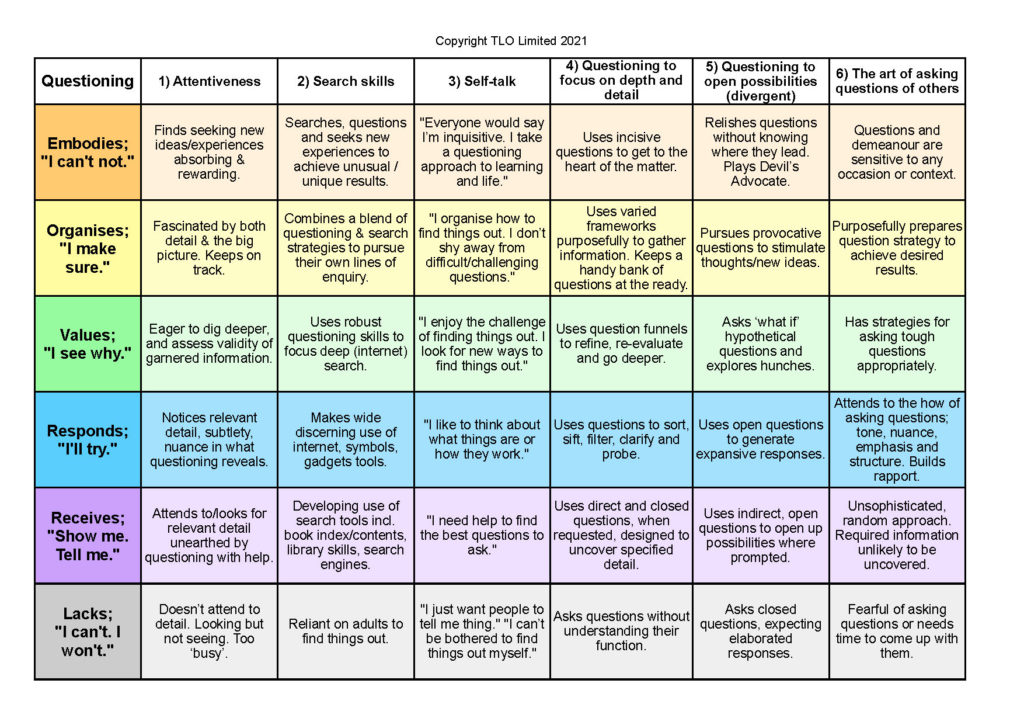
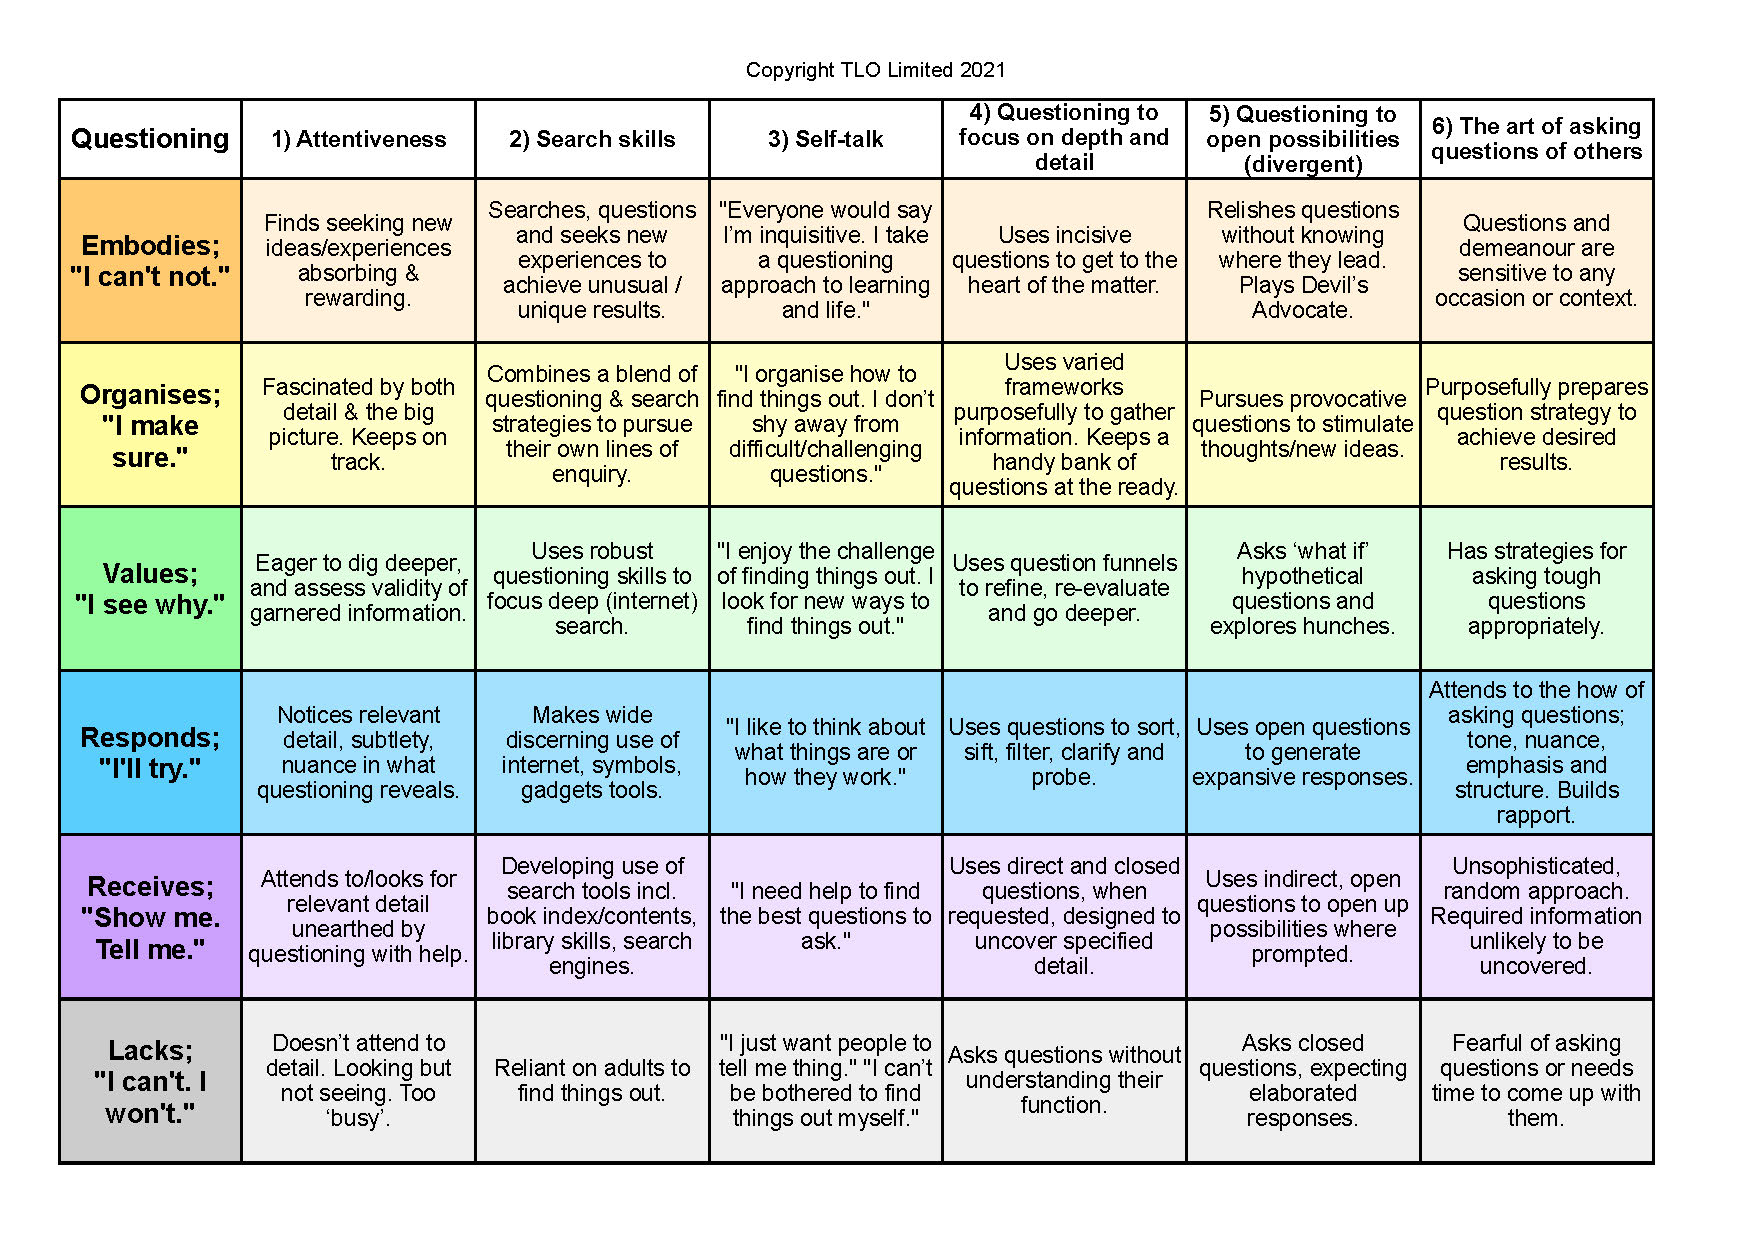
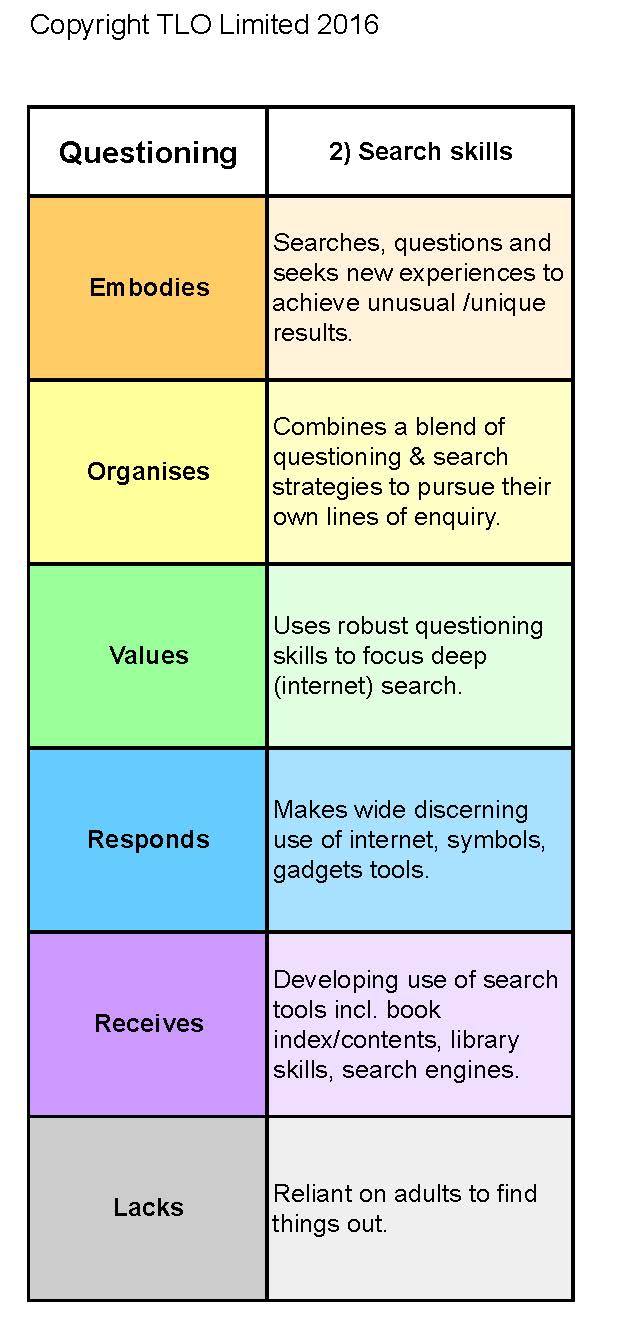
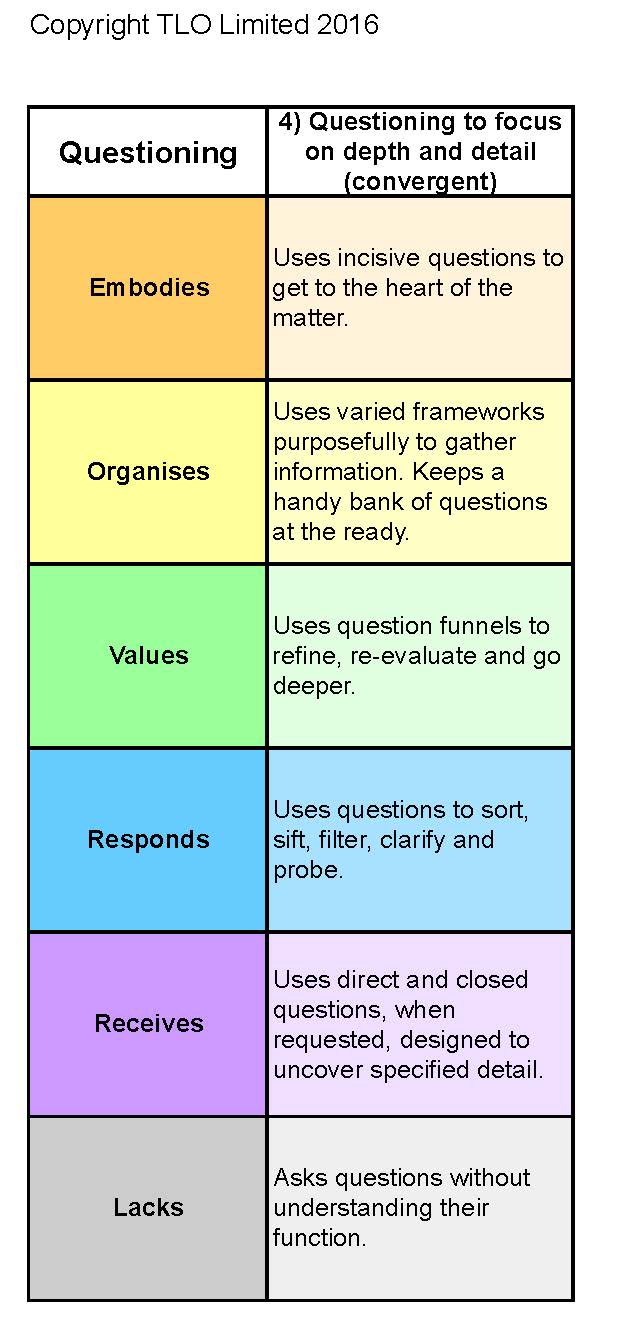
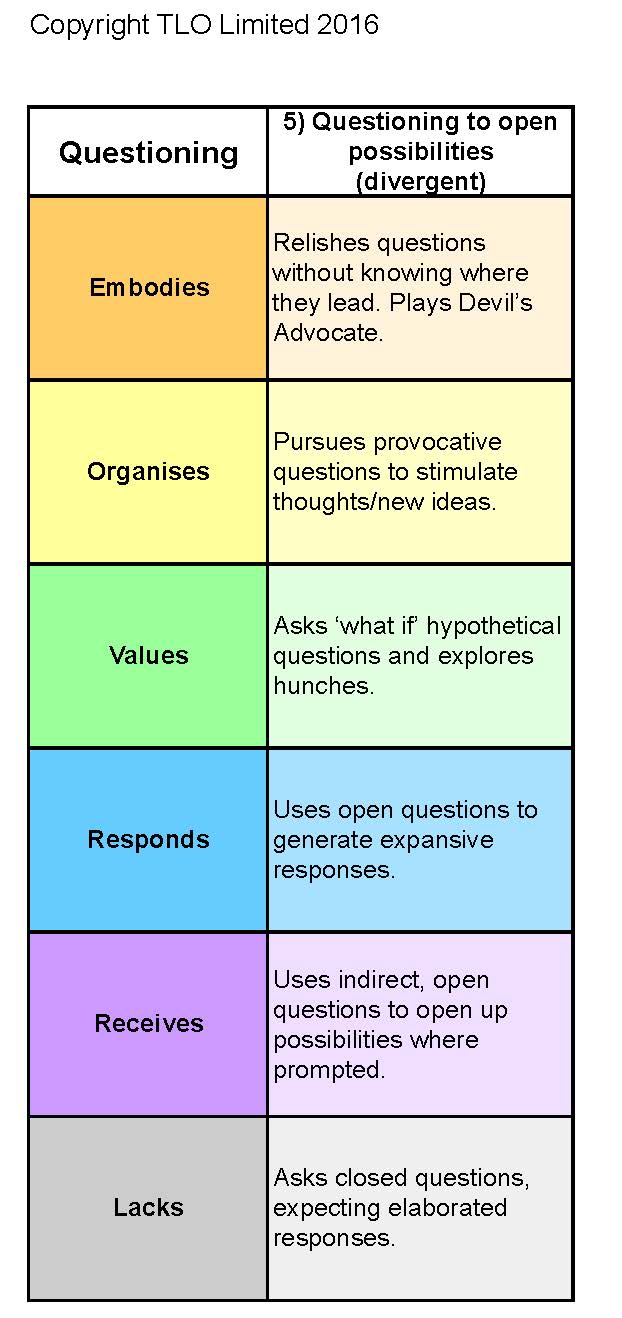
Effective questioners are motivated and not afraid to ask questions about the past, the present and to explore the future. They have an extensive range of question types and techniques at their disposal, which they use with discernment and sensitivity to occasion. A well-formed questioning habit involves being ready, willing and able to; not take things at face value; be less likely to accept answers uncritically; ask questions of oneself as well as of others; get under the surface of things; be comfortable with uncertainty and ambiguity; not be afraid of the ‘don’t know’ state of mind; be playful, yet systematic and analytical; be socially aware of the impact that questions may have on others; challenge others’ thinking; understand and use different types of question for different purposes; recognise that revealing their own uncertainties helps them learn.
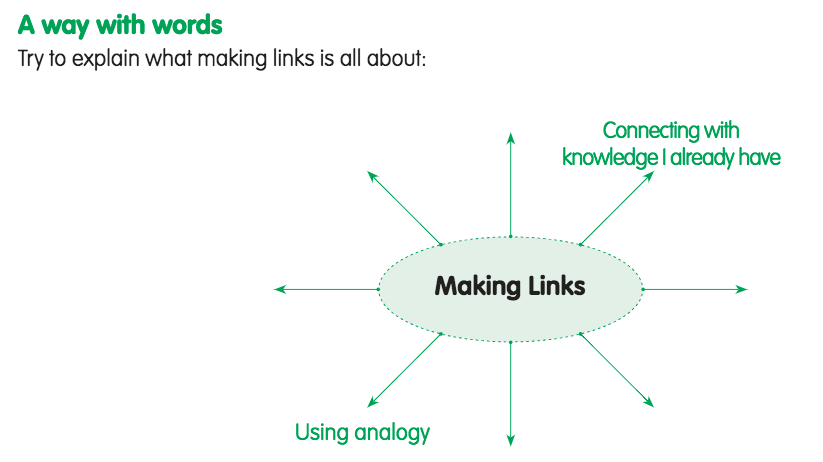
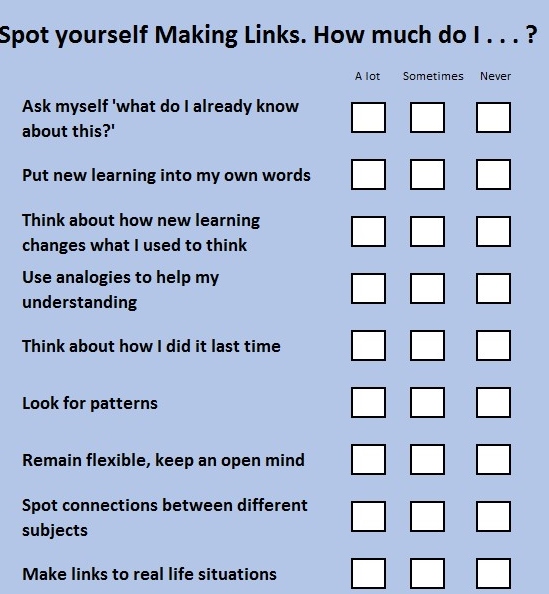
Making Links – Making connections
Making links between different things comprises not only the ability to see or make relationships but also the inclination to look for them. Trying to hook up new experiences with what you already know is what some people call ‘making meaning’. New ideas become meaningful to the extent that we can incorporate them within our own mental webs of associations and significances. Good learners get pleasure from seeing how things fit together. They are interested in the big picture, and how new learning expands it. They experience them through the ‘ah ha’ experience of seeing a connection between two previously isolated concepts, or the satisfaction of seeing the connection between an abstract idea and a ‘hands-on’ concrete experience. It’s how you make sense of the world. To be a good link maker you need to keep stimulating your brain and enriching your experiences because through active learning you quite literally ‘build’ your own mind. At the heart of all this is your attitude to knowledge; whether it is bound up in rules and ‘is-language’, or whether you see knowledge as provisional, ever building and changing.
Reasoning – Thinking logically
A well formed Reasoning habit involves being ready, willing, and able to: resist jumping to conclusions; seek justifiable evidence to shape sound, well-honed arguments; scrutinise your assumptions; seek evidence and counter evidence, look for false steps and carefully draw conclusions; remain suspicious, doubting and self-doubting in order to avoid unwarranted certainty; convey your logical thinking clearly, through dialogue, symbols, analogies, prose and pictures. So, at a less abstract level, students need to learn the inclination to resist impulsive responses; to respond logically and thoughtfully; to apply logic by explaining, justifying and, ultimately, proving what they think; to utilise a range of reasoning tools; and to develop strategies for presenting their reasoning to others persuasively.
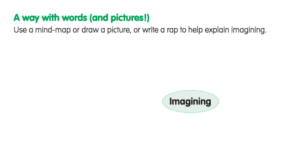
Imagining – Thinking differently
Imagining is an important way of thinking but one that seems to be afforded too few opportunities in classrooms. Imagination isn’t just a cute faculty that children use to weave fantasies: it is one of the most effective tools in the learner’s toolbox. Scientists, designers and executives need a powerful imagination just as much as painters and novelists.There are two kinds of imagination: active and receptive. In active imagination, you deliberately create a scenario to run in your mind’s eye. Sports people use this kind of mental rehearsal and experiments have shown it to be very effective at improving their level of skill. The second kind of imagination is more receptive, like daydreaming: letting a problem slip to the back of your mind, and then just sliding into a kind of semi-awake reverie, where the mind plays with ideas and images without much control on your part
A well formed Imagining habit involves being ready, willing, and able to: use the mind as a theatre in which to play out ideas and possible actions experimentally; use a rich variety of visual, aural and sensory experiences to trigger creative and lateral thinking: explore possibilities speculatively, saying ‘What might …’, ‘What could …’ and ‘What if …?’ rather than being constrained by what is; retain a childlike playfulness when confronted with challenges and difficulties; be aware of intended outcomes whilst adopting a flexible approach to realising goals; rehearse actions in the mind before performing them in reality.
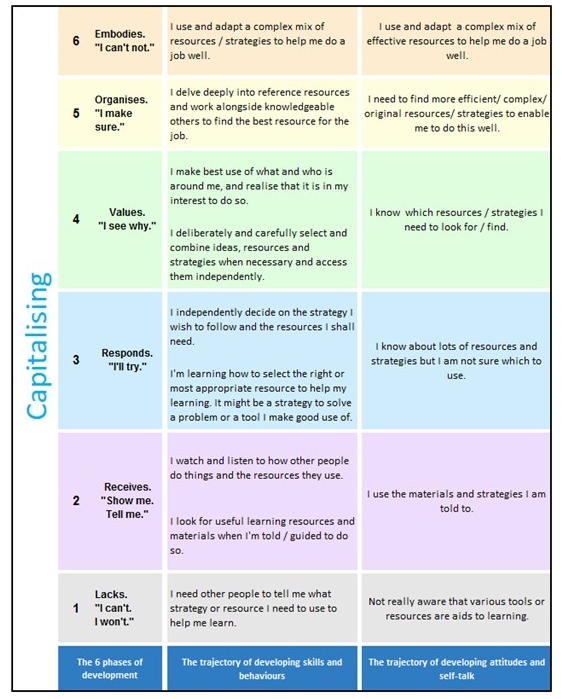
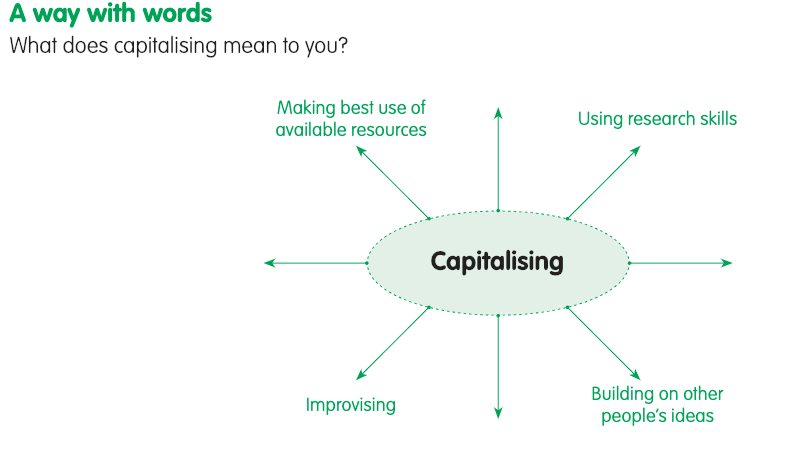
Capitalising – Using resources
Effective resource users learn with the help of many different sources – other people, books, the internet, music, the environment, experience…and making intelligent use of all kinds of strategies and things to aid learning. In the early stages, it means selecting and making the best use of known strategies and classroom resources but this swiftly moves on to embracing a much wider and varied range of possibilities. This involves being able to seek novel ways of solving problems by exploiting the potential of known strategies and what is around them including things they may never have thought of as a resource.
How these cognitive domain learning behaviours grow
Growing questioning, making links, reasoning, imagining and capitalising
These five complex learning behaviours make up the cognitive domain of learning. Each has been reduced to a single column which attempts to capture enough detail for you to recognise the behaviours as you might witness them in your classroom. They follow the pattern of development described in the Phases of growth toggle box above.
Note also that the actions going up the columns become more skilled and sophisticated. Purple, blue and green phases have two descriptions which belong to the same phase but the lower ones in each colour tend to happen first.
Questioning drives our learning; that curiosity to find out. The column focuses on skills that enable students to find things out for themselves and emphasises getting under the surface of things and assessing the validity of information.
Making Links shows the growing complexity involved in link making and how, when done well, it builds their minds. There is an emphasis on connecting old and new and that what they know now will forever be adapting and changing.
Reasoning is strong on finding proof and evidence and being able to justify their thinking. Often seen as the territory of Maths, these skills and the inclination to use them apply to all aspects of the curriculum.
Imagining is about triggering creative and lateral thinking. The column traces the stages of stepping outside their own reality and catapulting themselves into other situations.
Capitalising recognises that effective learning is helped by many other resources. The column charts learners’ growing awareness, skill and inclination to make the best use of resources to help learning.
Hearing and listening are different. Whereas hearing is an automatic and effortless process when sound waves strike the ear drum and cause vibrations in the brain, listening is about the brain giving those sounds meaning. It’s unnatural, and it requires effort. There’s all sorts of faulty listening. Sometimes we fake it or pretend to listen; sometimes we only respond to the remarks we are interested in and reject the rest. Sometimes we listen defensively and take innocent remarks as personal attacks. Or, we listen to collect information to use to attack the speaker, or we avoid particular topics, or we listen insensitively and can’t look beyond the words for other meanings, or we turn the conversation to ourselves. So, listening is indeed hard and requires effort. To be a good listener you need to be able to listen for information, listen to judge the quality of the information and listen empathetically to build a relationship and help solve a problem. When looked at from these diverse angles, growing Listening moves well beyond encouraging a student to ‘do good listening’ or ‘now listen carefully’.
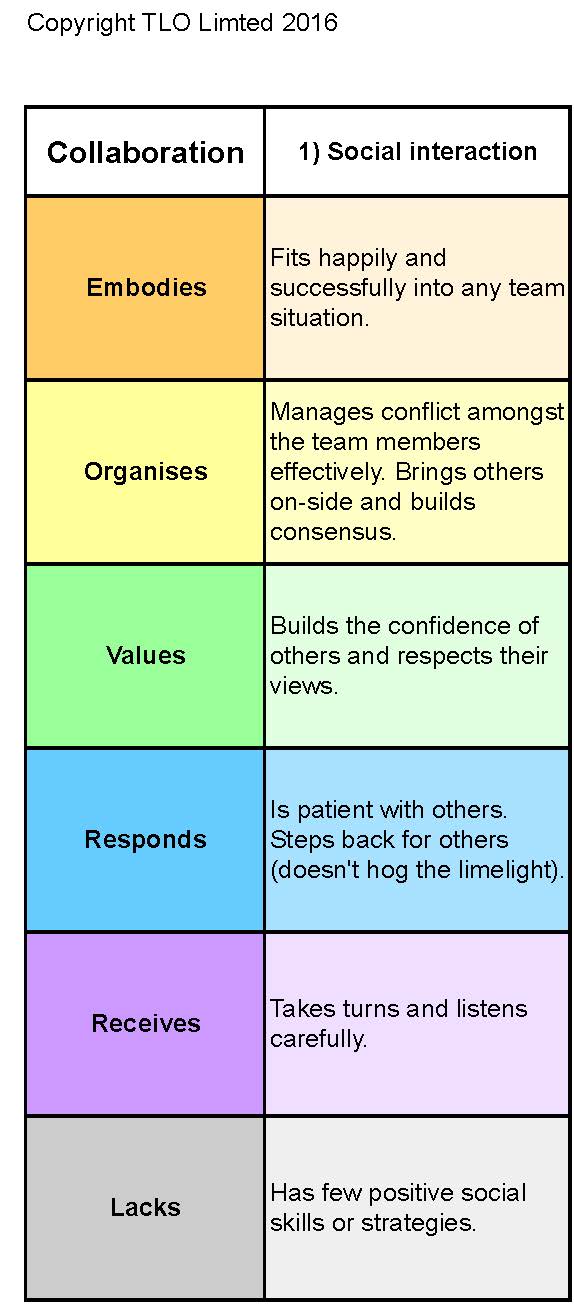
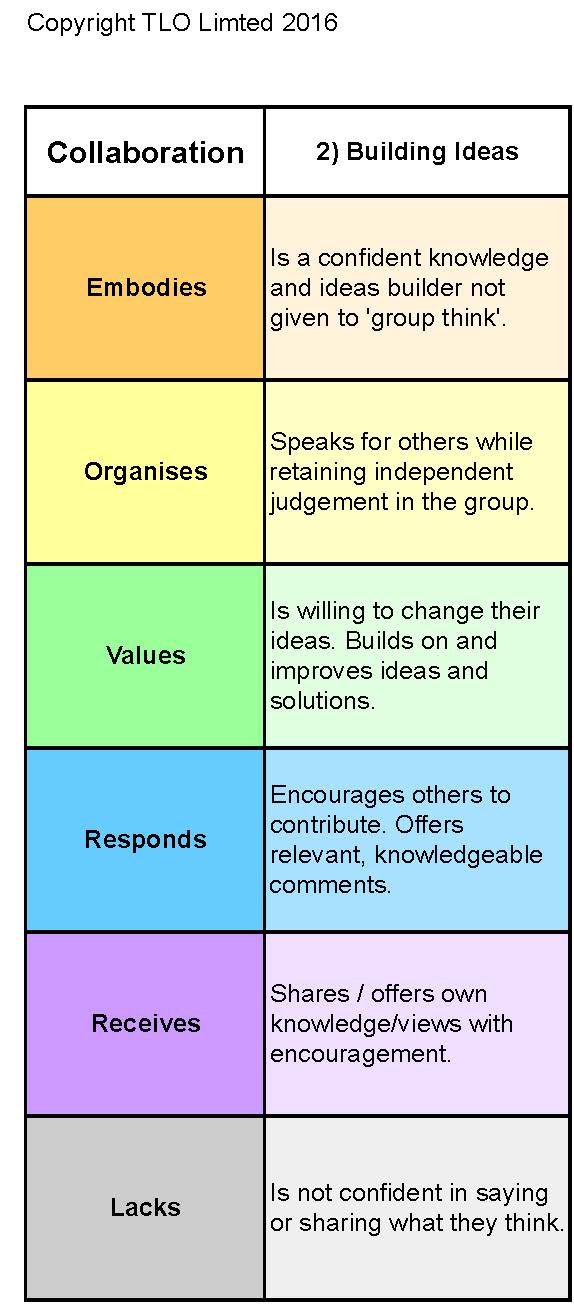
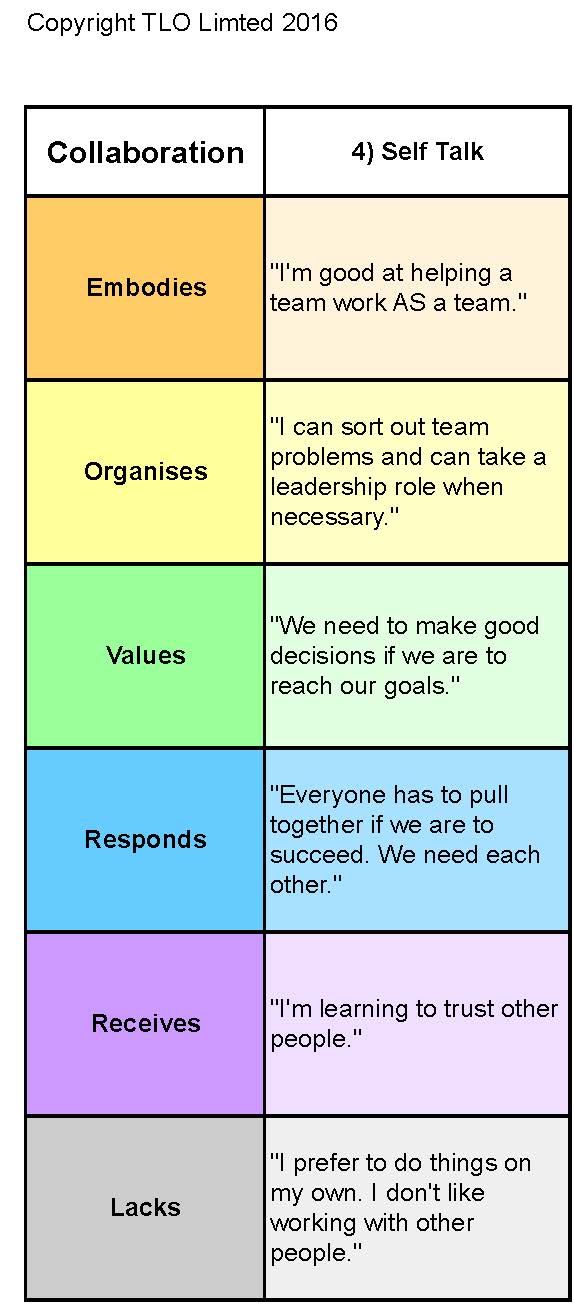
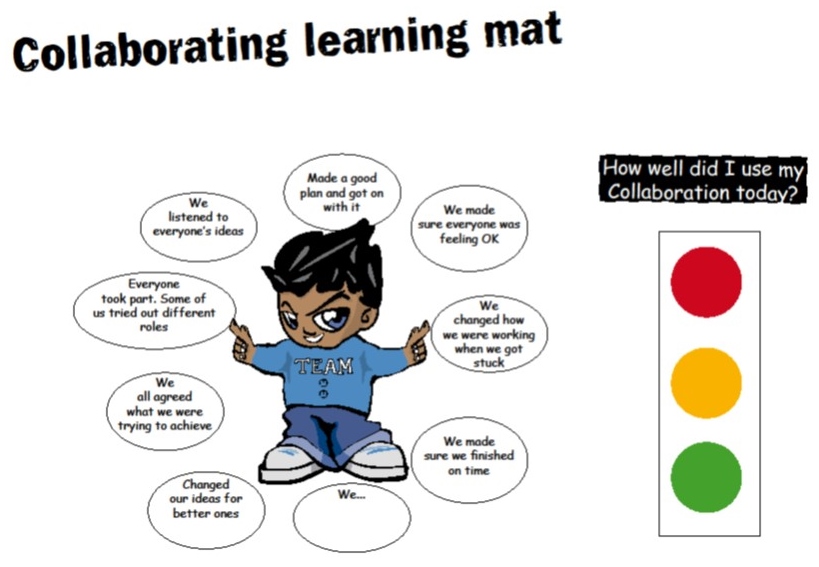
Collaboration – Learning together
Effective collaborators are adept at learning with and from others. They help to:
shape the ideas of the team
decide what needs to be done
contribute to getting the job done
keep an eye on how things are going
improve team performance through reflection.
A well-formed collaboration habit includes being ready willing and able to: work effectively with others towards agreed, common goals, acting flexibly in response to circumstances; adopt different roles and responsibilities in pursuit of agreed goals and the well-being of the team; hold and express opinions coherently, compromising and adapting when appropriate; seek to understand what others are saying; sharing, challenging, supporting and building on ideas.
These two complex learning behaviours are part of the social domain of learning. Each has been reduced to a single column which attempts to capture enough detail for you to recognise the behaviours as you witness them in your classroom. They follow the pattern of development described in the Phases of growth toggle box above.
Note also that the actions going up the columns become more skilled and sophisticated. Purple, blue and green phases have two descriptions which belong to the same phase but the lower ones in each colour tend to happen first.
Listening effectively requires a great deal of effort which is rarely referred to beyond ‘good listening’. The column captures various flavours and skills of listening and in doing so offers clues for how listening can be designed into classroom activities.
Collaboration is often thought of as a natural skill but as the column shows it is highly sophisticated and will take time to become productive. Here the skills of working with others as a team is given centre stage.
Planning is the ability to take a strategic overview of your learning, and make sensible decisions. It means:
taking stock of the problem and the parameters within which you must work
assessing the available resources, both inner and outer, and deciding which you think are going to be needed
making an estimate of the time the learning will take, and the competing priorities that may have to be delayed or sacrificed
imagining a route-map for the learning
anticipating hurdles or problems that may arise along the way.
Good learners like taking responsibility for planning and organising their learning. They welcome opportunities to decide for themselves when, where, why and how they are going to learn—and to get better at doing so. Research shows, for example, that people who can make a reasonable estimate of how long a task will take are more likely to finish on time, and to do better work.Training the process of thinking ahead often starts simply by asking students to find the resources they will need to carry out a task. But planning your own learning is a sophisticated task. It involves a personal, silent assessment of your learning skills (‘What can I feasibly achieve? What am I capable of doing? What resources would bolster my chances of success?’) The more timid, less confident or lower achieving students may find such planning a daunting prospect. Introducing and requiring students to work learning out for themselves will take time and careful planning on the part of the teacher.
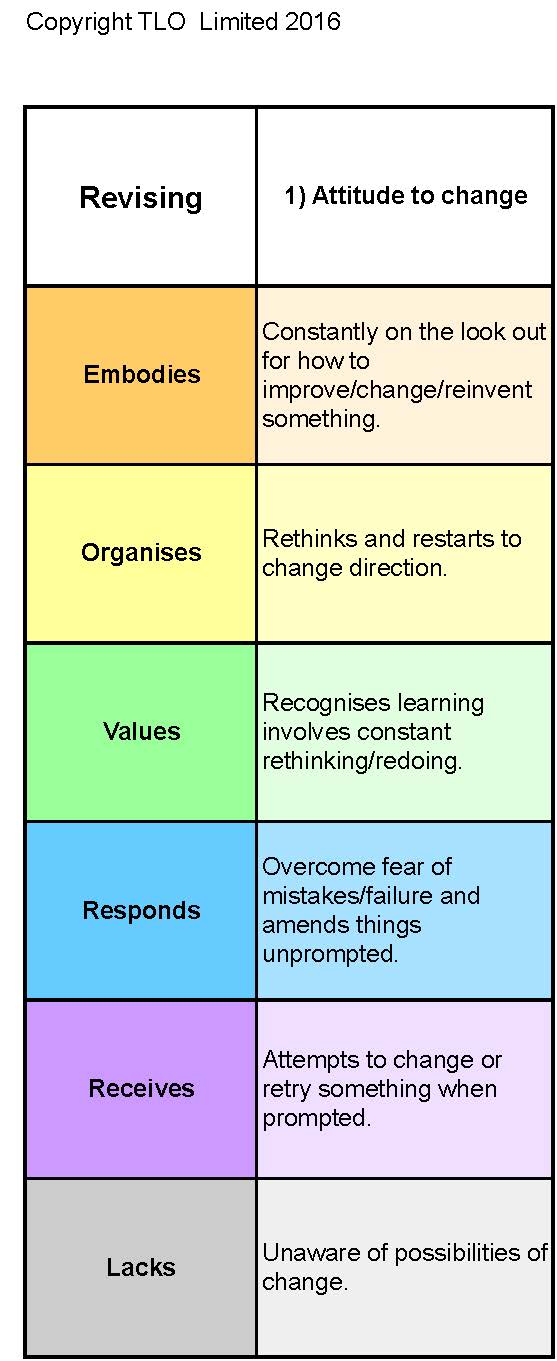
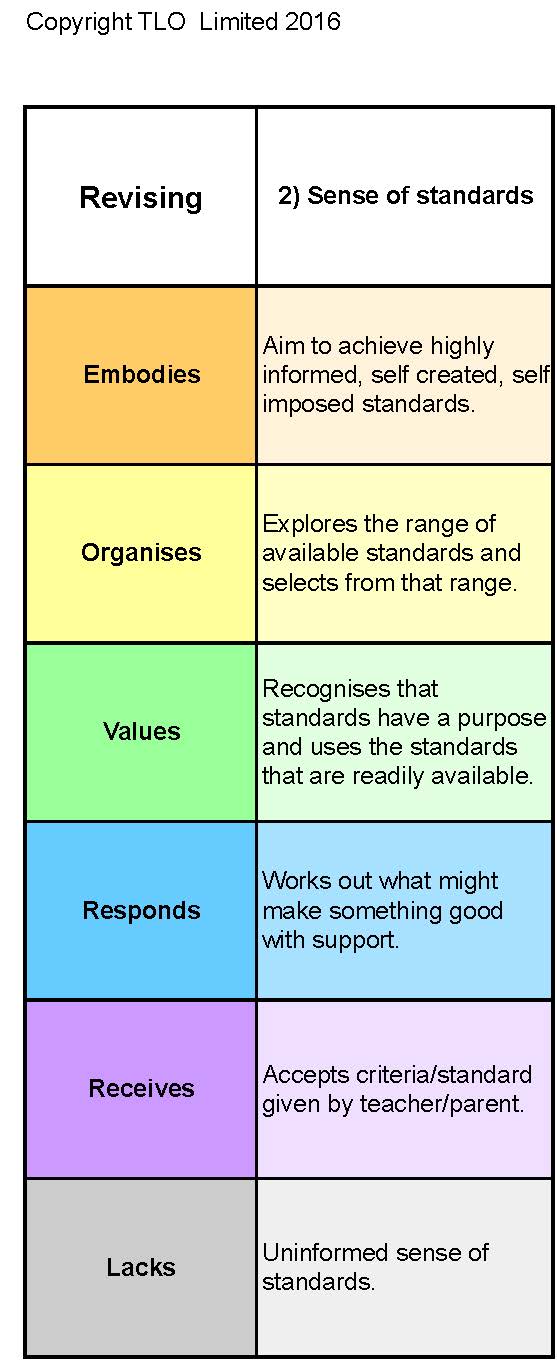
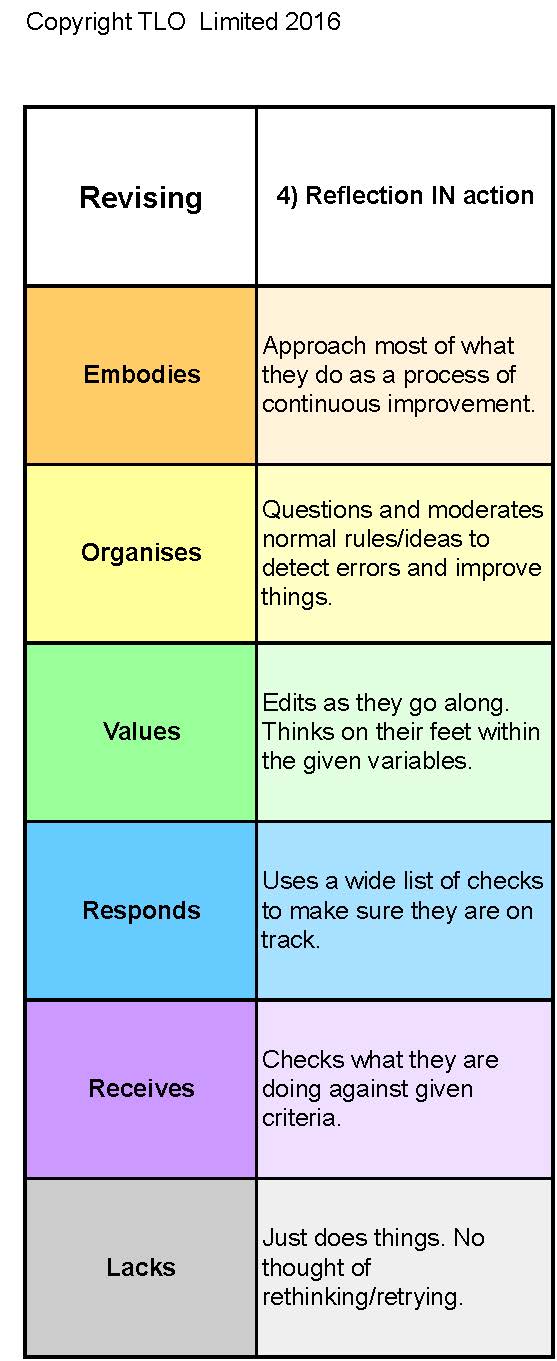
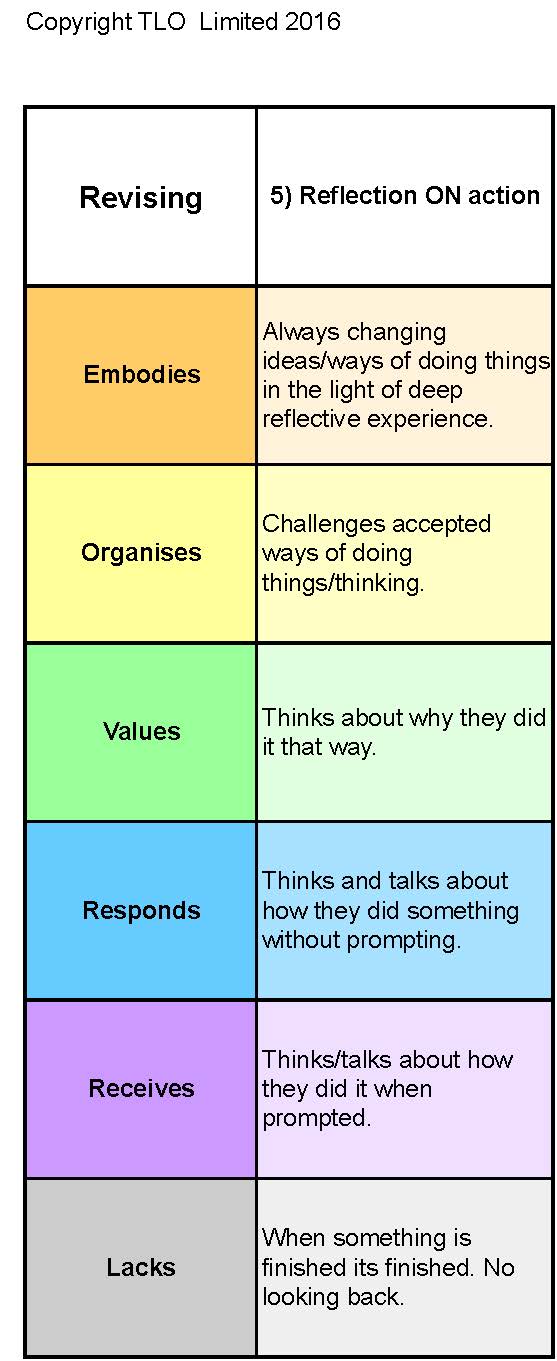
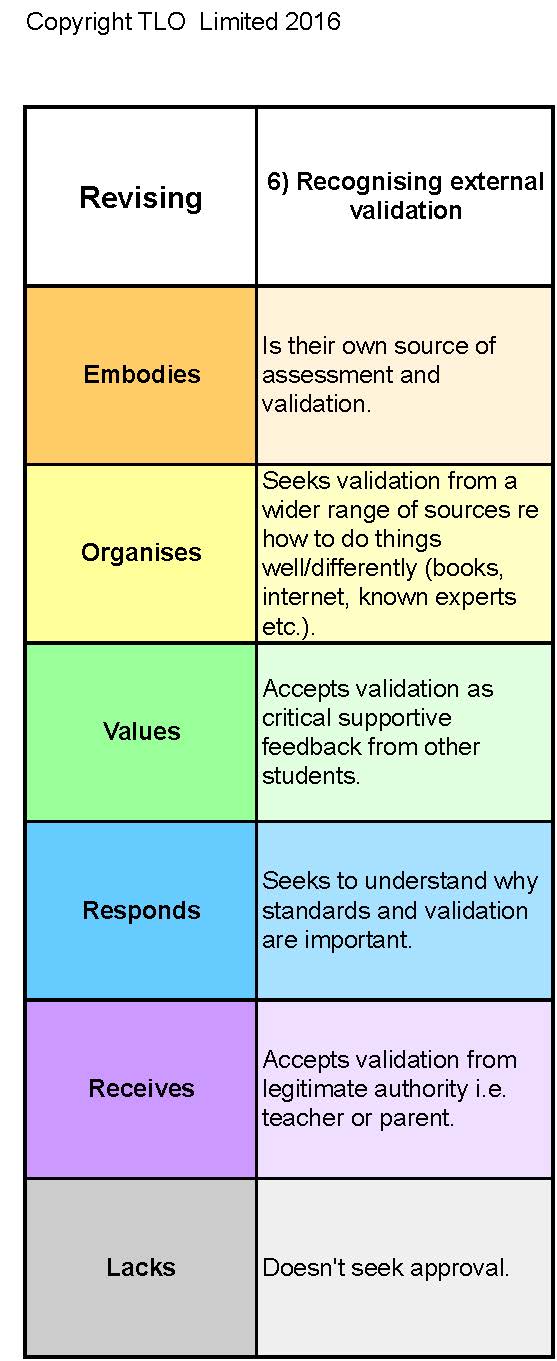
Refining – Making improvements
A well formed Refining habit involves being ready, willing, and able to: self-monitor how things are going, keeping an eye on the goal; expect the unexpected, having a readiness to re-shape, re-order, re-form plans to take account of new circumstances; remain alive to new, unforeseen opportunities and ideas; look at what you are doing with a critical eye; strive to be the best you can be; make sure things are on track and make improvements along the way.
So students need to learn how to deal with change, emotionally and practically. With an inflexible frame of mind they are unlikely to recognise the need to change their ideas or the way they do something. They also need to know what ‘good’ looks like; how to keep an eye on how things are going and the willingness to evaluate how things went against external standards. Growing revising moves well beyond encouraging a student to ‘have another go’.
Meta Learning – Thinking about learning
Meta-learning involves drawing out of your learning experience a more general, explicit understanding of the process of learning, and specific knowledge about yourself as a learner. Becoming a meta-learner is about being able to assess the effectiveness of your own learning process and regulate it for greater success. It has several strands; how you become and stay motivated and plan your learning, how you build and organise your ideas; how you learn with and from others; how you manage your learning environment and how you monitor your learning process itself in order to improve. When looked at from these diverse angles, growing meta-learning moves well beyond encouraging a student to ‘think about your learning’.
How these strategic domain learning behaviours grow
Growing planning, revising and meta-learning
These three complex learning behaviours are part of the strategic domain of learning. Each has been reduced to a single column which attempts to capture enough detail for you to recognise the behaviours as you witness them in your classroom. They follow the pattern of development described in the Phases of growth toggle box above.
Note also that the actions going up the columns become more skilled and sophisticated. Purple, blue and green phases have two descriptions which belong to the same phase but the lower ones in each colour tend to happen first.
Planning. The extent to which students can plan their own learning will largely rely on the opportunities they have for doing so. The column charts effective steps that students will need to take to become effective planners of their own learning
Revising. This critical learning skill has been given a new lease of life recently, often evoked by metacognition. The column charts the type of skills students will need to embrace to become an effective self-monitor and evaluator of their own learning.
Meta-learning or thinking about learning is the coming together of the currently popular concepts metacognition and self-regulation; it’s the two rolled into one. The column draws together and orders a complex range of skills expressed in plain language.
What sort of learning character do my learners have?
What sort of learning characteristics do my more successful learners have?
Which characteristics or behaviours do my struggling learners have?
Which learning behaviour contributes to the success of most of my learners?
Which learning behaviour is used less than any of the others?
How do the answers to these, and similar questions, apply to me, my teaching and the curriculum?
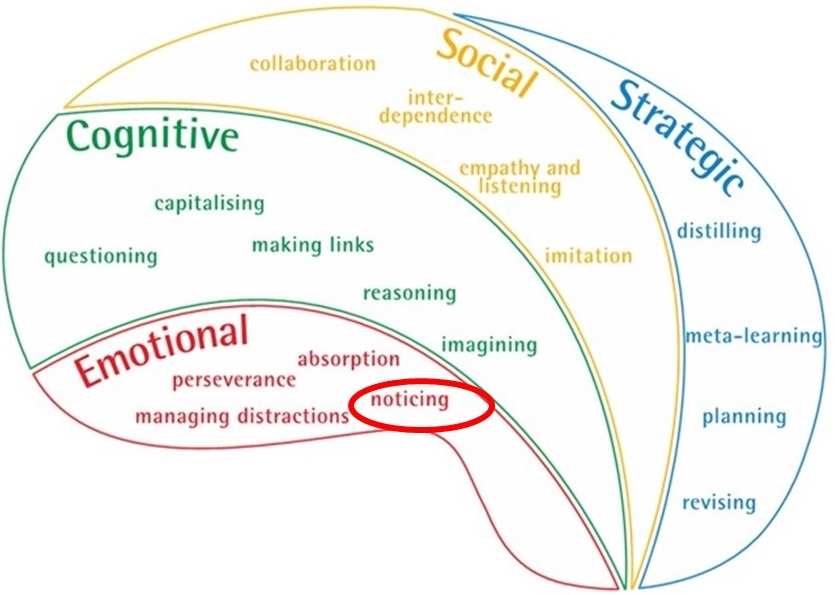
Before you start making use of the learning behaviour charts that can address these questions you’ll find it helpful to take a quick look at the background of learning domains and learning behaviours or powers. It’s an approach to learning that looks at the building blocks of learning, what they are, the part they play and why they matter. Read on to find out about the basic learning behaviour framework, known as the Supple Learning Mind, the importance of learning dispositions and where all these ideas have come from and why they matter.
Use a rich picture of your students’ learning behaviours to underpin your approach to improve, develop or catch up on their learning.
1.1 Framework of high value learning behaviours
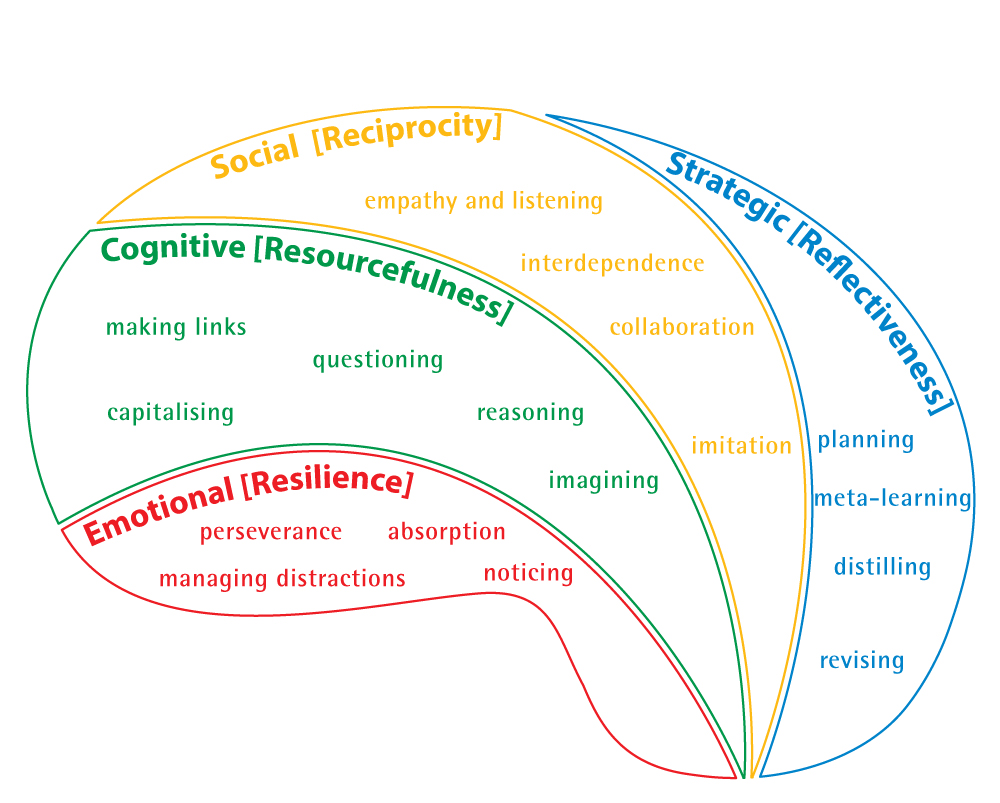
Learning Power has been described as the raw ‘building blocks’ of learning; not abilities, not styles, but the actual components of learning itself; the raw energy of learning. Through a systematic programme of research over several years, and with the co-operation of thousands of research participants, researchers at Bristol University turned this ‘learning power’ inside-out until finally it was broken down into the four domains of learning and seventeen identifiable learning capacities; key psychological characteristics that were and are judged to be of the highest value in helping students to learn and thrive in a complex world. These learning behaviours are inherent in us all, not fixed at birth, or when we leave school: they can be developed by everyone regardless of ‘ability’, social background, or age. There are no limits to extending our learning power.
The Supple Learning Mind framework of high value learning behaviours
A rich framework for learning
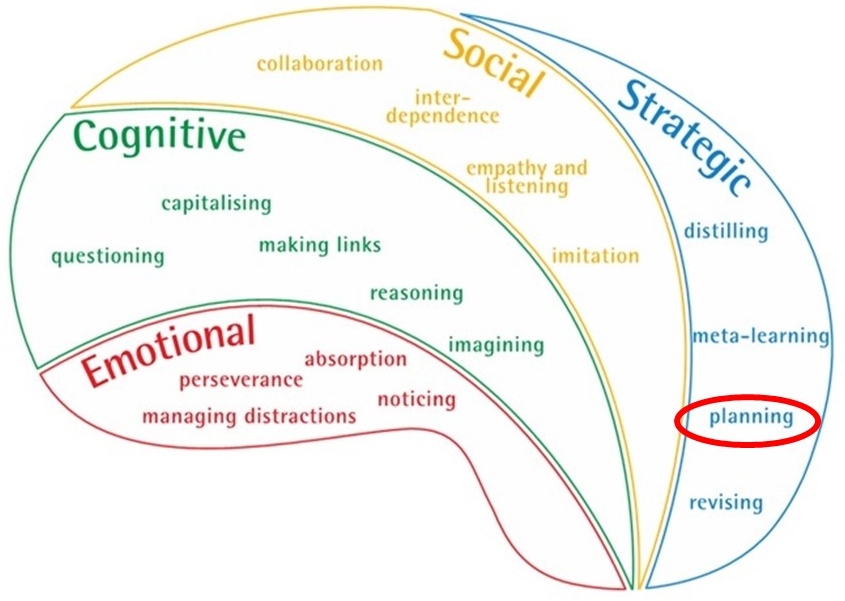
The Supple Learning Mind framework uses each of the domains of learning and these are shown in its four parts:
The Emotional domain of learning (where the disposition needed is resilience)
The Cognitive domain of learning (where the disposition needed is resourcefulness)
The Social domain of learning (where the disposition needed is reciprocity)
The Strategic domain of learning (where the disposition needed is reflectiveness)
This learning framework shows that learning isn’t just about having a good memory; it encompasses how we feel, how we think, how we learn alone and with others and how we manage the process of learning. It shows that effective learning is a complex process with a dispositional overlay. Furthermore it provides a language that helps teachers to think about how they cultivate each of the learning behaviours and helps students to gain a better personalised understanding of what they have to do to learn content.
Each learning domain clusters together the high value learning behaviours that best make that domain work well and each of these have a dispositional aspect. For example the social domain is made up of the learning behaviours of being ready, willing and able to be interdependent, to collaborate, to listen and empathise and to imitate.
1.2 The primacy of dispositions and the essentials of the approach
Underlying this approach is a recognition that learning how to learn involves more than skills, it involves students’ attitudes, values, interests and beliefs as well. It’s about helping students to help themselves to be disposed to persist, to question and be curious, to collaborate harmoniously and to be open to new ideas.
It may be that some of the girls in your classes believe that ‘Maths isn’t for girls’ or that some students think that ‘If you can’t solve it in a minute, you can’t solve it at all’ or that ‘Bright people never have to try’. All these erroneous ideas cause students to be disposed to give up easily, to feel stupid, to feel disengaged. You can think of ‘dispositions’ as indicators of the degree to which one is disposed to make use of a skill or knowledge.
The good thing is that these dispositions can be developed by all of us regardless of ‘ability’, social background or age when we encounter learning friendly cultures.
The essentials of building powerful learners
learning is a learnable craft
learning how to learn involves attitudes, values, interests and beliefs
developing better learners is done with and by learners rather than to learners
it involves cultivating dispositions and values rather than training skills
it is not an inevitable by-product of ‘traditional effective teaching’.
it is about making students ready and willing as well as able to learn
1.3 Can we trust it? Is it evidence based?
From there to here
An enthusiasm for ‘better learning’ has motivated teachers for a long time. In attempts to help students learn more or learn better, teachers tried to understand learning styles, multiple intelligences, and the like. In attempts to help students improve their organisation of knowledge or the effectiveness of their memory, teachers used tools like mind maps, mnemonics, and other study skills. These approaches laid the ground for a deeper, more permanent set of approaches, whose aim is to get beyond learning more, or learning better, to helping students to help themselves become better learners.
“I can’t think of anything more worth learning than learning to learn. It’s like having money in the bank at compound interest” David Perkins. Project Zero, Harvard University
Research in the learning sciences shows that learning is itself a learnable craft; that we can all get better at learning. This means that schools, teachers and parents can enable young people to help themselves to develop as better, more effective learners.
Skills and techniques aren’t enough. Students must not only possess the requisite capabilities; they must be ready, willing and able to use them when the time is right.
Dispositions to learning should be key performance indicators of the outcomes of schooling. Many teachers believe that, if achievement is enhanced, there is a ripple effect to these dispositions. However, such a belief is not defensible. Such dispositions need planned interventions. John Hattie.
We need to move from thinking about learning as a set of techniques and skills that can be ‘trained’, to a set of dispositions, interests and values that need to be ‘cultivated’. David Perkins
From learning more, to learning better, to becoming better learners
Learning more: an interest in raising achievement
Outcome of schooling (e.g. KS2 SATs results)
‘Good teaching’ was about content and acquisition
‘Good teachers’ could put across information, develop literacy and numeracy, etc.
When schools’ prospectuses first started talking a lot about ‘improving the quality of students’ learning’ what they really meant was ‘raising attainment’. ‘Learning’ was only used to refer to the outcome of schooling, learning as performance rather than learning as a process. There was no recognition of ‘learning’ as an interesting process going on in children’s brains.
Learning better: developing study skills
Hints and tips on retaining and recalling for tests
Practising techniques
‘Good teaching’ was still content focused, plus delivering study skill based on practical things that students could do to improve the organisation of their knowledge, their memories, or the effectiveness of their revision. The concern with ‘improving learning’ was linked to exams with numerous hints and tips on how best to retain and recall what had been learned.
Learning better: styles and self-esteem
Characteristic ways of learning (e.g. multiple intelligences)
‘Good teaching’ included reducing stress levels and helping students raise their attainment levels
Concern shifts to the ‘how’ of teaching
The concern with the emotional aspects of learning led to a tsunami of approaches but lacked an overall framework. Mind maps to help organise and retrieve knowledge; bottled water to lubricate students’ brain cells to ensure they didn’t ‘dry up’; learning styles of overall learning strengths (auditory, visual, kinaesthetic) which people were encouraged to play to; background classical music; the centrality of bolstering students’ self-esteem. L2L manuals became fashionable but the focus was on how the teacher could ‘teach’ better, rather than on how students could be helped to become better learners.
Becoming better learners: involving students in their learning
Concerned with how students can be helped to help themselves (e.g. think creatively)
Teachers themselves involved in becoming better learners
Developmental and cumulative — encouraging the ‘ready and willing’, not just the ‘able’
Why the shift in focus? A glance at the research
When we all believed that ‘intelligence’ was fixed at birth there seemed little point in trying to cultivate it. Now we know just how learnable learning is we are realising that there’s a place for developing how we learn. Research at Bristol University uncovered seven dimensions or energies or powers that can be used to shape how we learn. This was the beginning of shaping a good route map of how children’s learning power grows: a route map to do with the growth of our resilience in learning, our learning relationships, our thinking skills and how we manage our learning. The route map causes questions such as:
What does resilience mean to a four-year-old, or ten-year-old, and how can it be appropriately stretched?
What kinds of thinking skills will help students become better learners
Questions such as this explain why this ‘learning power’ approach is often referred to as ‘building’ learning power.
The secret of learning power: disposition to make use of skill
Underlying this approach is a recognition that learning how to learn involves more than skills. How, and how well, children learn can’t be reduced to a matter of ‘skill’; it involves their attitudes, values, interests and beliefs as well. For example…
Kamini believes that ‘Maths isn’t for girls’ so she is not predisposed to try hard tasks. Neither is Fred, but for a different reason: he believes that ‘If you can’t solve it in a minute, you can’t solve it at all’. Evie thinks that ‘Bright people never have to try’, so she feels stupid when she can’t do something easily, and gives up too.
Think of ‘dispositions’ as indicators of the degree to which one is disposed to make use of that skill or knowledge. Rather than nouns, ‘dispositions’ are adverbs — those little signifiers of ‘time, manner and place’ that modify the verbs they accompany.To be disposed to persist, for example, is simply
to show persistence across a broad rather than a narrow range of occasions;
to tend to persist in the face of more severe obstacles or frustrations; and
to have a rich repertoire of ways of supporting and encouraging one’s own persistence.
To be disposed to ask questions is to
tend to ask questions in English as well as in maths
to ask questions despite a degree of discouragement or fear.
When one is ‘disposed’ to self-evaluation you
stand back from time to time and ask yourself how it is going
self-evaluation has become routine, second nature, and across the board.
This shift in terminology reflects the influence of a particular strand of research that has emphasised the difference between skills and dispositions. David Perkins of Harvard University and others have shown that people often appear less capable than they are, not because they don’t possess the skill they need, but because they don’t realise that now is the right moment to call that skill to mind and make use of it. They lack what Perkins calls ‘sensitivity to occasion’.Skills and techniques aren’t enough. Students must not only possess the requisite capabilities; they must be ready, willing and able to use them when the time is right.
We need to move from thinking about learning as a set of techniques and skills that can be ‘trained’, to a set of dispositions, interests and values that need to be ‘cultivated’.
1.4 Why it matters
Schools today need to be educating not just for exam results but for a life of learning. To thrive in the twenty-first century, it is not enough to leave school with a clutch of examination certificates. Students need to have learnt how to be tenacious and resourceful, imaginative and logical, self-disciplined and self-aware, collaborative and inquisitive.
‘Students throughout the world need now to reach higher levels of achievement, not only to find fulfilling work but also to empower themselves to thrive in an increasingly complex world’ – Dylan Wiliam
Employment requires being able to enhance and transfer knowledge and to operate collaboratively.
The capacity to learn and adapt needs to be lifelong because change is a permanent state, and the pace of change is moving more rapidly.
The core purpose of education is to prepare young people for life after school; to get them ready, as Art Costa, an American educator with similar views, says, ‘not just for a life of tests, but for the tests of life’. This means helping them build up the mental, emotional, and social resources to enjoy challenge and cope well with uncertainty and complexity. If you strip away political dogma, the evidence is overwhelming that this aim is not currently being achieved for very many students. Of course, this has to be done in a way that also develops literacy and numeracy, and gets young people the best test results possible.
Building Coherence – Leadership questions for schools
The key differencesbetween this phase 2 unit, Building Coherence, and phase 1 of the Building Powerful Learners programme.
Building Coherence is a programme containing 2 substantial units designed to be undertaken by teams of teachers with a view to researching and developing whole school approaches. This could be achieved by two teams operating concurrently, or by one team that tackles the 2 units one after the other.
The goal is to create consistency across the school in terms of the complex areas of:
a) how learning behaviours are integrated into curriculum planning and lesson design;
b) how the school tracks student learning behaviour growth.
The blended learning approach and cycle of monthly meetings embedded in phase 1 is necessarily changed.
Unlike phase 1 of Building Powerful Learners which involved all teachers in undertaking small scale action research projects in their classrooms, Building Coherence is designed to support small teams of teachers to explore how the school can achieve consistency in terms of curriculum/lesson design and in terms of tracking learning development. Where phase one was an inclusive, whole school activity, Building Coherence is intentionally strategic in that it seeks to create whole school practices going forward.
This leads the school to several questions to be answered at the outset:
Do we see this as a developmental opportunity for some less experienced colleagues, as a wholly strategic exercise that requires experience, or most likely a combination of these two approaches? This will impact on how you choose to form your teams.
Do we form one team that tackles each unit in turn? Or do we form 2 teams, each focussing on one of the units? [We anticipate that each unit may take 6 months or so to complete.]
How will we build team membership – volunteers? nominated by senior leaders? A mix?
How will we ensure that the teams are sufficiently large to engage a range of views, yet sufficiently compact for reasons of efficiency?
And, critically, how will we maintain momentum and interest in teachers who are not directly involved in Building Coherence?
Keep these questions in mind as you work towards building your strategic plan for implementing Building Coherence.
1. Shared Values – How does phase 2 of Building Powerful Learners fit with our school’s ethos?
Given that the school has decided to continue Building Powerful Learners, it is reasonable to assume that this sits well with the school’s ethos and aspirations.
Leaders would do well to consider, in advance, how they are going to mirror the 4 aspects of classroom culture in their leadership approach. To align their leadership behaviours with the classroom culture developed in Building Powerful Learners, how will leaders:
devolve responsibility to teams and coach their development?
support team members to understand and exercise their team responsibilities?
build challenge and reflection into their leadership of the programme?
share emerging developments and celebrate successes?
2. Skills – What sort of skills/competencies would the programme enhance?
Building Coherence is a step change from phase 1 of Building Powerful Learners. It seeks to enable schools to develop consistent approaches to: planning learning behaviours into curriculum/lesson planning; and to tracking students’ growth as learners as they move through your school.
The impacts, in the longer term, will be considerable in terms of weaving the development of learning behaviours into delivery, and in terms of the monitoring and evaluation of learning behaviour growth over time.
3. Staff – How could we accommodate the staff development approach suggested?
Team members will begin to trial some aspects of building learning behaviours into curriculum delivery and of monitoring the growth of learning behaviours as they engage with the Building Coherence units. But what of those teachers who are not directly involved in these teams?
The risk here is that you may, unintentionally signal that Building Powerful Learners has ‘done its job’ and all that is left is to build a couple of new systems to implement it.
As the phase 2 programmes Building the Scope and Building Depth readily show, phase 1 was a great place to start, but a terrible place to finish. There is still much to do to develop the early stages of Building Powerful Learners into a school-wide approach to becoming a learning powered school.
Give careful consideration to adopting a twin track approach – some teachers in teams working on Building Coherence, while those who are notBuilding Coherence team members continue to build on phase 1 by exploring strategies for further developing their classroom culture and their students’ learning behaviours.
You could choose to use either of the phase 2 programmes, Building the Scope or Building Depth, to ensure that the gains from phase 1 are advanced further while your Building Coherence team undertake the more strategic developments.
4. Systems – How do we need to adapt our existing working practices?
Inevitably, this depends on the approach the school plans to take.
If the school is planning to work on Building Coherence without adding either of the other phase 2 units:
Redirect the time allocated to phase 1 of Building Powerful Learners to give team members time to explore the Building Coherence units;
Change the monthly meeting cycle to requiring teams to create an interim report after around 3 months with a view to making final recommendations after around 6 months.
In order to maintain momentum among teachers who are not part of the Building Coherence teams, challenge them to continue working on the phase 1 Building Powerful Learners package – there are more than sufficient materials in units 4, 5, 6 & 7 to keep things ticking over. The upside is that everyone stays engaged, but the downside is that neither teachers nor students will be expanding their understanding of learning beyond the foundational 4 behaviours.
If you have chosen to run Building the Scope alongside Building Coherence, you will need to decide which of the routes through Building the Scope that you prefer – you would be wise to have a look at the parallel senior leader guide for Building the Scope for more on this.
Whatever your preference, it would make sense to align the reporting cycle implied in Building Coherence with the reporting or meeting cycle that supports Building the Scope.
We suggest that you work on a termly cycle which will enable you to integrate the scheduling of interim and final reports from Building Coherence with reports/meetings arising from Building the Scope.
If you have chosen to run Building Depth alongside Building Coherence, you will find that both packages work on a broadly similar termly time cycle.
You would be wise to have a look at the parallel senior leader guide for Building Depth for more on this as it will help you to align the reporting cycle implied in Building Coherence with the reporting cycle that supports Building Depth.
We suggest that you work on a termly cycle which will enable you to integrate the scheduling of interim and final reports from Building Coherence with reports/showcase events arising from Building Depth.
5. Structure – Who will lead it and what accountability may be needed?
Building Coherence implies a small team approach. Each team will need oversight / leadership.
Decide on the extent to which this requires senior leader involvement.
Whoever you choose to lead the teams, how will you ensure that they have sufficient time to familiarise themselves with Building Coherencebefore it is launched to staff?
Will there be a written job description for the team leaders?
How will you ensure that the team leaders have sufficient time to discharge their responsibilities?
6. Style – How are we going to support the programme?
How will leaders create the conditions where development teams are encouraged to take risks, to try things out, to fail in safety?
How will leaders demonstrate an ongoing interest in the enquiries that teams are undertaking?
Given that the monthly meeting cycle from phase 1 no longer enables leaders to keep a close eye on emerging practice, how will leaders keep close to the ideas being developed by the teams?
7. Strategy – How do we expect phase 2 of Building Powerful Learners to work? How will we create and agree a plan to pull all this together?
Will this be a top-down ‘initiative’, or will we involve all staff in the forward planning?
How will we keep the strategy ‘tight but loose’? – tight enough to create momentum and maintain sustained interest, yet sufficiently loose to flex and accommodate emerging needs as necessary.
How are you planning to maintain the interest of teachers who are not involved in the working party(s)?
The level of detail contained in your plan is important. It sends a message to staff and to Governors that you have considered a wide range of programme related issues and provides a route map for implementation.
The key differencesbetween this phase 2 unit, Building Depth, and phase 1 of the Building Powerful Learners programme.
Building Depth is a programme designed to encourage teachers to focus on developing their classroom culture and on how their students are responding to the changes they make.
There is no prescribed route through the online materials and teachers are encouraged to explore them in relation to their perceptions of their current classroom culture and how their students are responding.
Moreover, it is nearly impossible to focus on any one of these aspects of classroom culture to exclusion of the other three. Developments in any area of culture almost always trigger developments in others. Hence teachers will inevitably move between the 4 units as necessary.
The cycle of monthly meetings embedded in phase 1 is necessarily changed.
Keeping an eye on developments and sharing emerging good practice requires attention.
1. Shared Values – How does phase 2 of Building Powerful Learners fit with our school’s ethos?
Given that the school has decided to continue Building Powerful Learners, it is reasonable to assume that this sits well with the school’s ethos and aspirations.
Leaders would do well to consider, in advance, how they are going to mirror the intentions of the 4 culture units in how the programme is run. To align their leadership behaviours with the classroom culture teachers are developing, how will leaders:
devolve responsibility to teachers and coach their development?
talk about learning, about classroom culture, and structure feedback on their observations?
build challenge and reflection into their leadership of the programme?
spot and share emerging best practice and developments, celebrate successes?
2. Skills – What sort of skills/competencies would the programme enhance?
Building Depth is designed to impact:
on teachers’ classroom culture and teaching behaviours. The 4 units address the four aspects of classroom culture (Relating, Talking, Constructing and Celebrating), supporting teachers to build on the cultural changes made in phase 1 of the Building Powerful Learners programme;
on students’ learning behaviours. As the classroom culture develops, the materials encourage teachers to introduce 8 further learning behaviours beyond the 4 foundational behaviours from phase 1, enabling students to expand their understanding of learning and of themselves as learners.
Schools might do well to consider if all teachers are ready for this development. Teachers new to the school or those who have failed to engage fully with phase 1 may need additional support and encouragement. If so, might it be helpful to consider ‘buddying up’ teachers to ensure no teachers (and their classes) are left behind?
3. Staff – How could we accommodate the staff development approach suggested?
Teachers are encouraged to explore the 4 units in any order, in line with their perceptions of their existing classroom culture and how their students are responding. It follows that every teacher will carve their own way through these materials.
The cycle of monthly meetings embedded in phase 1 is necessarily changed. We suggest a system of termly written feedback so that programme leaders can maintain an overview, and to identify emerging good practice. The school might well consider swapping the directed time formerly devoted to monthly phase 1 meetings for termly ‘development showcases’ when teachers can share their classroom experiments with each other.
4. Systems – How do we need to adapt our existing working practices?
Teachers are encouraged to explore the 4 aspects of classroom culture in any order / combination, in line with their own assessments of their existing classroom culture.
The cycle of monthly meetings embedded in phase 1 cannot continue. Instead, we propose termly written feedback to senior leaders / coordinators, and schools should consider introducing staff development ‘events’ that enable the sharing of experiences and emerging developments.
5. Structure – Who will lead it and what accountability may be needed?
Building Depth will need to be overseen by someone, or maybe by a small group of people. Whether it is an individual or a small team may well be determined by the staff development approach that you decide.
Decide on the extent to which this requires senior leader involvement.
Whoever you choose to lead the programme, how will you ensure that they have sufficient time to familiarise themselves with Building Depthbefore it is launched to staff?
Will there be a written job description for the programme leader?
How will you ensure that the programme lead has sufficient time to discharge their responsibilities?
6. Style – How are we going to support the programme?
How will leaders create the conditions where teachers are encouraged to take risks, to try things out, to fail in safety?
How will leaders demonstrate an ongoing interest in the enquiries that teachers are undertaking?
Given that the monthly meeting cycle from phase 1 no longer enables leaders to keep a close eye on emerging practice, how will leaders keep close to developments?
7. Strategy – How do we expect phase 2 of Building Powerful Learners to work? How will we create and agree a plan to pull all this together?
Will this be a top-down ‘initiative’, or will we involve all staff in the forward planning?
How will we keep the strategy ‘tight but loose’? – tight enough to create momentum and maintain sustained interest, yet sufficiently loose to flex and accommodate emerging needs as necessary.
The level of detail contained in your plan is important. It sends a message to staff and to Governors that you have considered a wide range of programme related issues and provides a route map for implementation.
Building the Scope – Leadership questions for schools
The key differencesbetween this phase 2 unit, Building the Scope, and phase 1 of the Building Powerful Learners programme.
Building the Scope is a programme designed to encourage teachers to introduce 8 further learning behaviours beyond the 4 foundational behaviours introduced in phase 1, and to monitor the impact of these changes.
There are 2 possible routes through the online materials:
Route A: Teachers are encouraged to explore and introduce these additional learning behaviours in any order, in line with their curriculum priorities. The cycle of monthly meetings embedded in phase 1 is necessarily changed. Hence, keeping an eye on developments and sharing emerging good practice requires attention.
Route B: The school decides in advance on the order in which the units will be tackled, thereby maintaining the phase 1 meeting structure.
There is a ninth, complementary, information unit that elaborates on progression in the four foundational learning behaviours from phase 1.
Deciding between Route A and Route B – some thoughts
Although Building the Scope might appear to introduce 8 separate new learning behaviours, it is not that simple. While these 8 behaviours are distinct, they do not function independently of each other. For example, effective Planning relies on aspects of Reasoning; Collaboration flourishes when Listening is effective; Noticng frequently stimulates Reasoning and Imagining; Imagination is strengthened by Capitalising; Meta Learning is closely aligned to Making Links and underpins all of the other 7 etc. As a result, it is difficult to determine in advance a logical sequence for introducing these behaviours.
Pros and Cons:
Route A – enables teachers to access the units in any order that fits their students’ existing learning behaviours, the curriculum needs, the individual teacher’s priorities / interests. The downside is that because teachers determine their own route through the 8 units, team meetings become problematic and maintaining an overview less straightforward.
Route B – allows the school to structure the order in which teachers will access the units. The existing blended learning approach and the meeting cycle established in phase 1 can be maintained. The downside is that it will take a significant time, perhaps even a full year, before some of the units are given attention.
[However, a further, hybrid route is possible. A school could decide to go with Route B, but also encourage teachers to explore another unit of their own choosing at the same time. For example, the school could agree that over the next half term we will all be focussing on, say, Listening, and that every teacher is expected to explore one of the other 7 units of their own choosing.]
1. Shared Values – How does phase 2 of Building Powerful Learners fit with our school’s ethos?
Given that the school has decided to continue Building Powerful Learners, it is reasonable to assume that this sits well with the school’s ethos and aspirations.
How the school selects which Route to follow is important. Will this be a top-down decision, a decision made after consultation, or maybe a decision made by the entire staff?
Give some thought to how teachers can be informed and consulted as these early decisions are taken. Time taken now delays the start time, but may be worthwhile in terms of gaining buy-in.
These are all choices for the school to make – you know what will work best in your own particular circumstances.
2. Skills – What sort of skills/competencies would the programme enhance?
Building the Scope is designed to impact:
on teachers’ teaching behaviours. The materials are organised around the four aspects of classroom culture (Relating, Talking, Constructing and Celebrating), supporting teachers to build on the cultural changes made in phase 1 of the Building Powerful Learners programme;
on students’ learning behaviours. The materials introduce 8 further learning behaviours beyond the 4 foundational behaviours from phase 1, enabling students to expand their understanding of learning and of themselves as learners.
Schools might do well to consider if all teachers are ready for this development. Teachers new to the school or those who have failed to engage fully with phase 1 may need additional support and encouragement. If so, might it be helpful to consider ‘buddying up’ teachers to ensure no teachers (and their classes) are left behind?
3. Staff – How could we accommodate the staff development approach suggested?
This depends on the ‘route’ the school decides to adopt.
Route A: Teachers are encouraged to explore and introduce the 8 additional learning behaviours in any order, in line with their curriculum priorities. The cycle of monthly meetings embedded in phase 1 is necessarily changed. We suggest a system of termly feedback so that programme leaders can maintain an overview, and to identify emerging good practice. The school might well consider swapping the directed time formerly devoted to monthly phase 1 meetings for termly ‘development showcases’ when teachers can share their classroom experiments with each other.
Route B: The school decides in advance on the order in which the units will be tackled, thereby maintaining the phase 1 meeting structure. Teachers feed in the 8 new learning behaviours at the same time, and we suggest a half termly meeting to review progress. This half termly cycle means that all 8 behaviours will be introduced over a 4 term period. Schools will need to consider how the order of introduction will be determined and who will do this – decide on all 8 at the outset? determine the first one or two, then subsequently agree the next ones etc?
4. Systems – How do we need to adapt our existing working practices?
This also depends on the ‘route’ the school decides to adopt.
Route A: Teachers are encouraged to explore and introduce these additional learning behaviours in any order, in line with their curriculum priorities. The cycle of monthly meetings embedded in phase 1 cannot continue. Instead, schools should consider introducing staff development ‘events’ that enable the sharing of experiences and emerging developments.
Route B: The school decides in advance on the order in which the units will be tackled, thereby maintaining the phase 1 meeting structure, although we would suggest moving from monthly to half termly meetings.
5. Structure – Who will lead it and what accountability may be needed?
Building the Scope will need to be overseen by someone, or maybe by a small group of people. Whether it is an individual or a small team may well be determined by the staff development approach that you decide.
Decide on the extent to which this requires senior leader involvement.
Whoever you choose to lead the programme, how will you ensure that they have sufficient time to familiarise themselves with Building the Scopebefore it is launched to staff?
Will there be a written job description for the programme leader?
How will you ensure that the programme lead has sufficient time to discharge their responsibilities?
6. Style – How are we going to support the programme?
How will leaders create the conditions where teachers are encouraged to take risks, to try things out, to fail in safety?
How will leaders demonstrate an ongoing interest in the enquiries that teachers are undertaking?
If you are going to encourage teachers to tackle the units in any order, the monthly meeting cycle from phase 1 no longer enables leaders to keep a close eye on emerging practice. How will leaders plan to keep close to developments in this case?
7. Strategy – How do we expect phase 2 of Building Powerful Learners to work? How will we create and agree a plan to pull all this together?
Ensure that the decision around whether teachers are free to explore the units in any order, or whether there will be a predetermined order, is included in the plan.
Will this be a top-down ‘initiative’, or will we involve all staff in the forward planning?
How will we keep the strategy ‘tight but loose’? – tight enough to create momentum and maintain sustained interest, yet sufficiently loose to flex and accommodate emerging needs as necessary.
The level of detail contained in your plan is important. It sends a message to staff and to Governors that you have considered a wide range of programme related issues and provides a route map for implementation.
However well prepared learners are, they have to expect the unexpected. They have to have the readiness to revise as they go along. Good learners are able to change their plans and think on their feet. They are able to be flexible. To be effective at revising, learners need to monitor how things are going and periodically review where they have got to. Monitoring is the art of looking over your own shoulder as you’re working away at a problem, asking yourself how it’s going. Getting better at monitoring (‘reflection in action’) involves cultivating the little voice of self-awareness that keeps the strategic goals in mind, and is ready to change tack if it seems appropriate. Reviewing (‘reflection on action’) means stopping every so often to take stock of progress, and to ensure that any emerging product—an artwork, an essay, a draft business plan—is on track. Reviewing requires the ability to look at your own work with the critical eye of an editor, and not be afraid of the possibility that some corrections may be needed. Extract from Building Learning Power. Guy Claxton 2002
1b) What does being a good Reviser involve?
A well formed Revising habit involves being ready, willing, and able to:
Self-monitor how things are going, keeping an eye on the goal
Expect the unexpected, having a readiness to re-shape, re-order, re-form plans to take account of new circumstances.
Remain alive to new, unforeseen opportunities and ideas
Look at what you are doing with a critical eye
Strive to be the best you can be
Make sure things are on track and make improvements along the way.
So at a less abstract level, students need to learn how to deal with change, emotionally and practically. With an inflexible frame of mind they are unlikely to recognise the need to change their ideas or the way they do something. They also need to know what ‘good’ looks like; how to keep an eye on how things are going and the willingness to evaluate how things went against external standards. When looked at from these diverse angles, growing revising moves well beyond encouraging a student to ‘have another go’.
The Revising grid below takes account of the constituent parts of building the habit of Revising
Our progression grid for Revising has 6 components:
Revising is about the way we work on something to improve it. Whether it be icing a cake, solving a tricky maths problem or creating a well-crafted essay, all require effort, retries and determination to satisfy ourselves that the result pleases us. How we tackle such a job isn’t just a case of monitoring as we go along or reviewing the result: it will be influenced by other qualities. Our attitude to change, whether we have a sense of quality and what sort of validation we need. The grid intertwines these important contributors to our growth in the habit of Revising.
The learning guru Royce Sadler put it like this: “Students need to be able to judge the quality of what they are producing and be able to regulate what they are doing during the doing itself”.
Take a closer look at what each column of the grid is about
1) Attitude to change
How we relate to the change process
For many of us, doing things differently is scary and only for the bold and confident. But if we want students to enjoy achieving their best learning outcomes, we need to scaffold that process by building confidence – helping students move beyond their comfort zone and becoming more flexible as a learner. In the early phases students adapt what they are doing because they are being told and/or supported to do so. But this support pays off at the ‘value’ phase (green) when students feel positive about their efforts and realise learning is all about rethinking and adjusting and redoing, rather than getting it right first time. By the ‘organises’ phase (yellow), students are ready, willing, and able to move beyond making relatively small changes to making wholesale changes or starting again on a different tack.
2) Sense of standards
How we relate to standards of excellence, quality, and correctness
The next contributory factor in revising what we are doing has to do with how we view quality; whether we have a sense of standards; our view of what’s good, bad or indifferent. In the early phases students accept what they are told about by teachers; what something needs to look like, be like, feel like. Schools are full of them – objectives, criteria, steps to success, outcomes – and constantly trying to achieve them can be dispiriting. But with support and encouragement students are able to begin to think for themselves what makes something good and determine their own standards.
3) Self-talk
The voice of self-awareness
Self-talk is what we say to ourselves as we learn. The statements capture what someone in each phase of the grid would be thinking. Students may use some of these phrases when talking with you, or in writing from time to time, but mostly self-talk goes on inside their heads. We have shown a small flavour of self-talk thoughts that teachers can encourage students to imitate. Some relate to standards, others to self-monitoring, or flexibility. All such self-talk is important in building a revising habit.
4) Reflection IN action
Checking of how things are going
This column is about how we monitor what’s happening as we go along; keeping a weather eye on how things are going. Students need help to do this well. They need to know what they are looking for, what they are tracking. Should they look for good things or bad, for feelings, for whether they understand…? It’s a minefield. The early phases shown here relate to monitoring what you are doing against known criteria, and checking the process of doing something itself. Students need these props in the early phases. It’s only in the ‘valuing’ ( green) phase that they become skilled at editing as they go along, having had practice with checklists and criteria in earlier phases.
Look particularly at the difference between ‘value’ and ‘organised’. In the ‘value’ phase the amends, revisions, and re-tries are being done with the original aim/goal/ objective in mind. In the ‘organised’ phase students are prepared to ditch the original plan, ask hard questions, change the rules and change direction. It’s a big and important shift in becoming an independent learner.
5) Reflection ON action
The inclination to reflect on what we have achieved
This is the essence of learning from experience although sadly it is not a common inclination. The key here is not simply reflecting on what happened and whether we could have improved, but whether we take heed of such lessons and behave differently next time. This is not a natural skill and will need careful structuring and nurturing. Notice that the early phases are about what happened and are heavily scaffolded. By green students are asking why they did it that way, and by yellow they are challenging those familiar ways of working and rethinking the how in order to achieve better outcomes. It’s a breakout moment.
6) Recognising external validation
How we relate to external validation.
The last constituent of revising has to do with how we need and use external validation – the need for a legitimate authority source to confirm that what we are doing is right. When we are chasing facts we need to be sure they are correct. When we are using standards we need to be sure they are sound. In the early phases this authority normally comes from parents and teachers. As students move through the phases there is a move to seeking out experts, dictionaries and original sources. (The internet invariably plays a role here but while it might be a great place to start it’s a terrible place to finish! It needs to be used with discernment.) Sources of legitimate authority plays into how we revise and improve our learning.
What do you think?
What have you learned about revising from these descriptions?
What have you had confirmed?
What surprised you?
How have your views changed?
Make a note of…
Any ideas for practical classroom experiments that these descriptions have triggered
Pair work, group work or teamwork are frequent features of classroom practice across all age ranges. But what are the essential features of this way of learning? How can students improve their collaborative behaviours in order to achieve better results?
In this unit, we explore the subtleties of collaboration and the skills that make up teamwork. We consider a broad order in which such skills might be explained, orchestrated, commented on and celebrated by teachers in classrooms to ensure the progressive development of students as collaborative learners.
There are many ways to define collaboration. In a learning context we have come to understand collaboration as being able to manage yourself effectively in the give and take of a collaborative venture, having a range of interpersonal skills that enable you to work and learn with and from others, being willing and able to contribute constructively and with sensitivity, and adding to and drawing strength from the team itself.
At its least sophisticated, it is little more than being cooperative. At its most sophisticated and complex levels it goes beyond learning ‘in a team’ and becomes learning ‘as a team’. It is an invaluable life skill.
In short…
Collaboration: Having both the skills and the inclination to contribute positively to group work in order to learn productively with and from others.
What do you think?
Are you aware of students whose lack of social skills limits their ability to cooperate, let alone collaborate, with others?
Are you aware of students who regard group work as an opportunity to allow others do all the work? (the social loafers,)
Are you aware of students who are keen to do all of the work themselves to the exclusion of others? (the job hogs)
Make a note of…
Students who do not trust others to contribute effectively
Students who are reluctant to contribute to group work
What does a well-formed habit look like?
Effective collaborators are adept at learning with and from others. They help to: shape the ideas of the team; decide what needs to be done; contribute to getting the job done; keep an eye on how things are going; improve team performance through reflection.
At-a-glance Collaboration card [extract] – Click image to view full screen
Find out more about Collaboration:
A well-formed collaboration habit includes being ready willing and able to:
Work effectively with others towards agreed, common goals, acting flexibly in response to circumstances.
Adopt different roles and responsibilities in pursuit of agreed goals and the well-being of the team.
Hold and express opinions coherently, compromising and adapting when appropriate.
Seek to understand what others are saying; sharing, challenging, supporting and building on ideas.
What do you think?
Do your students become increasingly like this as they move through your school?
What makes you say that?
What do you currently do in school that encourages students to develop their social learning skills?
What might you be doing to inhibit collaborative learning?
Make a note of…
Things you do to support collaboration
Things you do that might hinder collaboration
1b) How Collaboration might build when we nurture it.
Being collaborative isn’t something that switches on on good days and off on bad days. Being a good collaborator grows and builds when it’s nurtured and supported. Furthermore, being collaborative involves gaining control of a range of linked skills and emotions. Take a look at how progression in Collaboration might grow across six contributory aspects.
Cast your eye over the ‘big picture’ of growing Collaboration below. Then move on to finding out what the columns (1.3) and the rows (1.4) are all about.
Collaboration involves knowing how to learn with others, as part of a team, in situations where no one person knows all parts of the puzzle. This complicated yet essential learning habit develops in several different ways. First of all it hinges on social interaction; how well we get on together, whether we are patient with others and respect their views. Then how we are able to bounce off others to build ideas; making the most of several brains rather than one. Next, how we learn to be part of a team and to perform different roles when needed. Fourthly, how we talk to ourselves about learning with others, where our real understanding of the process is revealed. Fifthly, how we contribute to the process of actually getting things done. Not just being there but doing something helpful. And lastly how we contribute to improving team performance by evaluating not just outcomes but the process of getting there.
Take a closer look at what each column of the grid is about
1) Social interaction
How we interact socially in learning and working with others. The way in which we learn the social conventions of behaving in a group; taking turns to speak and contribute, listening to understand others; being patient with others and not hogging the limelight; stepping outside our own concerns and building the confidence of others and respecting their views; being able to manage and overcome the inevitable controversy as teams work creatively together; and thus being able to become a valuable sociable member of any team.
2) Building ideas
Just being good mates in a team doesn’t lead to success. Teams have to understand how to build ideas together; to draw on the ideas of others, to be able to graciously set aside ideas that wouldn’t work, to spark off others to ensure new and better ideas get an airing. And somehow, in all this ‘togetherness’ people are able to retain their independent judgement and avoid being drawn into group think. Teams share and build ideas together; growing and improving possible solutions in order to reach their goals
3) Working as a team
Working as a team is rather different to working in a team. It’s all about ‘teamness’ or ‘togetherness’. In order to work as a team people need to understand team roles, to find out what role they are particularly good at, to take on a range of roles when needed and eventually be willing to play any role in a team to ensure the goal is reached. Being able to work as a team is influenced by how our self-perception and confidence grow, how we learn to trust, how we recognise the need for each other.
4) Self talk
The voice of self awareness
Self-talk is what we say to ourselves as we learn. The statements capture what someone in each phase of the grid might be thinking. Students may use some of these phrases when talking with you, or in writing from time to time, but mostly self-talk goes on inside their heads. We have shown a small flavour of self-talk thoughts that teachers can encourage students to imitate. Some relate to standards, others to self-monitoring, or flexibility. All such self-talk is important in building a collaborating habit.
5) Getting the job done
How teams achieve their goals by using the well-known learning process of Plan Do Review. Good teams have people who know that the first job is to be clear about what the task is really about. They are skilled in considering/creating/agreeing realistic goals to be achieved and which everyone has bought in to. Then the team have to plan how they will achieve the goal, how they will monitor their progress and methodology and how they will make sure the job is well done.
6) Reviewing action
This aspect is about how teams learn how to improve. It’s the aspect of teamwork that is frequently left out altogether or given short shrift. But it’s the aspect of teamwork that helps teams build themselves into better teams. It includes evaluating how they performed as individuals in contributing to the work of the team and how/whether the team process worked to achieve the team goal. Importantly such reflection leads to serious re-planning of their ways of working. It’s meta learning at a team level. Good teams will be looking for what has become known as marginal gains, those little things can we do better/improve that will impact on the overall performance.
What do you think?
Do these contributory features of collaboration make sense to you?
Make a note of…
Things that you think might be missing from this big picture of collaboration
What do you think?
Do you think there’s an order in which these skills develop? Would it be the same order for every student?
Do you think these behaviours develop ‘naturally’ as students mature?
Do we need to intervene in order to support this positive development?
Make a note of…
Any behaviours you think develop naturally
Any behaviours you think may be missing from this picture of collaboration
Wonder is the beginning of wisdom.’ So stated Socrates, considered by some to be ‘the father of questioning’. Even through nearly 2,500 years of human development and societal ‘progression’, those words still hold true. In growing the habit of questioning, it is important to acknowledge that questioning itself is rooted in curiosity, that great driver of engagement, of seeking, of asking, and asking again.
‘Good learners like to wonder about things. For them, it often really is a wonder-ful world. The phrases ‘How come?’ and ‘What if?’ are never far from their lips.
They value getting below the surface of things, and are less likely to accept uncritically what they are told. They like to come to their own conclusions. They are more willing to reveal their questions and uncertainties if they think it will help them learn.
Questioning can be as much non-verbal as it is verbal. Playing around with materials or ideas just to see what happens is a powerful way of asking questions. It is what artists and inventors spend a lot of their time doing. The inclination to ask questions flourishes when you are around people who are also asking questions, and who encourage and appreciate your questions too’.
Extract from Building Learning Power. Guy Claxton 2002
What do you think? How well do you know your students as questioners?
Think of the students that you teach:
Who amongst them is irrepressibly curious?
Which of your students are reticent in asking questions?
Why this might be?
Have you ever considered the quality of the questions that your students ask?
Make a note of...
How ‘good’ are they at asking questions?
Do they ask ‘good’ questions?
Your definition of a ‘good’ question?
A well-formed habit
Let’s dig a little deeper into questioning. Effective questioners are motivated and not afraid to ask questions about the past, the present and to explore the future. They have an extensive range of question types and techniques at their disposal, which they use with discernment and sensitivity to occasion.
A well-formed questioning habit involves being ready, willing and able to;
Not take things at face value
Be less likely to accept answers uncritically
Ask questions of oneself as well as of others
Get under the surface of things
Be comfortable with uncertainty and ambiguity
Not be afraid of the ‘don’t know’ state of mind
Be playful, yet systematic and analytical
Be socially aware of the impact that questions may have on others
Challenge others’ thinking
Understand and use different types of question for different purposes
Recognise that revealing their own uncertainties helps them learn.
What do you think?
Do you detect that your students are becoming increasingly curious as they move through your school?
How do you know? What makes you say that?
What do you currently do in school to develop an insatiable appetite to find out more?
Make a note of…
What you might be doing at the moment that inhibits curiosity?
1.2 How Questioning might build when we nurture it.
Being good at questioning isn’t something that switches on on good days and off on bad days but like all learning behaviours it is sensitive to the learning culture. Questioning grows and builds when it’s nurtured and supported where students also learn to gain control of a range of linked skills and emotions.
Cast your eye over the ‘big picture’ of growing Questioning below. Then move on to finding out what the columns (1.3) and the rows (1.4) are all about.
We tend to think of questioning as a common everyday skill that we all use and indeed it is. But questioning is rooted in curiosity and is therefore big driver of learning. But as with any learning behaviour it can wither and atrophy if left unattended. If children are made to feel stupid for asking questions, or told that questioning is cheeky, or that questioning is time wasting they are more than likely to give it up…it has little value to them. So this grid draws together all the aspects of learning that might contribute to questioning becoming a vital, well-honed skill for navigating life. It deals with the details of questioning skill but also touches on search skills and indeed how we ask questions of others such that it’s accepted and generously answered.
Take a closer look at what each column of the grid is about
1) Attentiveness
The first column is about how we actually attend to being curious; what is it that piques our curiosity and how we keep it going. In the early phases this might involve looking carefully for the issues or details that our questions raise, using this information to go deeper, becoming fully involved/absorbed in a quest to uncover possibilities or answers. The more we ask, the more we find out, and the more curious we become to find out yet more. In the later phases we might become more picky about the information we are uncovering/seeking, making sure it is valid for our purposes. We become fascinated by both the big picture as well as the small details of an enquiry and seeking new experiences and information becomes a way of life.
2) Search skills
Being curious, finding things out, seeking information requires the ability to search effectively. This may start with asking questions of others or using a book index and library skills or reading a map. But these days searching rapidly embraces the internet and a whole new range of focused questioning skills come into play. Finding information may have become rapid and simple but discerning relevant, reliable and robust information calls for yet more new skills. How we seek, question and capitalise on a variety of resources, from books, to the internet, to physical tools is a vital aspect of any ‘finding out’ quest.
3) Self-talk
The voice of self-awareness
Self-talk is what we say to ourselves as we learn. The statements capture what someone in each phase of the grid might be thinking. Students may use some of these phrases when talking with you, or in writing from time to time, but mostly self-talk goes on inside their heads. We have shown a small flavour of self-talk thoughts that teachers can encourage students to imitate. How might we talk to ourselves in shaping our questioning behaviour. How does this talk move from the ‘need for help’, to enjoying the challenge of finding out, to taking a questioning approach to everything we do.
4) Questioning to focus on depth and detail (convergent)
In column four we get serious about types of questions and in this case the type of questions that are designed to seek more detail and depth. Here the questioning is more focused moving from simply knowing about closed questions and using them to find things out; to developing questions that will sift and filter information; to being about to use question frameworks purposefully; to being able to construct incisive and generative questions to probe the essence of something. In brief, how adept are we at posing questions that will uncover specific details and converge on and getting to the heart of the matter.
5) Questioning to open possibilities (divergent)
In column five we consider a different sort of questioning; that of opening possibilities (divergent). Here our questioning approach gets braver as we move from opening possibilities when prompted, probing for more expansive information, to asking ‘what if’ questions. This expansive questioning leads to exploring possibilities, thinking about things differently, stimulating new ideas, daring to be different, exploring hunches, being creative. It’s a line of questioning that leads us into the unknown.
6) The art of asking questions of others
The last column is about the aspect of asking questions of others. Questioning others, even through the lens of being curious, is a skilful business. It’s easy to upset people without realising it. It might be by using the wrong tone, or putting the emphasis in the wrong place. Building rapport with people is a really important aspect of being able to ask questions, especially when, for one reason or another, the questions have to be tough. In the later phases of developing this skill we learn how to prepare a set of questions that will make an argument/case, or uncover a problem, or develop a story (much as you may do in preparing a set of questions for guiding a lesson). Eventually we become skilled enough to know just what sort of question to ask, in the right way, in the appropriate setting. Thus we have become sensitive to the potential impact of posing questions as much as to the quality of the question itself.
What do you think?
In what order do you think these skills might develop?
Will it be the same for all students?
Do you think these skills will develop ‘naturally’ as children mature?
Do we need to intervene in some way order to support the development?
Do you think that there are any missing skills? Where would you add them?
“Attention can be broken when learning gets blocked, but good learners have learnt the knack of maintaining or quickly re-establishing their concentration when they get stuck or frustrated. The quality of stickability or perseverance is essential if you are going to get to the bottom of something that doesn’t turn out as quickly or easily as you had thought, or hoped.
If you get upset and start to think there is something wrong with you as soon as you get stuck, you are not going to be able to maintain engagement.
Instead, all your energy will go into trying to avoid the uncomfortable feeling, and this may mean drifting off into a daydream, creating a distraction, or blaming somebody else. A great deal of classroom misbehaviour starts this way. If students were better equipped to cope emotionally with the inevitable difficulty of learning, they would mess about less. There is a range of things that teachers can do to strengthen students’ stickability.
Building Learning Power, Guy Claxton
Perseverance is often undermined by two common and erroneous beliefs. The first is that learning ought to be easy. If learners think that they will either understand something straight away, or not at all, then there is simply no point in persisting and struggling. The second is that bright people pick things up easily, so if you have to try it means you’re not very bright. Clearly the idea that effort must be symptomatic of a lack of ability makes persevering an unpleasant experience. Good learners develop perseverance when their parents and teachers avoid conveying these messages, even unwittingly.”
Extract from Building Learning Power, by Guy Claxton
In a nutshell…
Perseverance is about;
Keeping going in the face of difficulties; channelling the energy of frustration productively; knowing what a slow and uncertain process learning often is.
A mature learner understands that real learning requires effort and persistence, relishes opportunities to struggle with challenge, and believes that with effort they can become a more effective learner.
What do you think?
Are you aware of students who prefer to succeed at ‘easy’ work ?
Are you aware of students who are over-anxious to get things ‘right’?
Does your reward system reward attainment over ‘having a go’?
Are you aware of parents who view success mainly in terms of achievement and progress?
Make a note of…
Students who remain optimistic when faced with challenge
Students who remain optimistic after making a mistake
1.2 How perseverance might build when we nurture it
Being perseverant isn’t something that switches on on good days and off on bad days. Perseverance grows and builds when it’s nurtured and supported. Furthermore, being perseverant involves gaining control of a range of linked skills and emotions. Take a look at how progression in Perseverance might grow across five components.
Cast your eye over the ‘big picture’ of growing Perseverance below. Then move on to finding out what the columns and the rows are all about.
Perseverance is about the way we stick at things even when they are difficult. It’s one of the most useful but neglected learning behaviours. What makes us able to persevere more and more usefully? We think several things come into play here. How you are willing and able to deal with being stuck, how you are able to manage distractions and manage the learning environment, how you relate to a challenge and whether you are influenced by goals whether they be your own or imposed by others. All these things contribute to being able to persevere. And lastly there’s your own little voice of self-awareness: what you say to yourself and how this influences your beliefs and values.
Take a closer look at what each column of the grid is about
1) Dealing with ‘stuckness’
How we deal with being stuck
Column 1 is all about way how we react when we get stuck; the strategies we have for overcoming it; being brave about not knowing something; how we cope with making mistakes; how we benefit from feedback about mistakes or being stuck; how we come to love mistakes, become curious about them and learn from them. There’s a long and winding road buried in the statements in this column and the role of the teacher is to ensure students make a significant start on this journey.
2) Managing the learning environment
How adept we are at maintaining focus
Column 2 is about how we manage our learning environment; the extent to which we can manage our own learning climate, ignore or manage distractions, regain focus if lost. Since much of students’ learning takes place in a classroom, they need to be able to manage and take advantage of that environment. They learn to understand just what distracts them from learning and why distractions can be both a help and a hindrance. How they need to learn to overcome the hard slog of practice and use their environment to help. How the learning environment can include all sorts of negativity from others and how they might overcome these disruptive emotions. The learning environment itself has many facets that can trip up and stall learning.
3) Self-talk
The voice of self awareness
Self-talk is what we say to ourselves as we learn. The statements capture what someone in each phase of the grid might be thinking. Students may use some of these phrases when talking with you, or in writing from time to time, but mostly self-talk goes on inside their heads. We have shown a small flavour of self-talk thoughts that teachers can encourage students to imitate. Some relate to how emotionally brave they are, others to the strategies they have at their disposal. All such self-talk is important in building a persevering habit.
4) Dealing with challenge
The relationship we have with challenge
Column 4 is about how we relate to challenge: are we more excited by the prospect of triumphing over challenge, or more afraid of failing when faced with difficulty? Challenge needs to be included here with Perseverance because there is little need to persevere with easy, familiar activities. Students need to be challenged even for us to discover how or whether or not they persevere at all. So the growth of ways to cope with challenge helps to cement Perseverance too. Here they learn to enjoy a challenge and recognise the satisfaction of triumphing over difficulty. The phases include practical ideas like recognising risks, sorting out what the challenge is fundamentally about, and using tools to plan and avoid obstacles.
5) Orientation to goals
How our orientation to goals influences our determination to persevere.
Column 5 concerns goals; having goals can have an impact on our perseverance. Let’s face it, if you haven’t got a goal, or at least an interest in something, you are not likely to stick at it and channel your emotion positively to get it done. In the beginning students have little sense of goals or purpose but this can be turned into being able to imagine what something might look like. Later students can be helped to understand what a ‘do-able’ goal is and how to turn goals set by the teacher into a goal that they want to achieve – to make it their goal. A wanted goal is something you put effort into. Later phases in this development include being able to put your goals into a wider context, to realise that being able to do X or Y isn’t just about the here and now but has wider implications for life. This will certainly come into play when choosing options, for example. Do students go for something they like, enjoy and find easy or do they chose some options on the basis of their relevance to their future career? It’s a hard and grown up sort of decision to make. This orientation to goals all turns on how we design our own goals, blend these with the goals of others, and then pursue them with tenacity and independence.
What do you think?
What have you learned about Perseverance from these descriptions?
What have you had confirmed?
What surprised you?
How have your views changed?
Make a note of…
Any ideas for practical classroom experiments that these descriptions have triggered.
What do we mean by Noticing? Read more about Noticing, explore what a good noticer does, and reflect on the noticing behaviours of your students.
Creating a classroom culture for Noticing. Take time to think about the aspects of classroom culture that encourage the Noticing habit.
How does Noticing grow? Explore a progression chart for Noticing, and consider how your students’ Noticing skills are growing.
Some teaching ideas to encourage a Noticing frame of mind.Explore some teaching ideas to introduce and extend the language of Noticing to students, and some ideas for starting a lesson with a Noticing activity.
Develop your learning language for Noticing. Explore how you might talk in ways that stimulate your students’ Noticing behaviours.
1) What do we mean by Noticing?
Learning often relies on being able to pay attention to what you are interested in: not necessarily thinking about it, just really noticing how it looks, what it is made of, or how it behaves. Many professionals, from poets to scientists to business managers, rely on this quality of attentive noticing: being able to identify the significant detail, or to let an underlying pattern of connections emerge into their minds. Sometimes you have to be patient before the detail or the pattern will reveal itself to you, like looking for sea creatures in a rock pool.
This is a skill that can be strengthened with practice. We often pick up this skill from people around us. Babies very soon learn to work out what their mother is focusing on, and to ‘share joint attention’ with her. It helps to be around people who are demonstrating this ability to watch carefully and turn their observations into accurate descriptions. Getting a really clear sense of what, before starting to think about how or why, is very useful.
What does being a good Noticer involve?
If you have a well formed Noticing habit you will be ready, willing, and able to:
be attentive to details and subtleties in order to understand things;
seek underlying patterns patiently, understanding that connections take time to emerge;
actively use all your senses to gather information to build understanding of the world around;
gain a clear sense of the ‘what’ of something before considering the ‘why’ and ‘how’;
recognise that learning is often complex and difficult and takes time and effort to accomplish.
Spot the Noticers in your classes
Just to get you tuned in – have a quick think about ‘noticers you may know’. Make a note of students you know who display these characteristics.
Becoming a teacher who develops students’ learning power means developing a keen awareness of the subtleties of your students’ learning behaviours.
2) Creating a classroom culture for Noticing
Cultivating learning habits ultimately involves:
Providing rich and varied occasions for exercising learning habits
Infusing learning habits into lessons to enhance content understanding
Recognising and celebrating the use and growth of learning habits
Expecting students to take ownership of and responsibility for their own learning habits
Exploring the development of learning habits with students over time
As a teacher you are an influential character builder and so need to be mindful of how you help students form, replace, re-form and strengthen their learning habits.
But don’t worry you are not expected to be there yet. It takes most teachers between 2 and 3 years to become really fluent with this way of teaching. So, go easy on yourself. Feel determined because small steps often prove to be big levers for change. Have a think about what you might do…
What to stop and start
Here are a few ideas you might want to try. Take it steady, this way of teaching can be a big but exciting shift so it’s worth doing it slowly and thoughtfully.
Look first at the Stop/avoid ideas. Some of these are far from trivial but it’s best to try to remove them before starting on the Start/do more of, Start slowly and Experiment with ideas.
3) How does Noticing grow?
Get a handle on progression
As with all learning behaviours, Noticing is not a case of ‘either you do, or you don’t’. Few learners are oblivious to detail in every circumstance, and equally few are hugely attentive to detail in every situation. Most lie somewhere between these 2 extremes.
The chart below offers a glimpse of how Noticing may grow. Column 1 identifies 6 phases of development, column 2 describes how the skills and behaviours may grow over time, column 3 shows the self-talk; what students may quietly say/explain to themselves at each phase of development.
Which colour best describes the majority of your students’ current noticing behaviours? What do they do? What can they not yet do?
4) Some teaching ideas to encourage a Noticing frame of mind.
In the early stages of building your students’ learning power your role is to; make them aware of the behaviour; talk about it (what, how, why, when, if); celebrate its use; give opportunities to practise it, both in lessons and elsewhere; reflect on it to improve it. This staged start is reflected below…
Firstly… make students aware of the use and importance of noticing…when, where, why, how they are or could be doing it
Then… explore noticing a little more through the language of noticing
Try… using noticing as a lesson starter to tune students into using it
4a. Make students aware of Noticing
How you make your students aware of the words that describe the behaviour and why it is important to use it.
Younger students
Give noticing a high profile
For example, create a Noticing table with magnifying glasses and interesting objects …. shells, coins, dead insects, flowers …… and lots more! Spend a few minutes each day for children to report on what new things they have noticed about the objects.
Older students
Give time to think … and share ideas
What do experts notice? – A painter will notice subtle differences in colour, shape or texture. What about other experts … gardeners, doctors, musicians, drivers, sports-people, actors, cooks, mechanics?
Choose a couple of experts from the list or from your own ideas and think about what they notice and how and why they might have learned this.
Younger students
Introduce games that require noticing behaviours
For example… use the familiar Kim’s game where students have to look carefully for a given time and then try to remember the group of articles. This simple format has numerous variations…what’s missing, what’s been added, what’s the odd one out?
Older students
Introduce intriguing pictures to provoke noticing
4b. Explore the language of Noticing
How you might extend the language and understanding of this behaviour
Younger students
Discuss noticing others
Invite some students to be Learning Detectives. Task them with watching how children play team games. Their job is to watch out for how to do the activity best, what works and what doesn’t work. You will need to model this regularly, it won’t matter whether they are throwing bean bags into buckets, jumping through hoops or balancing on bars, the noticing and coaching will make a real difference to their learning. If possible, capture examples of effective learning on camera / video. Build the outcomes into a display that helps all students to become more aware of the effective habits of others.
Older students
Extend the language of noticing
Collect words that tell you how people learn to notice detail.
Relate noticing to well known sayings
What do we mean when we say …
Eagle-eyed.
I’ve gone through it with a fine-tooth comb.
Keep your eyes peeled
4c. Use Noticing as a lesson starter
Use a quick starter to key your students into the learning behaviour you want to concentrate on in the lesson. i.e. here you are starting up their noticing behaviour.
Younger students
Intriguing Images
For example, have an intriguing picture ready on the whiteboard before the lesson starts. Students look forward to looking carefully at pictures where all is not as it seems.
Older students
Finding shapes
Offer students a random set of dots (or picture of the night sky). Invite them to seek items such as:
A letter of the alphabet
An animal
A regular shape
A face
Or something linked to the content of the forthcoming lesson
5. Develop your learning language for Noticing
Here is a range of things you could say to nudge Noticing. When you use this kind of language you are talking as a learning coach; encouraging students to think for themselves. Using such statements encourages your students to:
imitate you
start to think in this way
become conscious of these phrases and their meaning.
Gradually you will hear some of the statements pop up in students’ self-talk….in speech or even in writing from time to time, but mostly this will go on inside their heads. As your work on noticing gathers pace, see if you can detect students who talk, or think, in these ways.
Learning-talk nudges that encourage Noticing
Teacher talk – as a learning coach
Here are 10 ideas to ensure your students do the thinking for themselves
What do you notice about the way… is doing that?
Just watch/listen for a while. What’s happening? Wait a little longer. What’s really going on?
Be patient for a bit longer. Do you notice any patterns here?
Great! Your patience is rewarded. You noticed some (unusual) patterns/really useful details there.
Do you notice any differences between xxx and yyy?
Is there more to this than you are seeing now?
Had you noticed that before?
What seems to be going on here?
Do you notice [something different/unusual] about this?
What do we mean by Reasoning? Read more about reasoning, explore what a good reasoner does, and reflect on the reasoning behaviours of your students.
Creating a classroom culture for Reasoning. Take time to think about the aspects of classroom culture that encourage the reasoning habit.
How does Reasoning grow? Explore a progression chart for Reasoning, and consider how your students’ Reasoning skills are growing.
Some teaching ideas to encourage a Reasoning frame of mind.Explore some teaching ideas to introduce and extend the language of Reasoning to students, and some ideas for starting a lesson with a Reasoning activity.
Develop your learning language for Reasoning. Explore how you might talk in ways that stimulate your students’ Reasoning behaviours.
1) What do we mean by Reasoning?
Reasoning—the kind of logical, analytical, explicit disciplined thinking that schools often focus on. There is a lot of interest at the moment in ways of teaching thinking, and in building students’ Learning Power, such ‘Show your working’kinds of thinking are a very important part of the good learner’s toolkit, although not the be-all and end-all of learning. In fact, research suggests that schools have not been very successful at developing students’ ability to think logically in real life.
It turns out to be quite difficult to free any kind of thinking or learning skill from its ties to the particular setting and subject matter in which it was originally practised.
Nevertheless, being able to construct logical arguments or make practical use of Venn diagrams, for example, is very useful, and good learners need practice at using such tools in the context of their real-life concerns.
What does being a good Reasoner involve?
A well formed Reasoning habit involves being ready, willing, and able to:
Resist jumping to conclusions;
Seek justifiable evidence to shape sound, well-honed arguments;
Scrutinise your assumptions;
Seek evidence and counter evidence, look for false steps and carefully draw conclusions;
Remain suspicious, doubting and self-doubting in order to avoid unwarranted certainty;
Convey your logical thinking clearly, through dialogue, symbols, analogies, prose and pictures.
So, at a less abstract level, students need to learn the inclination to resist impulsive responses; to respond logically and thoughtfully; to apply logic by explaining, justifying and, ultimately, proving what they think; to utilise a range of reasoning tools; and to develop strategies for presenting their reasoning to others persuasively. When looked at from these diverse angles growing reasoning moves well beyond encouraging a student to ‘think it through’.
Spot the Reasoners in your classes
Just to get you tuned in – have a quick think about ‘Reasoners you may know’. Make a note of students you know who display these characteristics.
Becoming a teacher who develops students’ learning power means developing a keen awareness of the subtleties of your students’ learning behaviours.
2) Creating a classroom culture for Reasoning
Cultivating learning habits ultimately involves:
Providing rich and varied occasions for exercising learning habits;
Infusing learning habits into lessons to enhance content understanding;
Recognising and celebrating the use and growth of learning habits;
Expecting students to take ownership of and responsibility for their own learning habits;
Exploring the development of learning habits with students over time.
As a teacher you are an influential character builder and so need to be mindful of how you help students form, replace, re-form and strengthen their learning habits. But don’t worry, you’re not there yet. It takes most teachers between 2 and 3 years to become really fluent with this way of teaching. So, go easy on yourself. Feel determined because small steps often prove to be big levers for change. Have a think about what you might do…
What to stop and start
Here are a few ideas you might want to try. Take it steady, this way of teaching can be a big but exciting shift so it’s worth doing it slowly and thoughtfully. Look first at the Stop/avoid ideas. Some of these are far from trivial but it’s best to try to remove them before starting on the Start/do more of, Start slowly and Experiment with ideas.
3) How does Reasoning grow?
Get a handle on progression
As with all learning behaviours, Reasoning is not a case of ‘either you do, or you don’t’. Few learners are consistently illogical in every circumstance, and equally few are always totally logical in every situation. Most lie somewhere between these 2 extremes.
The chart below offers a glimpse of how Reasoning may grow. Column 1 identifies 6 phases of development, column 2 describes how the skills and behaviours may grow over time, column 3 shows the self-talk; what students may quietly say/explain to themselves at each phase of development.
Which colour best describes the majority of your students’ current reasoning behaviours? What do they do? What can they not yet do?
4) Some teaching ideas to encourage a Reasoning frame of mind.
In the early stages of building your students’ learning power your role is to; make them aware of the behaviour; talk about it (what, how, why, when, if); celebrate its use; give opportunities to practise it, both in lessons and elsewhere; reflect on it to improve it. This staged start is reflected below…
Firstly… make students aware of the use and importance of reasoning…when, where, why, how they are or could be doing it
Then… explore reasoning a little more through the language of reasoning
Try… using reasoning as a lesson starter to tune students into using it
4a. Make students aware of Reasoning
How you make your students aware of the words that describe the behaviour and why it is important to use it.
How you make students aware of the words that describe the behaviour and why it is important to use it.
Younger students
Get a feel for thinking logically using Mazes
Have a go at solving some simple mazes with small groups of children. Finding the way through a maze is a fun approach to helping young children with logical thinking.
You could also ask your Y5 or Y6 colleagues to engage their children in planning and designing 3D mazes for the younger children to solve. This would be an excellent open ended design DT project guaranteed to need lots of planning and revising!
You might also be lucky enough to find real mazes near enough for a visit with your class.
Older students
Draw out reasoning in Strategy Games
Use games that require strategy and logical thinking. From noughts and crosses to chess, from hangman to backgammon, such games help to develop and refine reasoning skills.
Many appear in the form of maths investigations and problems: Frogs; Tower of Hanoi; Nim; Connect 4; etc.
Present students with coded messages and require them to work them out using their deductive skills.
Start with simple substitution codes where, for example, each letter is replaced by the one after it in the alphabet. (i.e. b replaces a, c replaces b etc. etc.) Increase difficulty by using more complex ciphers.
4b. Explore the language of Reasoning
How you might extend the language and understanding of this behaviour
Younger students
Draw out the language of reasoning through jigsaws
Sit at the jigsaw table with groups of children and work on the jigsaws together. Model your reasoning out loud to the children explaining what you did first, second, third, etc. so that they begin to understand a methodical, step by step approach. Explain why you put a piece in a certain place and why it couldn’t go elsewhere. Develop conversations around…What can we see? Why does this fit here? What tells you it is right? Does this make sense? and so on.
Older students
Explore the meaning of reasoning
Collect words that tell you how people learn to Reason.
Relate reasoning to well known sayings
What do we mean when we say …
On the one hand . . .
One step at a time
It adds up
4c. Use Reasoning as a lesson starter
Use a quick starter to key students into the learning behaviour you want to concentrate on in the lesson. i.e. here you are starting up the Reasoning behaviour
Younger students
Sequencing
Cut up;
a cartoon,
series of pictures of a production process,
a flow diagram,
a mathematical proof,
a story line,
a musical score,
a poem,
a sequence of events, and so on.
Invite students to reassemble the pieces in what they think is a viable order and explain their reasons for this. Model and listen for the language of reasoning to strengthen the process.
[Lift the level of challenge by omitting one or two of the pieces, or by including a red herring or two, or by interleaving two sequences that need to be separated before the sequencing can be completed.]
Older students
Ranking
Offer students pieces of information or ideas or pictures or statements as a set of separate items, usually on cards.
The subject could be: possible causes of global warming; the sayings of a religious leader; discoveries of the last 20 years; the music of Gershwin; causes of WW1; poems of Sylvia Plath; healthy lifestyle indicators; famous people etc.
The criterion for ranking the cards is given or negotiated with students. For example rank the cards in order of;
importance
appeal
relevance
how controversial
any other appropriate criterion.
The point of the activity is to debate the relative merits, place them in rank order according to the chosen criterion, and to be able to explain and justify the ranking based on evidence rather than opinion.
5. Develop your learning language for Reasoning
Here is a range of things you could say to nudge Reasoning. When you use this kind of language you are talking as a learning coach; encouraging students to think for themselves. Using such statements encourages your students to:
imitate you
start to think in this way
become conscious of these phrases and their meaning.
Gradually you will hear some of the statements pop up in students’ self-talk….in speech or even in writing from time to time, but mostly this will go on inside their heads. As your work on reasoning gathers pace, see if you can detect students who talk, or think, in these ways.
Learning-talk nudges that encourage Reasoning
Teacher talk – as a learning coach
Here are 10 ideas to ensure your students do the thinking for themselves
What assumptions are you making? Are they sound?
Can you think it through in clear steps from start to finish?
How many reasons can we find for that?
Can you spot the false step there? Is the argument watertight?
What evidence can you find to support your case/argument? What’s the counter evidence?
How have you reached that conclusion? What are the implications?
Which thinking tool would help us solve this?
Are you convinced?
One the one hand . . . , but on the other . . .
Why do you think that?
Imagining
When you use this learning muscle, you …
picture how things might look, sound, feel, be
let your mind explore and play with possibilities and ideas
build up stories around objects, facts, theories or other stimuli
rehearse things in your mind before doing them for real
What do we mean by imagining? Read more about imagining, explore what a good imaginer does, and reflect on the imagining behaviours of your students.
Creating a classroom culture for imagining. Take time to think about the aspects of classroom culture that encourage the imagining habit.
How does imagining grow? Explore a progression chart for imagining, and consider how your students’ imagining skills are growing.
Some teaching ideas to encourage a imagining frame of mind.Explore some teaching ideas to introduce and extend the language of imagining to students, and some ideas for starting a lesson with a imagining activity.
Develop your learning language for imagining. Explore how you might talk in ways that stimulate your students’ imagining behaviours.
1) What do we mean by imagining?
Imagination is not just a cute faculty that children use to weave fantasies: it is one of the most effective tools in the learner’s toolbox. Scientists, designers and executives need a powerful imagination just as much as painters and novelists, and it can either be developed, through appropriate experience and encouragement, or left to shrivel up. Good learners are ready and able to look at things in different ways. They like playing with ideas and possibilities, and adopting different perspectives (even though they may not have a clear idea of where their imagination is leading them). They use pictures and diagrams to help them think and learn.
There are two kinds of imagination: active and receptive. In active imagination, you deliberately create a scenario to run in your mind’s eye. Sports people use this kind of mental rehearsal, and experiments have shown it to be very effective at improving their level of skill.
The second kind of imagination is more receptive, like daydreaming: letting a problem slip to the back of your mind, and then just sliding into a kind of semi-awake reverie, where the mind plays with ideas and images without much control on your part. Successful learners and inventors know how to make good use of this kind of creative intuition. They are interested in inklings and ideas that just bubble up into their minds.
What does being a good Imaginer involve?
If you have a well formed Imagining habit you will be ready, willing, and able to:
Use the mind as a theatre in which to play out ideas and possible actions experimentally;
Use a rich variety of visual, aural and sensory experiences to trigger creative and lateral thinking;
Explore possibilities speculatively, saying ‘What might …’, ‘What could …’ and ‘What if …?’ rather than being constrained by what is;
Retain a childlike playfulness when confronted with challenges and difficulties;
Be aware of intended outcomes whilst adopting a flexible approach to realising goals;
Rehearse actions in the mind before performing them in reality.
Spot the Imaginers in your class
Just to get you tuned in – have a quick think about ‘imaginers you may know’. Make a note of students you know who display these characteristics.
Being a teacher who develops students’ learning power means developing a keen awareness of the subtleties of your students’ learning behaviours.
2) Creating a classroom culture for imagining
Cultivating learning habits ultimately involves:
Providing rich and varied occasions for exercising learning habits;
Infusing learning habits into lessons to enhance content understanding;
Recognising and celebrating the use and growth of learning habits;
Expecting students to take ownership of and responsibility for their own learning habits;
Exploring the development of learning habits with students over time.
As a teacher you are an influential character builder and so need to be mindful of how you help students form, replace, re-form and strengthen their learning habits.
But don’t worry, you are not expected to be there yet. It takes most teachers between 2 and 3 years to become really fluent with this way of teaching. So, go easy on yourself. Feel determined because small steps often prove to be big levers for change. Have a think about what you might do…
What to stop and start
Here are a few ideas you might want to try. Take it steady, this way of teaching can be a big but exciting shift so it’s worth doing it slowly and thoughtfully.
Look first at the Stop/avoid ideas. Some of these are far from trivial but it’s best to try to remove them before starting on the Start/do more of, Start slowly and Experiment with ideas.
3) How does imagining grow?
Get a handle on progression
As with all learning behaviours, imagining is not a case of ‘either you do, or you don’t’. Few learners lack imagination in every circumstance, and equally few are hugely imaginative in every situation. Most lie somewhere between these 2 extremes.
The chart below offers a glimpse of how imagining may grow. Column 1 identifies 6 phases of development, column 2 describes how the skills and behaviours may grow over time, column 3 shows the self-talk; what students may quietly say/explain to themselves at each phase of development.
Which colour best describes the majority of your students’ current imagining behaviours? What do they do? What can they not yet do?
4) Some teaching ideas to encourage a imagining frame of mind.
In the early stages of building your students’ learning power your role is to; make them aware of the behaviour; talk about it (what, how, why, when, if); celebrate its use; give opportunities to practise it, both in lessons and elsewhere; reflect on it to improve it. This staged start is reflected below…
Firstly… make students aware of the use and importance of imagining…when, where, why, how they are or could be doing it
Then… explore imagining a little more through the language of imagining
Try… using imagining as a lesson starter to tune students into using it
4a. Make students aware of imagining
How you make your students aware of the words that describe the behaviour and why it is important to use it.
Younger students
The Mind’s Eye
Introduce pupils to the idea of the mind’s eye: Talk about the fact that we all have 2 eyes which we use all the time but that everyone also has a third, hidden, mind’s eye. Talk about how we can use this secret third eye to imagine and create pictures and ideas inside our minds.
Invite pupils to close their eyes and imagine they are using their third eye. Describe something in great detail and ask them to try and see it with their third eye.
For example: Close your eyes tightly and imagine my alien. It has a large, round, green body with lots of arms and legs. On the top of the round, green body is a huge pink and purple head with spiky yellow hair and 4 great big blue eyes. It has long, pink fingers on its hands and short, purple toes on its big feet. When it walks along it makes a high squeaky sound and it smells just like fish and chips!
You could ask pupils to draw their idea of the alien, concentrating on their ideas rather than an exact representation of your description.
Ask pupils to imagine something for themselves- unprompted by you. Invite them to describe what they are imagining.
Talk about what seems to happen in their mind when they imagine.
Talk about when our ability to imagine can be useful.
Ask, “When do you use your imagination?”
Older students
Guided Visualisation
Invite students to visualise, for example, a snowy mountain peak until the image fades – discuss how long this could be sustained.
Now visualise hovering over the mountain and exploring the terrain by helicopter – the experience will have lasted longer.
Now provide students with a guided visualisation of the mountain that triggers their imaginative faculties – discuss the features of this experience.
Enable students to identify the ways of triggering their own imaginations when provided with stimuli. Invite them into a city at night, or the alimentary canal, . . .
Stimulating the imagination
Use music to create atmosphere and stimulate imaginative thinking.
Provide varied, unexpected and ever-changing visual experiences — on whiteboards, classroom walls, in ideas banks, through web-links, etc.
Read vivid prose and poetry that captures details, moods and atmospheres.
Younger students
Capture ideas
Encourage pupils to brainstorm or mind-map and keep notebooks or Post-its of interesting ideas to feed their creativity. Do this collectively and individually.
Elect one pupil as ‘Plant of the Day’, whose job it is to suggest unlikely ideas.
Older students
Play the prediction game, emphasise mental rehearsal
Show video clips of e.g. rugby or football heroes preparing to kick a ball, as well as other sports and entertainment people rehearsing ahead of action.
Discuss what they are doing to ‘play the movie’ in their heads before they act.
Explore occasions when this could be useful in students’ own lives. Identify the triggers and habits required when anticipating the right action.
4b. Explore the language of imagining
How you might extend the language and understanding of this behaviour
Younger students
Talk about how things might look, feel, sound.
Give pupils a familiar object – a pencil, hairbrush, scissors, toilet roll, cushion – whatever comes to hand.
Then pose the question: ‘What else could it be?’ or ‘What could this become’
Discuss and praise the most imaginative ideas.
What you are trying to develop in young learners is:
An awareness of the power of imagination;
The ability to use their imagination to picture how things might look, sound, feel or be;
The willingness to talk imaginatively about situations, events, characters, etc.
Older students
Expand the vocabulary of imagining
Click to enlarge
Collect words that tell you how people learn to imagine.
Relate imagining to well known sayings
What do we mean when we say …
In my mind’s eye
Thinking outside the box
4c. Use imagining as a lesson starter
Use a quick starter to key your students into the learning behaviour you want to concentrate on in the lesson. i.e. here you are starting up their imagining behaviour
Younger students
Extend imaginative thinking by telling stories
Provide a stem statement…
A man walks into a room with a suitcase in his hand…
Invite one student to carry it on. Each student continues from where the previous one left off.
Or . .
Create a scenario…There are no windows, water drips into a bucket, two people are seated back to back…what might be happening? What might happen next? Can you improvise the dialogue between the people?
Older students
Trigger imagination with ‘What if …’ challenges
Provoke students to think ‘What if… we ran out of oil in 25 years… we lived in a two-dimensional world… we all lived for exactly 70 years… tennis balls were heavier… we had two moons…’
Encourage students to build collaborative spider diagrams that explore the possible ramifications of such eventualities. Extend the imagining in creative presentations using a variety of media.
5. Develop your learning language for imagining
Here is a range of things you could say to nudge imagining. When you use this kind of language you are talking as a learning coach; encouraging students to think for themselves. Using such statements encourages your students to:
imitate you
start to think in this way
become conscious of these phrases and their meaning.
Gradually you will hear some of the statements pop up in students’ self-talk….in speech or even in writing from time to time, but mostly this will go on inside their heads. As your work on imagining gathers pace, see if you can detect students who talk, or think, in these ways.
Learning-talk nudges that encourage imagining
Teacher talk – as a learning coach
Here are 10 ideas to ensure your students do the thinking for themselves
What would happen if …
Try to picture … in your mind. Tell me about . . . .
Can you use your mind’s eye to see what that might look like?
Are there any other possible explanations?
Close your eyes – what can you see? Hear? Feel?
What do you feel might be happening?
What could this be?
How might you do this differently?
Imagine yourself doing it before you do it for real.
Can you imagine how xxx feels now even though you disagree with their views?
Making Links
When you use this learning muscle, you …
look for connections between experiences or ideas
find pleasure in seeing how things fit together, make patterns
connect new ideas to how you think and feel already
look for analogies in your memory that will give you a handle on something complicated
See below to find out more about Making Links . . .
What do we mean by Making Links? Read more about Making Links, explore what a good Link Maker does, and reflect on the Link Making behaviours of your students.
Creating a classroom culture for Making Links. Take time to think about the aspects of classroom culture that encourage the Link Making habit.
How does Making Links grow? Explore a progression chart for Making Links, and consider how your students’ Link Making skills are growing.
Some teaching ideas to encourage a Link Making frame of mind.Explore some teaching ideas to introduce and extend the language of Making Links to students, and some ideas for starting a lesson with a Link Making activity.
Develop your learning language for Making Links. Explore how you might talk in ways that stimulate your students’ Link Making behaviours.
1) What do we mean by Making Links?
Making links is about integrating or making connections between different things. It comprises not only the ability to see or make relationships but also the inclination to look for them.
Trying to hook up new experiences with what you already know is what some people call ‘making meaning’.
New ideas become meaningful to the extent that we can incorporate them within our own mental webs of associations and significances. Good learners get pleasure from seeing how things fit together. They are interested in the big picture, and how new learning expands it.
Good learners can make all kinds of different links. They can link together this lesson’s physics topic with what they were doing in maths last week. They can look for links to their own goals and interests, to discover the relevance of the new learning to their own lives. They find links to their own real-life experience—using new ideas or theories to make sense of past impressions. They weave new events into their developing autobiographical story relating them to their sense of self. They can connect new learning with their own opinions and beliefs, so that they come out not just knowing something new, but looking at the world in a different way. And—very importantly for creativity—they may look for analogies in their own memory that give them a handle on a complicated new domain.‘What’s it like?’they ask themselves.
What does being a good Link Maker involve?
A well formed Making Links habit involves being ready, willing, and able to:
Connect new ideas to what you know and feel already;
Match and categorise ideas, techniques and concepts to ones that are already understood;
Link ideas across different academic disciplines and in varying contexts;
Looking for similarities, differences, the unusual and absurd;
Seek novel and inventive ways of connecting apparently unconnected ideas, events or techniques.
Spot the Link Makers in your class
Just to get you tuned in – have a quick think about ‘Link Makers you may know’. Make a note of students you know who display these characteristics.
Becoming a teacher who develops students’ learning power means developing a keen awareness of the subtleties of your students’ learning behaviours.
2) Creating a classroom culture for Making Links
Cultivating learning habits ultimately involves:
Providing rich and varied occasions for exercising learning habits;
Infusing learning habits into lessons to enhance content understanding;
Recognising and celebrating the use and growth of learning habits;
Expecting students to take ownership of and responsibility for their own learning habits;
Exploring the development of learning habits with students over time.
As a teacher you are an influential character builder and so need to be mindful of how you help students form, replace, re-form and strengthen their learning habits.
But don’t worry, you’re not expected to be there yet. It takes most teachers between 2 and 3 years to become really fluent with this way of teaching. So, go easy on yourself. Feel determined because small steps often prove to be big levers for change. Have a think about what you might do…
What to stop and start
Here are a few ideas you might want to try. Take it steady, this way of teaching can be a big but exciting shift so it’s worth doing it slowly and thoughtfully.
Look first at the Stop/avoid ideas. Some of these are far from trivial but it’s best to try to remove them before starting on the Start/do more of, Start slowly and Experiment with ideas.
3) How does Making Links grow?
Get a handle on progression
As with all learning behaviours, Making Links is not a case of ‘either you do, or you don’t’. Few learners are adept at spotting connections in all aspects of their learning, and equally few are unable to sense links in any situation. Most lie somewhere between these 2 extremes.
The chart below offers a glimpse of how Making Links may grow. Column 1 identifies 6 phases of development, column 2 describes how the skills and behaviours may grow over time, column 3 shows the self-talk; what students may quietly say/explain to themselves at each phase of development.
Which colour best describes the majority of your students’ current Making Links behaviours? What do they do? What can they not yet do?
4) Some teaching ideas to encourage a Making Links frame of mind.
In the early stages of building your students’ learning power your role is to; make them aware of the behaviour; talk about it (what, how, why, when, if); celebrate its use; give opportunities to practise it, both in lessons and elsewhere; reflect on it to improve it. This staged start is reflected below…
Firstly… make students aware of the use and importance of Making Links…when, where, why, how they are or could be doing it
Then… explore Making Links a little more through the language of Making Links
Try… using Making Links as a lesson starter to tune students into using it
4a. Make students aware of Making Links
How you make your students aware of the words that describe the behaviour and why it is important to use it.
Younger students
My Grandma went shopping . . .
Recommend group of no more than 12-15
Start by saying “My grandma went shopping and she bought…” and say an item. Let pupils take turns and each time one of them adds another item, they have to explain their link to everyone else.
Encourage the children to think of lots of different ways of linking items and reward their ingenuity.
To take the learning a little bit further, it could be useful to share a real shopping list with your children and discuss the links that help you when actually shopping.
For example, perhaps you list all the fruit and vegetables first, if they are found in the first aisle etc. Or perhaps you list all the breakfast foods together…
Older students
Mind Maps for link making
Use mind maps to encourage students to link and explain how information and ideas seem to be associated.
Use mind mapping at the beginning, middle and end of a unit of study to show how links and understanding change as knowledge grows.
Use a ‘thought shower mind map’ at the outset of a lesson to connect with prior learning and activate link making. Use in the middle to monitor shifts in understanding. Use at the end of a module of learning as a synthesising tool.
Younger students
Think and Link
Organisation: For groups of 5/6 children.
Print out and photocopy the Odd One Out series of pictures. (see resource).
Each row has 5 pictures in it. Four can be linked together easily but one doesn’t fit readily with the others.
Encourage the children to find an odd one out and perhaps invent a reason or story about how/why the odd one could be made to ‘fit’.
Spend plenty of time discussing why the pictures fit together and what the links are. It’s fine if the children can think of different ways to link them as long as they can explain their rationale to you and the other children.
Keep praising and rewarding the ‘making links’ bit of the activity rather than focusing on getting it right.
To extend this activity a little and assess their understanding, ask the children to devise a row of pictures of their own and give them to each other as a fresh challenge.
Join in yourself and model your link making by thinking aloud.
Older students
Match Them Up
Offer students a set of cards that need to be matched up or linked in some way.
It might be:
a set of pairs of cards like ‘It has been raining’ and ‘The river is flowing fast’ where the student is challenged to decide whether there Must be a connection between the two events, Could be a connection, or No possible connection;
a problem to select a substance (metal, clay, wax, salt, ice, …) and a change (freezes, dissolves, melts, burns, …) and decide if the change is Reversible or Irreversible;
a set of cards that students are required to match into pairs – it could be 5 graphs and 5 equations; 5 characters and 5 attitudes; 5 words and 5 definitions etc.
[The ‘Thinking Through’ series edited by David Leat has individual books for Geography, History, RE, MFL, English, Maths, Science and PSHE which all contain subject specific examples.]
4b. Explore the language of Making Links
How you might extend the language and understanding of this behaviour
Younger students
Discuss making links
Gather together a really good assortment of shapes: 2D and 3D shapes and different sizes and colours. Using small hoops or different coloured paper circles ask pupils to take turns to sort the shapes by putting them in the hoops and explain their reasoning for sorting them this way. It should be possible to rearrange the shapes in several different ways as different children take a turn. This can help the children understand that there are often many different ways to link things together.
Older students
Extend the language of Making Links
Collect words that tell you how people learn to make links.
Relate link making to well known sayings
What do we mean when we say …
Chain reaction
Cause and effect
Seeing the wood and the trees
4c. Use Making Links as a lesson starter
Use a quick starter to key your students into the learning behaviour you want to concentrate on in the lesson. i.e. here you are starting up their Making Links behaviour.
Younger students
Similarity and Difference
Find two images with both similarities and differences. Invite students to work in pairs to identify at least 5 of each, and then work as a four to decide the 3 most important similarities and differences.
Timings could be around 1 minute for the pair work, and 2 minutes for the work in fours.
This will also support the skills of noticing, collaborating, and distilling.
Older students
Odd One Out
Identify four ‘things’ related to your own subject area – this could be 4 images, 4 words, 4 techniques, or anything else that links to your own subject and/or what students are currently learning about.
Invite them to identify the odd one out, and to explain why they think this.
When you can, construct lists where it is possible to justify that each of the items are, in fact, the odd one out.
5. Develop your learning language for Making Links
Here is a range of things you could say to nudge Making Links. When you use this kind of language you are talking as a learning coach; encouraging students to think for themselves. Using such statements encourages your students to:
imitate you
start to think in this way
become conscious of these phrases and their meaning.
Gradually you will hear some of the statements pop up in students’ self-talk….in speech or even in writing from time to time, but mostly this will go on inside their heads. As your work on Making Links gathers pace, see if you can detect students who talk, or think, in these ways.
Learning-talk nudges that encourage Making Links
Teacher talk – as a learning coach
Here are 10 ideas to ensure your students do the thinking for themselves
What do you know already that might help?
Can you say how . . is like . . .?
What conclusions can you draw?
Does the analogy… help us to get a handle on this?
Now that you know… has it changed how you think about…?
Can you see a link between what we did in… and what you do…?
How can you apply what you know about xxx to this problem?
Have you seen/done/felt something like this before?
Do you need to re-think ‘X’ in light of ‘Y’?
Can you relate this information to what you know already?
Capitalising
When you use this learning muscle, you …
learn from many different sources — people, books, the Internet, music, the environment, experience …
make intelligent use of all kinds of strategies and things to aid learning
notice the approach and detail of how others do things
adopt and adapt the successful strategies of others
See below to find out more about Capitalising . . .
What do we mean by Capitalising? Read more about Capitalising, explore what a good Capitaliser does, and reflect on the Capitalising behaviours of your students.
Creating a classroom culture for Capitalising. Take time to think about the aspects of classroom culture that encourage the Capitalising habit.
How does Capitalising grow? Explore a progression chart for Capitalising, and consider how your students’ Capitalising skills are growing.
Some teaching ideas to encourage a Capitalising frame of mind.Explore some teaching ideas to introduce and extend the language of Capitalising to students, and some ideas for starting a lesson with a Capitalising activity.
Develop your learning language for Capitalising. Explore how you might talk in ways that stimulate your students’ Capitalising behaviours.
1) What do we mean by Capitalising?
Capitalising on resources means being on the lookout for strategies, materials, resources and forms of support in the environment that can help you in your current learning or problem- solving. Traditional schooling assumes that intelligence is all in the head. But recent studies show that it is much fairer and more accurate to see good learners as people who are ready and able to make intelligent use of all kinds of things around them – books, phones, social media, e-mail, the internet, and, of course, a range of learning strategies and other people. Everyone needs to be good at finding and using the learning resources available in the world, so it is obviously a good idea to start developing this habit at school.
The forms of assessment we use in schools have a powerful influence on the kinds of learning that students do, and the kinds of teaching their teachers use. If the good learner is essentially the person plus their resources (and their ability to draw on them), our methods of testing should encourage teachers and students to value and practise capitalising. In today’s world, it makes as much sense to sit 15-year-olds down at solitary desks and ask them to display their knowledge and skill as it would to take away Lionel Messi’s football and tell him to perform.
What does being a good at Capitalising involve?
A well formed Capitalising habit involves being ready, willing, and able to:
Recognise that we learn from many different sources – other people, books, the internet, music, the environment, experience…
Select appropriately from a range of learning strategies;
Keep a purposeful look-out for useful learning aids;
Adapt and adopt the successful habits and values of others into their own learning repertoire;
Make intelligent use of all kinds of things to aid learning;
Use resources in novel ways to solve problems.
Spotting the Capitalisers in your class
Just to get you tuned in – have a quick think about ‘capitalisers you may know’. Make a note of students you know who display these characteristics.
Becoming a teacher who develops students’ learning power means developing a keen awareness of the subtleties of your students’ learning behaviours.
2) Creating a classroom culture for Capitalising
Cultivating learning habits ultimately involves:
Providing rich and varied occasions for exercising learning habits;
Infusing learning habits into lessons to enhance content understanding;
Recognising and celebrating the use and growth of learning habits;
Expecting students to take ownership of and responsibility for their own learning habits;
Exploring the development of learning habits with students over time.
As a teacher you are an influential character builder and so need to be mindful of how you help students form, replace, re-form and strengthen their learning habits. But don’t worry, you’re not there yet. It takes most teachers between 2 and 3 years to become really fluent with this way of teaching. So, go easy on yourself. Feel determined because small steps often prove to be big levers for change. Have a think about what you might do…
What to stop and start
Here are a few ideas you might want to try. Take it steady, this way of teaching can be a big but exciting shift so it’s worth doing it slowly and thoughtfully. Look first at the Stop/avoid ideas. Some of these are far from trivial but it’s best to try to remove them before starting on the Start/do more of, Start slowly and Experiment with ideas.
3) How does Capitalising grow?
Get a handle on progression
As with all learning behaviours, Capitalising is not a case of ‘either you do, or you don’t’. Few learners are totally dependent on others to tell them what to do and how to do it, and equally few are enterprising and resourceful in every situation. Most lie somewhere between these 2 extremes.
The chart below offers a glimpse of how Capitalising may grow. Column 1 identifies 6 phases of development, column 2 describes how the skills and behaviours may grow over time, column 3 shows the self-talk; what students may quietly say/explain to themselves at each phase of development.
Which colour best describes the majority of your students’ current Capitalising behaviours? What do they do? What can they not yet do?
4) Some teaching ideas to encourage a Capitalising frame of mind.
In the early stages of building your students’ learning power your role is to; make them aware of the behaviour; talk about it (what, how, why, when, if); celebrate its use; give opportunities to practise it, both in lessons and elsewhere; reflect on it to improve it. This staged start is reflected below…
Firstly… make students aware of the use and importance of Capitalising…when, where, why, how they are or could be doing it
Then… explore Capitalising a little more through the language of Capitalising
Try… using Capitalising as a lesson starter to tune students into using it
4a. Make students aware of Capitalising
How you make your students aware of the words that describe the behaviour and why it is important to use it.
Younger students
Organise the classroom for easy access to resources
The obvious starting point is to organise classrooms in such a way that pupils are able to select, get and return the resources they need.
Design tasks that require the use of a range of resources and gradually expect the children to select what they need.
At the beginning of a session talk with the children about the things they might use to help them with their learning.
As the pupils’ understanding grows, introduce the idea of “learning tools” and start filling a plastic toolbox with things like a ruler, calculator, notepad and pencil. Keep asking the children for new ideas and regularly look through it together.
Older students
Learn from expert interviews
Set up interviews with people who can do something really well. Develop a series of questions with students to uncover exactly what the ‘expert’ does. E.g. What sort of preparation is there? What resources are needed? What does it feel like? What sort of thinking, habits of mind, values or beliefs are helpful?
Create a checklist of key aspects to imitate.
Extend with students in the role of real or imaginary expert, encouraging them to assess their own subconscious knowledge of how to succeed.
Younger students
Use display to share key learning
Set aside an area of display where students are asked to share any strategies or ‘top tips’ that they have found particularly helpful in their own learning.
Set up a Helpful Habit board for tips from students to others about habits which might help them to achieve their long or short term goals. For those offering the ‘top tip’ it is a distilling activity, but the resulting gallery of ‘top tips’ invites students to adopt the successful strategies of others.
Older students
Explore how things can be used
Collect a pile of unrelated objects, or ask students to bring in one object each and mix them in random groupings – eg a copper tube, piece of cloth, felt pen, blu-tack.
Challenge students to make as many things as they can from the objects, using all of them but nothing else.
Discuss examples of particularly imaginative / effective use of materials and whether these ideas can be used in another context.
4b. Explore the language of Capitalising
How you might extend the language and understanding of this behaviour
Younger students
Discuss capitalising
Use language to encourage thinking about capitalising. Build these into your learning language:
Have you thought about what would help you to do this?
Just think about all the things we have in the classroom that might be useful.
How else might you do it?
What is everyone else doing?
Is there anything else that you could use?
There may be other people who could help you with this.
Who do you think might know something about this?
Where could you find out more about this?
Which of the things you used did you find the most useful?
If you had to do this again is there anything else you might use to help you?
Older students
Extend the language of capitalising
click to enlarge
Collect words and phrases that tell you how people learn to Capitalise on what is around them.
Relate capitalising to well known sayings
There is more than one way to skin a cat
Making the best of a bad job
A bit ‘Heath Robinson’
4c. Use Capitalising as a lesson starter
Use a quick starter to key your students into the learning behaviour you want to concentrate on in the lesson. i.e. here you are starting up their Capitalising behaviour.
Younger students
How might we tackle this?
At the beginning of a session talk with the children about the strategies and things they might use to help them with their learning.
Talk to the children frequently about where they might find information or help.
Offer the children a rich and varied curriculum so that they can start to appreciate that they are learning from lots of different sources using a range of learning strategies.
Older students
How many uses for . . . .
To get students thinking about how resources can be used in many different ways.
5. Develop your learning language for Capitalising
Here is a range of things you could say to nudge Capitalising. When you use this kind of language you are talking as a learning coach; encouraging students to think for themselves. Using such statements encourages your students to:
imitate you
start to think in this way
become conscious of these phrases and their meaning.
Gradually you will hear some of the statements pop up in students’ self-talk….in speech or even in writing from time to time, but mostly this will go on inside their heads. As your work on Capitalising gathers pace see if you can detect students who talk, or think, in these ways.
Learning-talk nudges that encourage Capitalising
Teacher talk – as a learning coach
Here are 10 ideas to ensure your students do the thinking for themselves
What could we use to help us with this?
What led you to choose to use that?
Look very carefully at someone you think is doing …… really well and think about how you can do it like that
Could you tackle this by imagining someone who does it really well?
What sort of reference / resource do you need here?
Look around. See what is available to help. How could you use it?
Could you work this out for yourself first before looking for more information?
Who could you turn to for help?
Think through the strategies you might use.
Which is the best learning strategy for this job?
Listening
When you use this learning muscle, you …
pay attention to other people
show you are listening by eye contact and body language
reflect back the main points that someone has said
What do we mean by Listening? Read more about Listening, explore what a good Listener does, and reflect on the Listening behaviours of your students.
Creating a classroom culture for Listening. Take time to think about the aspects of classroom culture that encourage the Listening habit.
How does Listening grow? Explore a progression chart for Listening, and consider how your students’ Listening skills are growing.
Some teaching ideas to encourage a Listening frame of mind.Explore some teaching ideas to introduce and extend the language of Listening to students, and some ideas for starting a lesson with a Listening activity.
Develop your learning language for Listening. Explore how you might talk in ways that stimulate your students’ Listening behaviours.
1) What do we mean by Listening?
Understanding how to listen effectively is an essential skill that benefits everything from family life to business. It’s one of the most critical skills for working effectively in teams. Hearing and listening are different. There’s all sorts of faulty listening. Sometimes we fake it or pretend to listen; sometimes we only respond to the remarks we are interested in and reject the rest. Sometimes we listen defensively and take innocent remarks as personal attacks. Or, we listen to collect information to use to attack the speaker, or we avoid particular topics, or we listen insensitively and can’t look beyond the words for other meanings, or we turn the conversation to ourselves. So, listening is hard and requires effort. To be a good listener you need to be able to listen for information, listen to judge the quality of the information and listen empathetically to build a relationship and help solve a problem. When looked at from these diverse angles growing Listening moves well beyond encouraging a student to ‘do good listening’.
What does being a good Listener involve?
A well formed Listening habit involves being ready, willing, and able to:
Be genuinely interested in other people and what they are saying;
Focus on the current moment, being attentive and responsive to visual cues and atmosphere;
Notice subtle details and nuances in what is being said;
Know when to make well-judged interventions to elucidate, probe or challenge;
Manage distractions constructively;
Be comfortable with silence and attend actively to what is being said.
Spot the Listeners in your class
Just to get you tuned in – have a quick think about ‘listeners you may know’. Make a note of students you know who display these characteristics.
Becoming a teacher who develops students’ learning power means developing a keen awareness of the subtleties of your students’ learning behaviours.
2) Creating a classroom culture for Listening
Cultivating learning habits ultimately involves:
Providing rich and varied occasions for exercising learning habits;
Infusing learning habits into lessons to enhance content understanding;
Recognising and celebrating the use and growth of learning habits;
Expecting students to take ownership of and responsibility for their own learning habits;
Exploring the development of learning habits with students over time.
As a teacher you are an influential character builder and so need to be mindful of how you help students form, replace, re-form and strengthen their learning habits.
But don’t worry, you’re not expected to be there yet. It takes most teachers between 2 and 3 years to become really fluent with this way of teaching. So, go easy on yourself. Feel determined because small steps often prove to be big levers for change. Have a think about what you might do…
What to stop and start
Here are a few ideas you might want to try. Take it steady, this way of teaching can be a big but exciting shift so it’s worth doing it slowly and thoughtfully.
Look first at the Stop/avoid ideas. Some of these are far from trivial but it’s best to try to remove them before starting on the Start/do more of, Start slowly and Experiment with ideas.
3) How does Listening grow?
Get a handle on progression
As with all learning behaviours, Listening is not a case of ‘either you do, or you don’t’. Few learners are unable to listen attentively in most circumstances, and equally few are sufficiently skilful learners who listen in order to develop understanding and empathise with the speaker in every situation. Most lie somewhere between these 2 extremes.
The chart below offers a glimpse of how Listening may grow. Column 1 identifies 6 phases of development, column 2 describes how the skills and behaviours may grow over time, column 3 shows the self-talk; what students may quietly say/explain to themselves at each phase of development.
Which colour best describes the majority of your students’ current Listening behaviours? What do they do? What can they not yet do?
4) Some teaching ideas to encourage a Listening frame of mind.
In the early stages of building your students’ learning power your role is to; make them aware of the behaviour; talk about it (what, how, why, when, if); celebrate its use; give opportunities to practise it, both in lessons and elsewhere; reflect on it to improve it. This staged start is reflected below…
Firstly… make students aware of the use and importance of Listening…when, where, why, how they are or could be doing it
Then… explore Listening a little more through the language of Listening
Try… using Listening as a lesson starter to tune students into using it
4a. Make students aware of Listening
How you make your students aware of the words that describe the behaviour and why it is important to use it.
Younger students
Make pupils aware of listening
Who said “Sausages”?
An activity to encourage good listening skills.
First, try a quiet activity to help the children focus on the physical sensation of intent listening.
Ask the children to move round to sit in a circle.
Ask them to close their eyes and clasp their hands gently on their laps.
Tell them you are going to chime an Indian bell and that they should listen as carefully as they can and only open their eyes when they can no longer hear the sound.
Ask them to be very, very quiet so that they do not disturb each other.
Now move on to a simple listening game.
Children remain sitting in their circle. They take turns to sit blindfolded in the middle.
Point to a child in the circle who then says “sausages.” The blindfolded child has to guess whose voice it is.
As the children become more familiar with this game, they will deliberately alter their voices and it can be a lot of fun.
Regularly remind the children of the skills they are using and reward really good listening!
After playing this game, you may be able to agree some good listening tips with the children.
Now think about how you could extend this into other listening activities.
Older students
Offer ways to focus on listening
What Can You Hear?
A short listening activity to help students to recognise that attentive listening enables them to centre themselves, focus on what is really happening and take possession of themselves as learners.
Explore sentences spoken with different stress, tone, pace and emphasis, to yield different meanings.
For example:
‘I don’t know why you didn’t go.’
‘How can I answer that?’
Older students
Become aware of the effect of sounds
Silent Film Show
Play a two-minute scene from a film, without the visuals.
Listen for clues in sound effects, voices, soundtrack.
Predict / speculate what is happening.
Show the film and attend to the way in which sounds contributed to meaning.
4b. Explore the language of Listening
How you might extend the language and understanding of this behaviour
Younger students
Discuss listening and tone of voice.
Model different tones of voice. Start with ones that are easy to recognise and understand, like a cross voice or a scared one. Gradually build up this repertoire of voices and use them in stories and songs. Talk about when we use these different tones of voice and why. Ask the children to listen carefully to the way people talk at different times and spot their feelings.
Expand further by inventing voices that you can use for different activities: imagine the voices for different toys or puppets you may have in the classroom; count like robots for a day; recite a rhyme like the big bad wolf. The children will have fun inventing a wide and wonderful assortment of voices whilst refining their listening skills.
Older students
Expand the listening vocabulary
Collect words that tell you how people learn to listen attentively.
Relate listening to well known sayings
What do we mean when we say …
Being all ears
Listening between the lines
4c. Use Listening as a lesson starter
Use a quick starter to key your students into the learning behaviour you want to concentrate on in the lesson. i.e. here you are starting up their Listening behaviour.
Younger students
Centring Activities
Use centring activities at the beginning of lessons to focus minds before the learning begins. Play music and ask students to focus on the associations that it conjures about places, people, moods and atmospheres.
Something wrong here ?
Read a sentence or statement without expression, then read it again, once, with changes; no further repetition. Students have to spot the changes.
Older students
Listen for inference and understanding
Play recordings of, for example:
One end of a telephone conversation: Who’s on the other end… What’s being said… How do you know?
A dialogue: What’s just happened… What happens next… How do you know?
Recognisable people: Who are they… What’s the evidence… How do you know?
Unknown individuals talking: What do you know… Who could they be… How do you know?
5. Develop your learning language for Listening
Here is a range of things you could say to nudge Listening. When you use this kind of language you are talking as a learning coach; encouraging students to think for themselves. Using such statements encourages your students to:
imitate you
start to think in this way
become conscious of these phrases and their meaning.
Gradually you will hear some of the statements pop up in students’ self-talk….in speech or even in writing from time to time, but mostly this will go on inside their heads. As your work on Listening gathers pace see if you can detect students who talk, or think, in these ways.
Learning-talk nudges that encourage Listening
Teacher talk – as a learning coach
Here are 10 ideas to ensure your students do the thinking for themselves
What does the tone of voice tell you about the person?
Close your eyes and let the sounds wash over you.
Can you hear what she’s really saying?
Listen for the main messages. Can you summarise the key points of what you’ve just heard.
How does what he’s saying make you feel?
Wait for your turn to talk.
How can you help XXX to say what they are thinking?
Do you think there’s a deeper meaning in what is being said?
How can you show empathy for the speaker in your responses?
Do you understand the mood and beliefs of the speaker?
What do we mean by Planning? Read more about Planning, explore what a good Planner does, and reflect on the Planning behaviours of your students.
Creating a classroom culture for Planning. Take time to think about the aspects of classroom culture that encourage the Planning habit.
How does Planning grow? Explore a progression chart for Planning, and consider how your students’ Planning skills are growing.
Some teaching ideas to encourage a Planning frame of mind.Explore some teaching ideas to introduce and extend the language of Planning to students, and some ideas for starting a lesson with a Planning activity.
Develop your learning language for Planning. Explore how you might talk in ways that stimulate your students’ Planning behaviours.
1) What do we mean by Planning?
A well formed Planning habit involves being ready, willing, and able to:
Identify end goals or objectives before considering possible action;
Consider timescales and possible obstacles in drawing up a realistic plan;
Make use of a wide variety of skills and tools to gather ideas and information;
Sequence activity in order to decide what needs to be done;
Think laterally as well as logically so that the task benefits equally from creative and rational thought;
Be open-minded and flexible about how things might happen so that opportunities can be seized and fresh directions taken.
Being able to think ahead isn’t the whole story of Planning. Becoming an effective Planner of your own learning needs you to know something about yourself as a learner, your interests, your needs, your wishes. Training the process of thinking ahead often starts simply by asking students to find the resources they will need to carry out a task. But planning your own learning is a sophisticated task. It involves a personal, silent assessment of your learning skills (‘What can I feasibly achieve? What am I capable of doing? What resources would bolster my chances of success?’) The more timid, less confident or lower achieving students may find such planning a daunting prospect. Introducing and requiring students to work learning out for themselves will take time and careful planning on the part of the teacher. When looked at from these diverse angles growing planning moves well beyond encouraging a student to ‘think ahead’
Spotting the Planners in your class
Just to get you tuned in – have a quick think about ‘planners you may know’. Make a note of students you know who display these characteristics.
Becoming a teacher who develops students’ learning power means developing a keen awareness of the subtleties of your students’ learning behaviours.
2) Creating a classroom culture for Planning
Cultivating learning habits ultimately involves:
Providing rich and varied occasions for exercising learning habits;
Infusing learning habits into lessons to enhance content understanding;
Recognising and celebrating the use and growth of learning habits;
Expecting students to take ownership of and responsibility for their own learning habits;
Exploring the development of learning habits with students over time.
As a teacher you are an influential character builder and so need to be mindful of how you help students form, replace, re-form and strengthen their learning habits. But don’t worry, you are not expected to be there yet. It takes most teachers between 2 and 3 years to become really fluent with this way of teaching. So, go easy on yourself. Feel determined because small steps often prove to be big levers for change. Have a think about what you might do…
What to stop and start
Here are a few ideas you might want to try. Take it steady, this way of teaching can be a big but exciting shift so it’s worth doing it slowly and thoughtfully. Look first at the Stop/avoid ideas. Some of these are far from trivial but it’s best to try to remove them before starting on the Start/do more of, Start slowly and Experiment with ideas.
3) How does Planning grow?
Get a handle on progression
As with all learning behaviours, Planning is not a case of ‘either you do, or you don’t’. Few learners think ahead and plan how they are going to proceed in all circumstances, and equally few are impulsive and lacking forethought in every situation. Most lie somewhere between these 2 extremes.
The chart below offers a glimpse of how Planning may grow. Column 1 identifies 6 phases of development, column 2 describes how the skills and behaviours may grow over time, column 3 shows the self-talk; what students may quietly say/explain to themselves at each phase of development.
Which colour best describes the majority of your students’ current Planning behaviours? What do they do? What can they not yet do?
4) Some teaching ideas to encourage a Planning frame of mind.
In the early stages of building your students’ learning power your role is to; make them aware of the behaviour; talk about it (what, how, why, when, if); celebrate its use; give opportunities to practise it, both in lessons and elsewhere; reflect on it to improve it. This staged start is reflected below…
Firstly… make students aware of the use and importance of Planning…when, where, why, how they are or could be doing it
Then… explore Planning a little more through the language of Planning
Try… using Planning as a lesson starter to tune students into using it
4a. Make students aware of Planning
How you make your students aware of the words that describe the behaviour and why it is important to use it.
Younger students
Plan a picnic for teddies
Ask children to suggest things that might need doing and record on flip chart using picture prompts. They may well come up with ideas like food, games, music, invitations…
Have different groups to plan each part. Support each group in turn
Discuss what needs doing for one aspect of the picnic and act as their scribe. Summarise their plan back to them when everything is agreed.
Bring everyone back together and share each aspect of the plan.
Ask the children how they think they can work together to get everything ready for the party. Keep referring to the plan.
This is also a very good exercise in collaboration and will offer lots of opportunities for revising as well when things need changing from the original idea.
Older students
Jumbled up planning
click to enlarge
Can you put these jumbled aspects of planning into a sensible order? Could you use the outcomes to create a planning flowchart with your class to guide future planning?
Younger students
Timetables . .
Click to enlarge
Ask the children to think of other things that need a timetable or plan. Start a display table and board of anything the children suggest or collect. You could find some bus and train timetables, a plan of the school and playground or a dinner menu for the term and so on.
Follow a treasure map
Plan a treasure hunt around the school. This could have a seasonal theme or simply be a fun one. Use a small area of the school and make a very simple large scale plan. Attach photographs or drawings to help the children follow the plan. Take them on the treasure hunt in small groups and regularly refer to the Treasure Map as a plan.
Older students
Structure an extended project
Give students a pack of cards that describe the 10 or so sections in an extended project based on the Driving Question: Where’s the safest place to live? Ask them to sequence the material to make clearest sense. Ask them to give each section a generic heading.
Challenge students to prepare the outline structure for a response to other Driving Questions, for example, ‘Is Planet Earth injury prone?’ ‘Where did the dinosaurs go?’ ‘Why don’t people stay at home?’ ‘Should we choose to end a human life?’ ‘Is the idea of God more trouble than it’s worth?’
Agree with the class the generic headings for an extended piece of work – display it as an aide-memoire in the future.
4b. Explore the language of Planning
How you might extend the language and understanding of this behaviour
Younger students
Discuss planning
Design a planning sheet to use with the children when you are planning an activity with them. You might include these and other headings:
What are we trying to achieve? (agreed goal, outcome)
How will we know we have been successful? (success criteria)
What do we need to do? (actions, jobs)
What will help us? (resources)
What might be a problem? (traps, obstacles)
What will we do about it? (What- if or contingency plans)
Who will do what? (roles) [Simplify according to age range.]
Older students
Extend the language of planning
Collect words that tell you how people plan.
click to enlarge
Relate planning to well-known sayings …
If you fail to plan, you plan to fail.
Hit the ground running.
Cross that bridge when you come to it.
4c. Use Planning as a lesson starter
Use a quick starter to key your students into the learning behaviour you want to concentrate on in the lesson. i.e. here you are starting up their Planning behaviour.
Younger students
Clapping a pattern
Planning a short rhythm
Sit pupils in a circle. You are going to clap a short rhythm for them, but first of all you are going to plan it.
Think aloud as you plan what you are going to do. Mention “Beginning”, “Middle” and “End”. Then clap the pattern you have planned.
Ask if they want to listen again and then have a go with you. Explain you remember it because you planned.
Pupils work in pairs to plan a short clapping pattern of their own. Practise with their fingertips on their palms so that they don’t disturb each other too much.
Ask them to perform their rhythm in pairs for everyone to listen to. Some may also like to try to teach it!
The emphasis is on planning what they are going to clap rather than just clapping straight off.
You may want to encourage pupils to make some kind of paper plan with a mark for every clap.
Older students
‘What will it look like when it’s finished?’
Too often students start a task without giving thought to what it will look like when it has been completed, what a good one will look like. Some find it easier to plan ‘in reverse’ – working backwards from the finished article to where they are now to establish a sensible plan of action.
Make WWILLWIF the regular precursor to any action. Ask students to determine WWILLWIF for themselves in conjunction with others. Help them to visualise this in an appropriate form.
5. Develop your learning language for Planning
Here is a range of things you could say to nudge Planning. When you use this kind of language you are talking as a learning coach; encouraging students to think for themselves. Using such statements encourages your students to:
imitate you
start to think in this way
become conscious of these phrases and their meaning.
Gradually you will hear some of the statements pop up in students’ self-talk….in speech or even in writing from time to time, but mostly this will go on inside their heads. As your work on Planning gathers pace, see if you can detect students who talk, or think, in these ways.
Learning-talk nudges that encourage Planning
Teacher talk – as a learning coach
Here are 10 ideas to ensure your students do the thinking for themselves
What will your end product look like?
How will you judge the success of what you have done?
Look at what you have done so far – do you need to make any changes?
Are you on track to meet your deadline?
What needs doing? In what order will you tackle it?
Do you have a contingency plan if that does not work?
Keep a weather eye on how it is going.
Are any particular planning tools appropriate here?
Is the goal manageable?
How can you make this plan more efficient?
Meta Learning
When you use this learning muscle, you …
are interested in how you learn as an individual
can talk about what skills you need to make progress
can talk about how learning works for you
know your strengths and weaknesses as a learner
are interested in becoming a better learner
See below to find out more about Meta Learning . . .
What do we mean by Meta Learning? Read more about Meta Learning, explore what a good Meta Learner does, and reflect on the Meta Learning behaviours of your students.
Creating a classroom culture for Meta Learning. Take time to think about the aspects of classroom culture that encourage the Meta Learning habit.
How does Meta Learning grow? Explore a progression chart for Meta Learning, and consider how your students’ Meta Learning skills are growing.
Some teaching ideas to encourage a Meta Learning frame of mind.Explore some teaching ideas to introduce and extend the language of Meta Learning to students, and some ideas for starting a lesson with a Meta Learning activity.
Develop your learning language for Meta Learning. Explore how you might talk in ways that stimulate your students’ Meta Learning behaviours.
1) What do we mean by Meta Learning?
Becoming a meta-learner involves drawing out of your learning experience a more general, explicit understanding of the process of learning, and specific knowledge about yourself as a learner. Let’s take these two aspects of meta-learning in turn.
There is a wealth of research which shows that good learners know a lot about learning.
They possess a vocabulary for talking about the process of learning itself, and are able to articulate how learning works.
Good readers, even quite young ones, are often able tell you half-a-dozen things they can do when they come across an unfamiliar word: they sound it out, break it down into bits, re-read the previous sentence, read on to see if the meaning becomes clear, look at the picture and think about it, and so on. And so, more generally, for good learners. The more able they are to talk about their learning, the more likely they are to be able to apply their knowledge to new domains too: meta-learning increases generalisation.
And good learners also need an accurate sense of themselves as learners. Being a good learner means being able to take your own strengths and weaknesses into account as you are weighing up a learning challenge, or deciding on a course of ‘professional development.’In the business world, it is common now for people to take a job (if they are lucky enough to have a choice) partly on the basis of what they hope to learn from it. To make that decision well, they need not only to be able to plan their learning career, but also to base their decision on a realistic assessment of what they need and are ready to learn. Again, plenty of practice in thinking and talking about oneself as a learner at school is good preparation for the future.
The skills and dispositions of meta-learning can be cultivated simply by a teacher’s persistent use of questions such as ‘How did you go about finding that out?’ or ‘How would you go about teaching that to other people?’
What does being a good Meta-Learner involve?
A well formed Meta-Learner’s habit involves being ready, willing, and able to:
Use a well-formed vocabulary to talk about the process of learning and how learning works;
Understand how you learn, playing to your strengths and improving areas of weakness;
Learn from learning itself, mulling things over, and learning from experiences in order to avoid mistakes in the future;
Reflect on and draw out useful lessons from experiences and identify key features that might be useful elsewhere.
Spotting the Meta-Learners in your class
Just to get you tuned in – have a quick think about ‘Me learners you may know’. Make a note of students you know who display these characteristics.
Becoming a teacher who develops students’ learning power means developing a keen awareness of the subtleties of your students’ learning behaviours.
2) Creating a classroom culture for Meta Learning
Cultivating learning habits ultimately involves:
Providing rich and varied occasions for exercising learning habits;
Infusing learning habits into lessons to enhance content understanding;
Recognising and celebrating the use and growth of learning habits;
Expecting students to take ownership of and responsibility for their own learning habits;
Exploring the development of learning habits with students over time.
As a teacher you are an influential character builder and so need to be mindful of how you help students form, replace, re-form and strengthen their learning habits.
But don’t worry, you’re not there yet. It takes most teachers between 2 and 3 years to become really fluent with this way of teaching. So, go easy on yourself. Feel determined because small steps often prove to be big levers for change. Have a think about what you might do…
What to stop and start
Here are a few ideas you might want to try. Take it steady, this way of teaching can be a big but exciting shift so it’s worth doing it slowly and thoughtfully.
Look first at the Stop/avoid ideas. Some of these are far from trivial but it’s best to try to remove them before starting on the Start/do more of, Start slowly and Experiment with ideas.
3) How does Meta Learning grow?
Get a handle on progression
As with all learning behaviours, Meta Learning is not a case of ‘either you do, or you don’t’. Few learners are completely unaware of how they learn, and equally few have a complete understanding of learning and their own learning strengths and weaknesses. Most lie somewhere between these 2 extremes.
The chart below offers a glimpse of how Meta Learning may grow. Column 1 identifies 6 phases of development, column 2 describes how the skills and behaviours may grow over time, column 3 shows the self-talk; what students may quietly say/explain to themselves at each phase of development.
Which colour best describes the majority of your students’ current Meta Learning behaviours? What do they do? What can they not yet do?
4) Some teaching ideas to encourage a Meta Learning frame of mind.
In the early stages of building your students’ learning power your role is to; make them aware of the behaviour; talk about it (what, how, why, when, if); celebrate its use; give opportunities to practise it, both in lessons and elsewhere; reflect on it to improve it. This staged start is reflected below…
Firstly… make students aware of the use and importance of Meta Learning…when, where, why, how they are or could be doing it
Then… explore Meta Learning a little more through the language of Meta Learning
Try… using Meta Learning as a lesson starter to tune students into using it
4a. Make students aware of Meta Learning
How you make your students aware of the words that describe the behaviour and why it is important to use it.
Younger students
Give pupils a practical understanding of tools for learning
Discuss learning behaviours and link each one with a practical tool, following children’s ideas about the links. Display pictures of the tools labelled with the behaviour they represent. Collect real tools to be handled in class. When talking about learning behaviours ask pupils which tool would help them to learn something and why.
They will soon be able to go and fetch, say, a notebook representing planning, before going outdoors to build a rocket, or the mirror of imitation if they were going to learn by watching someone else first.
Older students
Find out what students know about themselves as learners
A learning fitness quiz
Use this quiz to get students thinking about the process of learning and how they are as learners.
Our learning friendThe purpose of this story is to introduce thinking about learning. It doesn’t by any means introduce all the learning ‘muscles’ but it begins to focus thinking about how we learn and what it is that good learners do. It offers a way to introduce the idea that there are very particular things that we can learn how to do that will help us to become better learners.
Pay equal attention to what has been learned and how it has been learned in plenaries and review points. Encourage students to describe and discuss the learning behaviours they have been employing. Build in such moments for reflection whenever possible.
You might use a Rating Wheel to capture their thinking – colour in the segments according to how much they feel they have used the learning behaviour.
How you might extend the language and understanding of this behaviour
Younger students
Encourage pupils to see themselves as learners
Invite pupils to make themselves a ‘Things I have Learned in my Life’ scroll or book.
Encourage them to get as much help as they can from friends and family in order to make the most comprehensive list they could.
Give them time to share their lists with one another so that one idea inspires another until they feel their list is as complete as it can be.
Each time they learn something new, in or out of school, they add it to their list.
This can prove be a super weekly celebration to hear about, talk about and congratulate additions.
Older students
Explore successful learning
Time to think … and share ideas
In a small group — Think of something that one of you is good at that the others would like to learn … could be a sport or a school subject, playing an instrument, playing a game, making a drawing.
Interview this person about what goes on in their head when they are practising the skill.
Try questions like;
“ What have you tried that didn’t work? ”
“ Can you describe what ‘better’ means? ”
“ What goes on in your head when you are doing it? ”
“ Do you talk to yourself whilst you are learning? – What do you say? ”
“ How do you get better at this? ”
“ What different ways do you try?”
” When is it best?”
“What hinders your learning?”
“What helps you to learn?”
4c. Use Meta Learning as a lesson starter
Use a quick starter to key your students into the learning behaviour you want to concentrate on in the lesson. i.e. here you are starting up their Meta Learning behaviour.
All students
Linking ‘Learning Objectives’ and ‘Learning Behaviours’
Rather than telling students how they will need to be as learners to be successful, share your Learning Objectives / Success Criteria and invite them to discuss and agree the types of learning behaviours that they expect they will need to use in the upcoming lesson / activity.
Ask:
Why did they choose those particular behaviours?
Have they missed any key ones?
How precisely will they use these key behaviours?
How will they monitor the use?
What are their Success Criteria for the use of these key behaviours?
What are my own?
5. Develop your learning language for Meta Learning
Here is a range of things you could say to nudge Meta Learning. When you use this kind of language you are talking as a learning coach; encouraging students to think for themselves. Using such statements encourages your students to:
imitate you
start to think in this way
become conscious of these phrases and their meaning.
Gradually you will hear some of the statements pop up in students’ self-talk….in speech or even in writing from time to time, but mostly this will go on inside their heads. As your work on Meta Learning gathers pace, see if you can detect students who talk, or think, in these ways.
Learning-talk nudges that encourage Meta Learning
Teacher talk – as a learning coach
Here are 10 ideas to ensure your students do the thinking for themselves
What are the most important things you have found out about yourself as a learner?
Build in a moment to review what you have done and how you have done it
Where else could you use this skill/knowledge/idea?
Think back to when you. . . What did you learn from that?
What went well? What could be improved? What can we learn from this?
How can you / do you plan your learning in advance?
Ask yourself: what you need to know and then how are you going to come to know it?
How do you get through the boring/difficult bits?
Are you getting better at regulating your learning environment?
…introduce you to or remind you of descriptions of different groups/types of learning activities, and to invite you to reflect on the types of activities that you routinely organise for your students. The different activity types are ordered to illustrate increasing levels of learner independence.
B. The best way of tackling this is to..
…read through the descriptions of activity types, thinking about which activity types you tend to favour in your own planning.
While this looks like a relatively quick and interesting read it’s packed with information you may not have come across in this form previously. It’s a section you may want to return to for reminders again and again.
C. As a result it should have the following impact.
You will have a heightened awareness of the activities you tend to gravitate to, and an understanding of how you might broaden your repertoire.
Activity design categories
Types of Activities
All teachers design activities to help their students to access and understand the content of the lesson. These activities lie at the heart of lesson planning, linking what is to be learned with how it will be learned. While it is impossible to list all such activities, is it possible to discern some different types of activities, to identify some overarching categories or groups of activities?
Here we try to suggest a hierarchy of activity types, going from ‘Listening’, through to ‘Discovery’. This progression of activities: demands more of students; activates a wider/richer range of learning behaviours; and is underpinned by a shift of responsibility from the teacher towards the learner.
As you read through this section, think of the activities that you plan for your students and ask yourself which activity types you tend to favour. Also consider how you might adapt/tweak your usual activity types to offer students greater responsibility for their own learning.
Activity Type – ‘Listening’
The characteristics of a ‘Listening’ type activity are that:
the outcomes, success criteria and content known to the teacher;
students learn by listening to teacher exposition.
Essentially a relatively passive experience for learners unless the teacher overlays an activity that requires students to do more than simply listen. Nonetheless the fact that the activity is rooted in the exposition of ‘an expert’ (this ‘expert’ could be the teacher, or a U tube clip, or some other source of ‘expertise’) means that levels of learner independence are limited and the classroom culture is heavily teacher-focused.
This is not necessarily a bad thing – there are occasions when teachers must tell students ‘stuff’, and this is particularly the case when students would have no way of discovering the information for themselves. Used sparingly and only when necessary it is a valuable tool in the teacher’s arsenal, but used excessively or when not necessary it reduces students to being spectators rather than participators.
Activity Type – ‘Practising’
The characteristics of a ‘Practising’ type activity are that:
the outcome, success criteria and content are known to learners;
students engage in rehearsal or reinforcement or retrieval of content/skill.
Strategies might include: Past papers; Practice tests; Multiple choice tests; Quizzes; Writing an essay; Answering a spoken question; Testing yourself on your notes / flash cards; Creating (and answering) your own questions; Testing others and/or being tested by others.
Used for consolidation rather than new learning, ‘Practising’ is about helping students to struggle to recall something. When we struggle to remember something, it primes our brain to remember it more easily the next time we look. The brain gets the message that this memory must be important because we are looking for it. The more times we try to retrieve something, the stronger the memory gets. But it is the struggle that is important. If we reteach content instead of getting students to try and retrieve stuff they’ve probably forgotten, the memory does not get strengthened in the same way. It seems kinder but actually does students no favours.
The retrieval effect is stronger if we allow a bit of forgetting to happen before getting students to retrieve. Memories get stronger once retrieved if we have had time to forget them – bizarre as that sounds. Hence the need to spread such activities out into future lessons, spaced learning as it is sometimes called.
Activity Type – ‘Manipulating’
The characteristics of a ‘Manipulating’ type activity are that:
students are given all of the information to work with;
students have to manipulate the information by organising / sorting / ranking / sequencing.
Students begin ‘Manipulating’ type activities having been given all of the necessary information, usually broken up into smaller pieces. The task is to make sense of these pieces and to rebuild the whole. Re-building may require students to: sequence the information (a story or poem or historical events etc.); rank the information using some agreed criteria (Ranking); sort any information with an underlying pattern that can be discerned or created.
For more ideas, there are a number of ‘Manipulating’ type activities in The Teachers’ Toolkit (by Paul Ginnis), including ‘Ranking’.
The characteristics of an ‘Assembling’ type activity are that:
the information is given but is hidden / obscured;
students have to sort the information, judge its relevance, and make sense of it for themselves.
Like ‘Manipulating’ in some ways, ‘Assembling’ differs in that although all the information is provided, it is obscured and students need to make judgments about its importance / relevance. It is this need for a critical appraisal of the information provided that sets ‘Assembling’ apart from ‘Manipulating’.
Consider the example given opposite – building a credible account from a range of sometimes conflicting eyewitness statements. Remove all of the conflicting or possibly biased statements and the task is reduced to synthesising similar statements into a credible account. No need to think critically about the statements, just create a summary. The effect is to reduce an ‘Assembling’ type task into a ‘Manipulating’ task.
‘Murder Hunt’ (see below) is an ‘Assembling’ activity because students need to identify and eliminate all of the irrelevant information and red herrings. Remove the irrelevant information in advance and it becomes a ‘Manipulating’ activity, organising the relevant clues without the need to think critically about their relevance.
Likewise, a ‘Manipulating’ activity can be turned into an ‘Assembling’ activity with a few tweaks. In its ‘Manipulating’ format, Tin Tin is little more than a jigsaw puzzle. But – adding a couple of pieces from a similar but different Tin Tin cartoon, or even removing a couple of key pieces and inviting students to create their own replacements, introduces the need for a more critical, ‘Assembling’ type approach.
For more ideas, there are a number of ‘Assembling’ type activities in The Teachers’ Toolkit (by Paul Ginnis), including ‘Murder Hunt’.
The characteristics of an ‘Enquiry’ type activity are that:
the outcome is known, success criteria are known, content is known, but the method is unknown;
students determine their method for themselves.
The ‘Rock Salt’ activity was planned by a teacher in Glasgow who was exploring how he could give more control to his students. Read more about it and the impact it had on both himself and his students in the toggle below.
What price control? How one school is starting to do things differently.
One of our consultants was working recently with a school that provides education for secondary aged children with social, emotional and behavioural needs, on full and part time placements. Additionally it offers support for primary aged pupils on a similar basis. They had undertaken a couple of days training, and the 12 teachers were set the challenge of undertaking a learning enquiry.
Typically such an enquiry is conducted in an area of interest for the individual teacher, and might be along the lines of:
‘If I assign roles to individuals before starting group work, will their inclination to engage purposefully with each other improve?’ or ‘If I stop repeating myself, will their listening skills improve?’ etc.
Notice that the teacher makes a conscious decision to change one of their existing teaching behaviours and monitors the impact that this has on their students.
The third day began with all 12 feeding back on their enquiries and the impact on their students. The feedback was fascinating in that all teachers had devised, quite independently, an enquiry that required students to take a greater responsibility for themselves as learners.
A science teacher described one of the enquiries thus:
“I’ve got my kids to do the experiment where they make salt from rock salt for years. Thus far I would tell them all they need to know to be successful, demonstrate the experiment to the whole class, and then ask them to repeat the experiment exactly as I had done it. It gave me control, took care of safety issues, and was as boring as it can get! Why, if you have just seen someone else do the experiment, would anyone be motivated to repeat it for themselves?
I explored my rationale for teaching in this way, and realised that, control aside, I believed that it enabled me to ‘deliver the course’, to ‘make sure’ they all had the revision notes they need, and to ‘convince myself’ that I had taught it well so that they simply must have learned it well. On reflection, this strategy was failing on all counts. Either I would have to re-double my efforts and ‘teach’ even more/better, or maybe there was another way . . . .
With trepidation, I went in with a lump of rock salt and a bowl of salt, and set them the challenge ‘I want you to find out how to make this (salt) from that (rock salt)’. I then sat down, refused to answer any further questions or offer guidance – and it was agony for someone so used to being the font of information in the classroom!
(I admit to making a couple of interventions relating to the safe use of Bunsen burners, but that aside I just let them get on with it.)
What a revelation! They all devised ways to make salt; they discovered the science behind it; they needed minimal external control; and I got a bit of a rest.
The students reported increased enjoyment levels, I reported reduced stress levels, and tests revealed a deeper scientific understanding than was previously the case.
My kids are challenging and frequently disruptive, so much so that mainstream schooling cannot handle them. How amazing that I gained more control and they achieved deeper learning when I stopped teaching for control and started letting them learn.
I realised that these kids need challenge and engagement, not control and instruction. I was afraid this change of approach would slow content learning down, but I was wrong. The learning was deeper and faster because they had done it for themselves, rather than observed it through the eyes of a science teacher. My kids were being scientists, not learning science.”
The room erupted with similar stories of potentially difficult students rising to challenge and ‘doing it for themselves’. One teacher commented “We never really believed our students could do this, but we were wrong!”
When asked what the common threads were through all of their enquiries, one teacher simply said “student power – give them responsibility and they will rise to it”.
Ask yourself what a comparable enquiry type activity in your own classroom might look like. What might be holding you back from giving it a go, or from using an activity of this type more frequently?
Activity Type – ‘Finding – Discovery’
The characteristics of a ‘Discovery’ type activity are that:
the outcomes are unknown, the success criteria are unknown, the content is unknown, or at most loosely defined;
students determine their own intended outcomes, success criteria, content and method for themselves.
Designing ‘wild tasks’.
Much of the time, classrooms are structured to ‘deliver’ the curriculum. Tasks are carefully designed by teachers to ensure that every child gets their predetermined dose of curriculum content, content that can be assessed so that progress can be evidenced. But what if we occasionally design tasks that are ‘wild’, that have no predetermined outcomes, that give learners free rein to explore areas of their own interest?
Begin by asking students to identify questions to which they would like to know the answer – as one school calls them, ‘big awe and wonder questions’. You may choose to sift them so that everyone chooses from a range of questions that the class considers of greatest interest rather than allow complete freedom of choice. Students then design and undertake their own enquiry into their preferred area of interest as a home learning project. Agreed, you could not operate like this all of the time (or could you??!!), but once in a while? What could possibly go wrong? What might the benefits be?
…alert you to the transition from content-only planning, through to planning that weaves together the content to be acquired, the planned activities and the learning behaviours that are being developed and grown. Ultimately it is about the content being the vehicle for growing learning behaviours, while the developing learning behaviours aid and speed the content acquisition.
B. The best way of tackling this section is to..
…read it through, thinking about your own curriculum planning and where it fits in this pattern of progression in integrating learning behaviours into curriculum plans.
C. As a result it should have the following impact.
In the longer-term there are implications for how you plan your curriculum, medium term plans, and individual lessons as you become increasingly aware of the learning behaviours needed to access the curriculum and/or activated by the planned activities.
Essentially you will come to a stark reality….that unless you plan as described by level 5 your curriculum will have little impact on students’ learning behaviours.
1. The whole picture
Traditionally curriculum planning has identified what is going to be taught, how it is going to be taught, and how success is going to be assessed. Such planning has traditionally been wholly content and teaching related, with no reference to the learning behaviours necessary for accessing the content.
In this section we consider the transitionfrom content-only planning through to curriculum planning that integrates progression in content with progression in learning behaviours.
Here’s an outline of the whole transitional journey.
Level 1. Knowledge you are aiming for.
Planning at this simplistic level describes what is to be taught, and in what order. The content is defined and sequenced. There’s little reference to how the curriculum might be delivered or how it might be assessed, and certainly no reference to the learning behaviours necessary for success.
In terms of the teachers’ palette diagram:
Outcomes for teaching…responsibility for learning lies exclusively with the teacher, talk is about content, lessons are constructed to ‘deliver’ the curriculum according to individual teacher’s preferred delivery styles, performance is celebrated.
Outcomes for learning…students are there to be taught what they need to know, students don’t think about or know how they learn, learning is about knowing stuff and getting it right.
Level 2. The ‘how’ of delivery
Adding the ‘how’ of delivery to the content to be delivered serves to guide teaching and maybe define the activities that will be undertaken. This level of planning ensures greater consistency of delivery across different teaching groups, but is still teaching-focused.
In terms of classroom culture, this level of planning creates a teacher-focused classroom, and depending on the nature of the planned activities, some limited elements of the learner-focused classroom.
Outcomes for teaching…responsibility still lies exclusively with the teacher, talk is still about content, lessons are constructed to ‘deliver’ the curriculum, but delivery is less dependent on individual teacher’s preferred delivery styles and activities are planned / agreed in advance of delivery, successful content acquisition is celebrated.
Outcomes for learning…learning is still focused on content, learners have no awareness of the learning behaviours they are exercising, learning activities are becoming more consistent and engaging.
Level 3. Linking subjects and learning behaviours
Linking subjects and learning behaviours can be seen as a step-change in terms of curriculum planning.
At this level, consideration is given in advance to how students will need to be as learners in order to access the prescribed content.
Mostly this is at the level of identifying the key learning behaviours necessary for or activated by different subjects. For example, Mathematics frequently requires students to employ their reasoning and their pattern seeking skills, but some maths topics may also require attentive noticing, or critical curiosity etc. Other subjects will have a different blend of learning behaviours that they exercise on a regular basis.
Still at an early stage, planning now links content with learning behaviours, but at a fairly simplistic level. Subject planning is beginning to include ‘go-to’ learning behaviours, but at least these behaviours are being identified in advance and as such it is now possible to alert students to the learning behaviours that they are expected to employ – it fosters the beginning of dual-focused teaching (sometimes called split-screen teaching), in which both the content to be studied and the learning behaviours to be employed can be built into lesson planning.
Learning is brought out of the shadows and made visible, to both students and teachers.
[A short lesson plan which is part of a unit on ‘Blood and the Circulatory System’ is shown opposite, with learning behaviours shown highlighted yellow.]
Outcomes for teaching…responsibility is beginning to shift towards the learner, talk is predominantly about content, but learning behaviours are beginning to figure in classroom discourse, lessons are constructed to help students to understand how they will be learning the content and learning behaviours are built into lesson objectives. There is a growing recognition that lessons have twin intentions – to learn content and to exercise specific learning behaviours. Successful learning behaviours are discussed and celebrated.
Outcomes for learning…learners are becoming aware of the learning behaviours they are expected to exercise and are coming to understand that there is more to learning than just ‘knowing stuff’. They are beginning to be able to talk about the process of learning, although in relatively simple terms at this stage. Their role is changing as they begin to understand that success is dependent on their learning behaviours.
Level 4. Learning behaviours linked to delivery strategies
Linking learning behaviours to delivery strategies takes planning beyond linking learning behaviours to the content that is to be delivered. It recognises that the way that the content is delivered also activates / requires learning behaviours that could / should be identified, planned for and made visible in advance.
Consider a Science curriculum that involves, at some stage, students undertaking a practical experiment.
The skills required to observe the teacher conduct the experiment and then faithfully recreate the experiment as an individual requires skills of observation, listening, attention to detail, following a prescribed plan etc.
Contrast that with the skills required when the teacher puts students into small groups and challenges them to work together to plan how to do the experiment, to identify and gather the resources needed, to conduct the experiment, and to reflect together on how they could have planned it more efficiently.
Same experiment – with different learning behaviours stimulated by how the teacher chooses to organise the activity.
At this phase, the learning behaviours identified will be drawn from a framework like the Supple Learning Mind.
[The same lesson, which is part of a unit on ‘Blood and the Circulatory System’, is shown opposite, with content related learning behaviours and activity related behaviours shown highlighted yellow.]
Outcomes for teaching…responsibility is becoming increasingly shared, teachers are expecting more of learners, direct teaching is diminishing, and teachers increasingly see their role as a learning coach, guiding both content acquisition and understanding of learning, talk is a balance between what is being learned and how it is being learned, and the learning language is becoming ever more sophisticated, lesson construction is dual-focused and makes both the content to be learned and the learning behaviours to be employed visible to learners. A wide range of learning behaviours are noticed, discussed and celebrated.
Outcomes for learning…learners have sensed a shift of focus, away from ‘being taught’, towards taking responsibility for their own learning, they are increasingly aware of their learning strengths and relative weaknesses, they are coming to understand the learning process and themselves as learners, and understand that learning about learning is at least as important as ‘knowing stuff’.
Learning behaviours of the supple learning mind
Level 5. Learning behaviours linked to their progress
The holy grail of curriculum planning is: carefully sequenced content related planning that ensures that students’ understanding of their growth as a learner is of equal importance as their progressive understanding of the content matter.
Consider the example of the science planning in 3A5, above. The second strategy included ‘working together’ [or Collaboration as we would call it in terms of the Supple Learning Mind].
But we have a much more elaborated understanding of ‘Collaboration’ through the collaboration progression chart. Depending on the collaboration skill levels of learners, ‘working together’ might become ‘listen carefully to others and share your own ideas’ or ‘contribute to creating and agreeing a realistic team plan’ etc.
At this depth of planning, both the content specific learning behaviours and the activity specific learning behaviours are differentiated by reference to learning behaviours drawn from the relevant progression trajectories.
In terms of making learning visible, planning has moved beyond ‘today you will need your reasoning skills’ to ‘today you will need to able explain your thinking to neighbour and offer evidence to support your thinking’. We have moved beyond simply naming the skill to identifying a particular aspect of the learning behaviour.
Where 3A5, above, was a little blunt-edged, here references to learning behaviours are specific and differentiated to support learner progress.
[The same lesson, which is part of a unit on ‘Blood and the Circulatory System’, is shown opposite, with content related learning behaviours and activity related behaviours drawn from progression charts shown highlighted yellow.]
Outcomes for teaching… learning is a shared responsibility, and has become a shared endeavour between teachers and learners. Teachers make learning and how to get better at learning visible to learners – through talk, feedback and display. Teachers ensure that the curriculum is constructed so that it stretches both content and learning behaviours. Teachers value the growth of learning behaviours equally alongside progress and attainment. The growth in a wide range of learning behaviours is noticed, discussed and celebrated.
Outcomes for learning…learners have taken control their own development as learners. They have a deep understanding of, and can talk fluently about, the process of learning. They are aware of their learning strengths and which aspects of learning behaviours they are seeking to improve, and understand how improving as a learner supports and strengthens their progress and attainment.
What do we mean by Meta Learning? Read more about Meta Learning, explore what a good Meta Learner does, and reflect on the Meta Learning behaviours of your students.
Creating a classroom culture for Meta Learning. Take time to think about the aspects of classroom culture that encourage the Meta Learning habit.
How does Meta Learning grow? Explore a progression chart for Meta Learning, and consider how your students’ Meta Learning skills are growing.
Some teaching ideas to encourage a Meta Learning frame of mind.Explore some teaching ideas to introduce and extend the language of Meta Learning to students, and some ideas for starting a lesson with a Meta Learning activity.
Develop your learning language for Meta Learning. Explore how you might talk in ways that stimulate your students’ Meta Learning behaviours.
1) What do we mean by Meta Learning?
Becoming a meta-learner involves drawing out of your learning experience a more general, explicit understanding of the process of learning, and specific knowledge about yourself as a learner. Let’s take these two aspects of meta-learning in turn.
There is a wealth of research which shows that good learners know a lot about learning.
They possess a vocabulary for talking about the process of learning itself, and are able to articulate how learning works.
Good readers, even quite young ones, are often able tell you half-a-dozen things they can do when they come across an unfamiliar word: they sound it out, break it down into bits, re-read the previous sentence, read on to see if the meaning becomes clear, look at the picture and think about it, and so on. And so, more generally, for good learners. The more able they are to talk about their learning, the more likely they are to be able to apply their knowledge to new domains too: meta-learning increases generalisation.
And good learners also need an accurate sense of themselves as learners. Being a good learner means being able to take your own strengths and weaknesses into account as you are weighing up a learning challenge, or deciding on a course of ‘professional development.’In the business world, it is common now for people to take a job (if they are lucky enough to have a choice) partly on the basis of what they hope to learn from it. To make that decision well, they need not only to be able to plan their learning career, but also to base their decision on a realistic assessment of what they need and are ready to learn. Again, plenty of practice in thinking and talking about oneself as a learner at school is good preparation for the future.
The skills and dispositions of meta-learning can be cultivated simply by a teacher’s persistent use of questions such as ‘How did you go about finding that out?’ or ‘How would you go about teaching that to other people?’
What does being a good Meta-Learner involve?
A well formed Meta-Learner’s habit involves being ready, willing, and able to:
Use a well-formed vocabulary to talk about the process of learning and how learning works;
Understand how you learn, playing to your strengths and improving areas of weakness;
Learn from learning itself, mulling things over, and learning from experiences in order to avoid mistakes in the future;
Reflect on and draw out useful lessons from experiences and identify key features that might be useful elsewhere.
Spotting the Meta-Learners in your class
Just to get you tuned in – have a quick think about ‘Me learners you may know’. Make a note of students you know who display these characteristics.
Becoming a teacher who develops students’ learning power means developing a keen awareness of the subtleties of your students’ learning behaviours.
2) Creating a classroom culture for Meta Learning
Cultivating learning habits ultimately involves:
Providing rich and varied occasions for exercising learning habits;
Infusing learning habits into lessons to enhance content understanding;
Recognising and celebrating the use and growth of learning habits;
Expecting students to take ownership of and responsibility for their own learning habits;
Exploring the development of learning habits with students over time.
As a teacher you are an influential character builder and so need to be mindful of how you help students form, replace, re-form and strengthen their learning habits.
But don’t worry, you’re not there yet. It takes most teachers between 2 and 3 years to become really fluent with this way of teaching. So, go easy on yourself. Feel determined because small steps often prove to be big levers for change. Have a think about what you might do…
What to stop and start
Here are a few ideas you might want to try. Take it steady, this way of teaching can be a big but exciting shift so it’s worth doing it slowly and thoughtfully.
Look first at the Stop/avoid ideas. Some of these are far from trivial but it’s best to try to remove them before starting on the Start/do more of, Start slowly and Experiment with ideas.
3) How does Meta Learning grow?
Get a handle on progression
As with all learning behaviours, Meta Learning is not a case of ‘either you do, or you don’t’. Few learners are completely unaware of how they learn, and equally few have a complete understanding of learniing and their own learning strengths and weaknesses. Most lie somewhere between these 2 extremes.
The chart below offers a glimpse of how Meta Learning may grow. Column 1 identifies 6 phases of development, column 2 describes how the skills and behaviours may grow over time, column 3 shows the self-talk; what students may quietly say/explain to themselves at each phase of development.
Which colour best describes the majority of your students’ current Meta Learning behaviours? What do they? What can they not yet do?
4) Some teaching ideas to encourage a Meta Learning frame of mind.
In the early stages of building your students’ learning power your role is to; make them aware of the behaviour; talk about it (what, how, why, when, if); celebrate its use; give opportunities to practise it, both in lessons and elsewhere; reflect on it to improve it. This staged start is reflected below…
Firstly… make students aware of the use and importance of Meta Learning…when, where, why, how they are or could be doing it
Then… explore Meta Learning a little more through the language of Meta Learning
Try… using Meta Learning as a lesson starter to tune students into using it
4a. Make students aware of Meta Learning
How you make your students aware of the words that describe the behaviour and why it is important to use it.
Primary
Give pupils a practical understanding of tools for learning
Discuss learning behaviours and link each one with a practical tool, following children’s ideas about the links. Display pictures of the tools labelled with the behaviour they represent. Collect real tools to be handled in class. When talking about learning behaviours ask pupils which tool would help them to learn something and why.
They will soon able to go and fetch say, a notebook representing planning, before going outdoors to build a rocket, or the mirror of imitation if they were going to learn by watching someone else first.
Secondary
Find out what students know about themselves as learners
A learning fitness quiz
Use this quiz to get students thinking about the process of learning and how they are as learners.
Our learning friendThe purpose of this story is to introduce thinking about learning. It doesn’t by any means introduce all the learning ‘muscles’ but it begins to focus thinking about how we learn and what it is that good learners do. It offers a way to introduce the idea that there are very particular things that we can learn how to do that will help us to become better learners.
Pay equal attention to what has been learned and how it has been learned in plenaries and review points. Encourage students to describe and discuss the learning behaviours they have been employing. Build in such moments for reflection whenever possible.
You might use a Rating Wheel to capture their thinking – colour in the segments according to how much they feel they have used the learning behaviour.
How you might extend the language and understanding of this behaviour
Primary
Encourage pupils to see themselves as learners
Invite pupils to make themselves a ‘Things I have Learned in my Life’ scroll or book.
Encourage them to get as much help as they can from friends and family in order to make the most comprehensive list they could.
Give them time to share their lists with one another so that one idea inspires another until they feel their list is as complete as it can be.
Each time they learn something new, in or out of school, they add it to their list.
This can prove be a super weekly celebration to hear about, talk about and congratulate additions.
Secondary
Explore successful learning
Time to think … and share ideas
In a small group — Think of something that one of you is good at that the others would like to learn … could be a sport or a school subject, playing an instrument, playing a game, making a drawing.
Interview this person about what goes on in their head when they are practising the skill.
Try questions like;
“ What have you tried that didn’t work? ”
“ Can you describe what ‘better’ means? ”
“ What goes on in your head when you are doing it? ”
“ Do you talk to yourself whilst you are learning? – What do you say? ”
“ How do you get better at this? ”
“ What different ways do you try?”
” When is it best?”
“What hinders your learning?”
“What helps you to learn?”
4c. Use Meta Learning as a lesson starter
Use a quick starter to key your students into the learning behaviour you want to concentrate on in the lesson. i.e. here you are starting up their Meta Learning behaviour.
All students
Linking ‘Learning Objectives’ and ‘Learning Behaviours’
Rather than telling students how they will need to be as learners to be successful, share your Learning Objectives / Success Criteria and invite them to discuss and agree the types of learning behaviours that they expect they will need to use in the upcoming lesson / activity.
Ask:
Why did they choose those particular behaviours?
Have they missed any key ones?
How precisely will they use these key behaviours?
How will they monitor the use?
What are their Success Criteria for the use of these key behaviours?
What are my own?
5. Develop your learning language for Meta Learning
Here is a range of things you could say to nudge Meta Learning. When you use this kind of language you are talking as a learning coach; encouraging students to think for themselves. Using such statements encourages your students to:
imitate you
start to think in this way
become conscious of these phrases and their meaning.
Gradually you will hear some of the statements pop up in students’ self-talk….in speech or even in writing from time to time, but mostly this will go on inside their heads. As your work on Meta Learning gathers pace see if you can detect students who talk, or think, in these ways.
Learning-talk nudges that encourage Meta Learning
Teacher talk – as a learning coach
Here are 10 ideas to ensure your students do the thinking for themselves
What are the most important things you have found out about yourself as a learner?
Build in a moment to review what you have done and how you have done it
Where else could you use this skill/knowledge/idea?
Think back to when you. . . What did you learn from that?
What went well? What could be improved? What can we learn from this?
How can you / do you plan your learning in advance?
Ask yourself: what you need to know and then how are you going to come to know it?
How do you get through the boring/difficult bits?
Are you getting better at regulating your learning environment?
What do we mean by Xxxing? Read more about xxxing, explore what a good xxxer does, and reflect on the xxxing behaviours of your students.
Creating a classroom culture for Xxxing. Take time to think about the aspects of classroom culture that encourage the xxxing habit.
How does Xxxing grow? Explore a progression chart for Xxxing, and consider how your students’ Xxxing skills are growing.
Some teaching ideas to encourage a Xxxing frame of mind.Explore some teaching ideas to introduce and extend the language of Xxxing to students, and some ideas for starting a lesson with a Xxxing activity.
Develop your learning language for Xxxing. Explore how you might talk in ways that stimulate your students’ Xxxing behaviours.
1) What do we mean by Xxxing?
text
2) Creating a classroom culture for Xxxing
text
3) How does Xxxing grow?
Get a handle on progression
As with all learning behaviours, Xxxing is not a case of ‘either you do, or you don’t’. Few learners are oblivious to detail in every circumstance, and equally few are hugely attentive to detail in every situation. Most lie somewhere between these 2 extremes.
The chart below offers a glimpse of how Xxxing may grow. Column 1 identifies 6 phases of development, column 2 describes how the skills and behaviours may grow over time, column 3 shows the self-talk; what students may quietly say/explain to themselves at each phase of development.
Which colour best describes the majority of your students’ current xxxing behaviours? What do they? What can they not yet do?
4) Some teaching ideas to encourage a Xxxing frame of mind.
In the early stages of building your students’ learning power your role is to; make them aware of the behaviour; talk about it (what, how, why, when, if); celebrate its use; give opportunities to practise it, both in lessons and elsewhere; reflect on it to improve it. This staged start is reflected below…
Firstly… make students aware of the use and importance of xxxing…when, where, why, how they are or could be doing it
Then… explore xxxing a little more through the language of xxxing
Try… using xxxing as a lesson starter to tune students into using it
4a. Make students aware of Xxxing
How you make your students aware of the words that describe the behaviour and why it is important to use it.
text
4b. Explore the language of Xxxing
How you might extend the language and understanding of this behaviour
text
4c. Use Xxxing as a lesson starter
Use a quick starter to key your students into the learning behaviour you want to concentrate on in the lesson. i.e. here you are starting up their xxxing behaviour.
text
5. Develop your learning language for Xxxing
Here is a range of things you could say to nudge Xxxing. When you use this kind of language you are talking as a learning coach; encouraging students to think for themselves. Using such statements encourages your students to:
imitate you
start to think in this way
become conscious of these phrases and their meaning.
Gradually you will hear some of the statements pop up in students’ self-talk….in speech or even in writing from time to time, but mostly this will go on inside their heads. As your work on xxxing gathers pace see if you can detect students who talk, or think, in these ways.
Learning-talk nudges that encourage Xxxing
Teacher talk – as a learning coach
Here are 10 ideas to ensure your students do the thinking for themselves
zzz
MASTER
Mostly from HYLT
need to crebeyond the ate supple with circle
need to get prog chart etc from phase 2 BBL
need to reduce sub headings to Heading 3
Find out 4
Finding out about 8 further learning behaviours to broaden the range of behaviours you are actively promoting in your classroom.
This Find Out, which appears in all units, is a reference tool to be accessed when / if you need it.
It gives a short introduction to 8 additional learning behaviours: Noticing; Making Links; Reasoning; Imagining; Capitalising; Listening; Planning; Meta Learning.
Each contains 5 short sections:
What do we mean by this learning behaviour?
How do teachers create a classroom culture for it.
How does the behaviour grow?
Some teaching ideas to encourage the behaviour.
How to develop your learning language to support the behaviour.
You will find these introductions most useful as you begin to tackle Steps 2 and 3 in the Try Outs (above).
From Find Out 1 (the green tables) you’ve developed an idea of where your classroom culture is in relation to Celebrating Learning, and from Find Out 2 (the blue quiz) you have considered how your students are responding to the changes you have made.
Look below at the 5 Steps and identify the step that best fits your current classroom culture and how the majority of your students are responding.
If in doubt, start at the step that most accurately reflects how the majority of your students are responding.
Step 1. Start here if . . .
You display subject knowledge or what has been learned so that students can use such displays to help recall what they have been taught (from Find Out 1).
And as a result, the majority of your students are used to displays that focus on the content they are learning (from Find Out 2).
These ideas will help you to begin to develop wall displays about the how of learning.
In these early stages of building students’ learning power classroom walls become vibrant places where the messages, the philosophy, the ‘how to’ ideas, the stages of growth etc. all find a space and echo the culture of learning power loud and clear. You will always know when you’ve walked into a learning powered classroom.
Step 1. Develop wall displays about the how of learning.
Stuck Posters.
Work with students to find useful questions for them to ask themselves and helpful strategies which they might take when they are stuck. Ensure that there are plenty of options that come higher on the list than “Ask the teacher”. Create displays as reminders.
Here is an example generated by a year 7 class.
So called Stuck posters or prompts come in various shapes and sizes, but essentially they are simply home-made lists of what students can try when they get stuck with their learning.
To begin with, the teacher trains the students to make use of this information by greeting every request for prompting with; ‘Have you looked at the poster?’ After a while, looking at the poster becomes routine, and eventually, when the habit of self-unsticking becomes second nature, even the poster becomes redundant. It does not take long, in such a classroom, before ‘Ask the teacher’ becomes a last-ditch strategy, to be engaged only when all else has failed.
Use noticing to drive curiosity
Collect a good mixture of seeds, encourage students to bring them to school. Have a careful examination of all the different seeds using magnifying glasses and encourage the students to feel and smell them. Using seed trays and potting compost, have a seed sowing session with students. Over the next few weeks encourage students to have a really good look at them every day and observe them growing. They will notice lots of similarities and differences.
Teacher talk
Look closely
Be patient – take your time.
What are you asking yourself?
How are these two different?
And – Display the use of students’ Noticing behaviours
“We used our Noticing skills to find the different fruits and vegetables Archimboldo used in his portrait”
Engage students in looking for learning
Invite some students to be Learning Detectives. Task them with seeking and capturing examples of effective learning on camera / video. Build the outcomes into a display that helps all students to become more aware of the effective habits of others.
Teacher talk
What have you discovered today?
How did you capture that with the camera?
Did you notice and interesting noticing?
Which noticing behaviour happens most often?
Step 2. Start here if . . .
You use a various displays to support what we are discovering about learning; e.g. Stuck prompts, Curiosity corner, ‘Smart’ mistakes, Rights and Responsibilities of learners (from Find Out 1).
And as a result, the majority of your students are beginning to use classroom displays to support their own learning (from Find Out 2).
The ideas below will help you to develop displays that explore the ‘how’ of an increasing number of learning behaviours.
What you put on your walls now has no bounds because you are gradually adding more learning behaviours into the mix. Display now turns more towards the ‘how to’ plan or listen, or the stages of reasoning, or the value of imagining, or the sort of questions to avoid in order to maintain harmonious relationships. Your classroom walls become a treasure trove of learning to learn ideas.
Step 2. Make your classroom walls into a treasure trove of learning to learn ideas.
Make your classroom question friendly.
Create question walls in the classroom to illustrate and prompt questioning. Display, for example:
Student-posted questions about current topics that need resolution.
‘The Question of The Day’.
Different types and purposes of questions.
Questioning routines that the class have defined.
A lexicon of questions for use when exploring and enquiring.
A list of questions for use to get started, or unstuck.
Annotated student work and pictures to provoke questioning.
Rethink displays to illustrate work in progress
Collect and display work at different stages of development, with arrows and notes highlighting changes and their impact. Refer to these to encourage students to review and amend their work. Provide guidelines with questions they can ask themselves or each other at different stages in the process. Show that you do not expect perfection at a first attempt!
Teacher talk
First attempts are rarely good enough.
Quality takes time.
That’s very close to the right/model answer.
What would make it even closer?
Can I tell you what I think?
Who decides what is correct/good/good enough?
Question walls…exploring question types
At the start of a topic call for and display questions which students think might be answered during a topic. Go on to;
Discuss what sort of questions these are — open, closed, speculative, divergent, clarifying, essential, subsidiary
how they might lead to different types of information/reactions/strategies to gather information.
Draw up and display lists of generic questions to use whenever students undertake certain types of task, e.g. scientific investigation.
Refer to and extend these question groups regularly.
Teacher talk
For example: Clarifying
What does this actually mean?
How did they get to this point?
Do the ideas follow logically?
What is the sequence of ideas, and how do they work?
Might there be more to it?
What is it we’re not seeing?
What do we need more clarity about?
Use display to record key learning
Set aside an area of display where students are asked to share any strategies or ‘top tips’ that they have found particularly helpful in their own learning. For those offering the ‘top tip’, it is a distilling activity, but the resulting gallery of ‘top tips’ invites students to adopt the successful strategies of others.
This will also support the skills of noticing, collaborating, and distilling.
Teacher talk
Who has a top tip to add to the board today?
What made you think of that way of doing it?
Well done, you worked this out for yourself.
Can you try to do this without that tool? Can you work it out in your head?
What else might be helpful?
Step 3. Start here if . .
You celebrate ‘learning to learn’ values with a range of displays e.g.: Questioning walls; If-Then statements; learning stretch ladders; drafts of work in progress (from Find Out 1).
And as a result, the majority of your students are beginning to contribute to learning-related displays (from Find Out 2).
The ideas below will help you to capture students’ own feelings about their growth of learning capacities.
At this stage, which could be about eighteen months or so into your work with learning power, you have plenty of material to work with. There are the original four learning capacities plus the ones you are gradually adding to the mix. So your walls should be alive with information on the value and ‘how to advice’ on say, planning or making links, or questioning or doing bits of reasoning. And in amongst all that advice and ‘know how’ be sure to save a bit of wall space to capture students’own feelings about their growth in these capacities.
Step 3. Enable students to capture their own feelings about the growth of their learning capacities.
Understanding their own progression
A village school in Cumbria has developed pictorial ladders for the learning behaviours they are focusing on – the ones illustrated relate to aspects of Collaboration and Perseverance.
Beside the ladders, students are expected to write about themselves and how they know where they are now. They are:
self-assessing;
explaining which of the skills they believe they use a lot;
offering evidence for when and how they did it.
Hence this piece of wall isn’t just about showing progression in learning, it’s more about reflecting on the process and coming to understand themselves as learners…in action!
Creating student-friendly progression charts
In Find Out 4 you have met the progression charts for 8 learning behaviours, but these have been written to support teachers’ understanding of how the learning behaviours grow.
To use them in the classroom, as in the example above, you will probably need to simplify the language and pick out a few key aspects.
For example, the Listening chart (opposite) might be simplified, for display purposes, as:
I take turns when I talk to other people;
I listen carefully to what my friends say;
I try to understand what my friends are saying;
I am interested in what my friends think;
I try to understand how my friends are feeling.
Mind Maps
Create and display mind maps to encourage students to link and explain how information and ideas seem to be associated.
Use mind mapping at the beginning, middle and end of a unit of study to show how links and understanding change as knowledge grows.
Use at the end of a unit of learning as a synthesising tool.
Use a ‘thought shower mind map’ at the outset of a lesson to connect with prior learning and activate link making.
Teacher talk
Which aspects of this topic can you capture in a mind map?
How do you think the main issues link together?
Now that we have finished/looked at this topic, what would you add to/ change in your original mind map?
How has your understanding changed?
Where did most of your changes happen…which bits of the topic?
Have you had to re-draw the mind map completely?
Step 4. Start here if . . .
Classroom displays offer a rich array of advice on ‘how to’: use learning behaviours; avoid wobble; find successful learning strategies; how to progress (from Find Out 1).
And as a result, the majority of your students use displays independently to support their learning development (from Find Out 2).
The ideas below will help you to begin to uncover and display the what and the how of learning.
It’s essential for you, and sometimes for students, to understand the relationships between what is being learned, i.e. the curriculum content, and how the learning behaviours being used help this learning to happen. Much of the time this link will be happening in your head or in your plans. But once and only once, did we see this link displayed on classroom walls for all to see and understand. These displays had such a profoundly beneficial effect on both staff, students and parents that we share one here.
Step 4. Uncover and display the what and the how of learning.
Make coupling content and process public
Every classroom in Cadland Primary school has two walls dedicated to current curriculum plans, one for maths and one for literacy. The purpose of these displays is to show the journey of the current unit of work. They show;
what the objectives are;
what the success criteria look like;
what the stages of the process consist of;
what is being learned at each stage;
prompts about the new things being learned;
what the end result might look like.
These visual journeys are talked about and added to as the class progresses through the unit content. Learning behaviours are added to each point in the plan. Now students are not only aware of what they are learning about but the learning behaviours they are using to help them get to grips with the content.
The broad brush descriptions of the learning behaviours being used is a powerful, visual coupling of content and process; the what with the how of learning.
The first photograph shows the learning behaviours they are using as they move through the unit. The second photograph shows a reflection on the learning behaviours used and what this accomplished.
Chains of thought
Use group work to connect new ideas to previous knowledge.
Give each group some blank postcards, a set of cards with pictures of interlinked chains, felt-tip pens, string and Blu-Tack®.
Write the new idea on a large card and put it in the middle of the group.
Individually or collectively students identify connections between their own previous knowledge and the central idea.
They write each one down on a separate postcard and connect it to the central idea or other pieces of knowledge.
Discuss the connections. Make a class chart of the chains of thought using a classroom wall or interactive whiteboard. Explore how the activity has changed or expanded their understanding of the topic.
Teacher Talk
Does this concept link to what you already know ?
This will probably force you to reconsider…
New learning frequently contradicts what we think we already know…
Take a broader view of Meta-Learning
Enlarge and print onto card the meta-learning chart and cut it up into small cards. Students work in groups of 6 or 7 and first think, talk and sort the cards into what they consider easy to hard. Students then sort the cards into those they think of as important and those they feel are less important. This simple activity helps students to gain a much richer understanding of the expanse of meta-learning behaviours and will surface some fascinating discussions.
[This approach could be used with any of the learning behaviour progression charts.]
Teacher talk
Which aspects of meta-learning seem more important to you than others?
Would you put that one closer to the middle or further out? What makes you say that?
Which is the most important of the easier ones?
Which of the important ones do you want to improve on/use more often.
Are there some ‘cells’ that you want to know more about?
You create displays with students that illustrate how learning behaviours and content learning are inter-related and growing strongly (from Find Out 1).
And, as a result, the majority of your students contribute to learning displays that link content with learning behaviours (from Find Out 2).
The ideas below will help you to secure this and further the success of an integrated learning culture.
Learning to learn values have been secured and can be witnessed in your classroom culture, in your relationships with students and in how the curriculum is organised. It’s not just displayed on classroom walls but in the whole look and feel of learning. Your classroom walls will of course be adorned with helpful tips and ‘feel good’ celebrations. Your interpretation of the curriculum in classroom activities will illustrate your now deep understanding of how learning behaviours grow. Your grouping of students to work together, the language you use to support their learning all add up to a learning enhancing environment. You’ll know it when you see it, feel it, talk it and love it. And so will your students.
Step 5. Further the success of an integrated learning culture.
An opportunity to reflect on classroom culture and display
You have already made changes to your classroom culture and how it is displayed through your engagement with the phase 1 modules and you are now looking at Step 5 in phase 2. Display in your classroom should have developed significantly over this period to reflect the many changes to classroom culture you have made.
But, take a little time to check that display in your classroom adequately reflects and supports these cultural shifts.
Download the Display Amble, and find a bit of quiet time in your classroom to take a hard look at display – is it keeping up with the cultural changes you have made?
For each of the 16 statements about classroom display, rate your own classroom displays using the following scale:
1 = Display in my classroom is nothing like this
2 = Display in my classroom is a bit like this
3 = Display in my classroom is a lot like this
4 = This accurately describes display in my classroom
You should be seeing lots of 3s and 4s as your displays have matured over time. But are there any 2s or 1s that might need a little attention?
Have a wander around your own school and look at classrooms through the lens of the Display Amble, focussing especially on your perceived weaknesses in your own displays. Are there any displays from which you can learn? Indeed – are you seeing any displays that are so effective that they should be shared more widely across the school?
Ask yourself – what will you now do as a result of having carried out this Display Amble?
And a word of warning . . .
Values are for Living, not Laminating
Carefully laminated displays are worthless if they do not reflect the underlying culture of the classroom.
For example, a Question Wall in a classroom where curiosity is stifled, or a display of Collaboration ‘rights and responsibilities’ in a classroom where most learning is undertaken individually, are little more than window dressing.
Ask yourself – do the displays in my classroom accurately reflect my classroom learning culture?
From Find Out 1 (the green tables) you’ve developed an idea of where your classroom culture is in relation to Celebrating Learning, and from Find Out 2 (the blue quiz) you have considered how your students are responding to the changes you have made.
Look below at the 5 Steps and identify the step that best fits your current classroom culture and how the majority of your students are responding.
If in doubt, start at the step that most accurately reflects how the majority of your students are responding.
Step 1. Start here if . . .
You differentiate effectively to ensure that learners experience success and avoid making mistakes whenever possible (from Find Out 1).
And as a result, the majority of your students are afraid of making mistakes (from Find Out 2).
These ideas will help you to encourage your learners to give something a go.
You have learned that students have to understand ‘being stuck’ or making mistakes as perfectly normal, acceptable or even interesting places to be…somewhere where they might uncover something new or learn more about themselves. It’s important to stop mistakes or being stuck being experienced as negative indicators of ‘ability’. Instead of avoiding the risk of making mistakes you want your students to give something a go. When that happens, research tells us, perseverance goes up.
Step 1. Encourage students to give something a go.
Give mistakes high status, a key role in learning
Say that you expect students to make, for example, 3 in a lesson. If they haven’t made the quota of mistakes they are to ask for harder work
Make a ‘Mistakes of the Week’ display.
identify Good mistakes – as misconceptions and discuss them
Offer a range of examples of good mistakes as lesson starters for students to find and discuss.
Model making mistakes and how you learn from them.
Differentiate between learning time and performance time
This cultural shift is THE essential aspect of friendly classroom cultures. We can do no better than suggest you watch this video by way of explanation.
Set aside some quality time to watch an 11 minute TED Talk by Eduardo Briceno called ‘How to get better at the things you care about’. Prepare to spend time in your own learning zone, and temporarily abandon your performance zone. Consider particularly how you might “create low stakes islands in otherwise high stakes seas” in your own classroom. Ask yourself if your students might benefit from watching this? What would you hope that they might learn? How might it help them to attempt and to relish greater challenge?
Recognise the big link between emotional engagement and challenge
Learning is always an emotional business and learning how to manage this is best done ‘on the job’ in the course of learning rather than as a separate stand-alone activity. Emotional engagement is a prerequisite of powerful learning, it’s what gets you interested enough to be willing to put in the effort to get better and see the value of pushing yourself. So lessons aren’t just designed to make use of different kinds of learning behaviours but to give those behaviours a good work-out. Activities are designed to:
be challenging, where being stuck and confused are regular and fruitful experiences.
give students the opportunity to ‘learn what to do when they don’t know what to do’ – to work on wild tasks, rather than tame ones, where there’s plenty of scope to get lost and perplexed.
Or, as a teacher said to us recently:
“I became a better teacher the day I stopped thinking ‘have I made it easy enough for them to understand it?’ and started thinking ‘have I made it hard enough to stretch them?'”
“The presence of challenging learning intentions has multiple consequences. Students can be induced to invest greater effort, and invest more of their total capacity than under low demand conditions.”
(Hattie, Visible Learning)
Try these ideas to support challenge:
Make positive connections between making mistakes and challenge
Model how to think about and work through challenges
Create a challenge wall; put up questions, extension tasks, riddles, problems. A go-to place for another challenge when other learning is finished
Display work that shows students have improved mistakes etc.
Stimulate using ‘Stingray’ questions…What if...(something they thought they knew from a different angle – What if gravity was twice as strong ?)
Use the ‘learning pit’ to talk through what to do to overcome/surmount a challenge.
Step 2. Start here if . . .
You give students opportunities to experience failure as an essential part of learning. You promote being stuck as an interesting place to be (from Find Out 1).
And as a result, the majority of your students are becoming comfortable with the feeling of being stuck (from Find Out 2).
These ideas below will help you to encourage students to find their own way through things.
As part of your strategy to re-define failure you are putting more emphasis on students finding their own way through with minimal help from yourself. This of course only works when ‘being wrong or stuck’ is seen as an interesting not shameful place to be.
Step 2. Encourage students to find their own way through things.
From ‘I’m stuck ‘ To ‘I’m stuck because …‘
When a student says ‘I’m stuck’, resist the temptation to ask ‘what are you stuck on?’ – you know only too well they will probably reply ‘everything’. Better to explore ‘why’ they are stuck . . . .
Encourage students to identify the cause of their stuckness. Move students from saying “I’m stuck” to ” I’m stuck because…” Naming the problem will often suggest a reasonable next step.
It’s also useful to insist that students can’t call themselves ‘stuck’ unless they have tried to apply at least 1 solution.
Display stuck prompts in all shapes and sizes
These might include:
Quick reminder sheets on group tables.
A special Stuck Table with plenty of resources.
Stuck Prompts.
Containers (e.g. wellies) holding laminated reminders of things to do. Spots=numeracy. Stripes=literacy.
Stuck Walls with multiple displays of Stuck Posters, ‘stuck-of-the-week’, the Learning Pit and so forth.
During lessons students post up stuck problems and other students suggest solutions.
Ensure students are involved in creating stuck prompts.
Teacher talk to reflect on getting unstuck
Questions you might use to encourage your students to reflect on and think meta-cognitively about stuckness:
When you got stuck what did you do?
And then what did you do?
Did that help you get unstuck?
What usually helps you get unstuck?
What’s your favourite way of getting unstuck?
What’s your best way of getting unstuck?
What other ways might you try?
Questions on display. Make the classroom question friendly.
Create question walls in the classroom to illustrate and prompt questioning. Display, for example:
Student-posted questions about current topics that need resolution.
‘The Question of The Day’
Different types and purposes of questions.
Questioning routines that the class have defined.
A lexicon of questions for use when exploring and enquiring.
A list of questions for use to get started, or unstuck.
Annotated student work and pictures to provoke questioning.
Teacher talk
That’s a really interesting question!
Which question do you think is best?
Why is x x x x a really good question?
What do we want to find out about?
Step 3. Start here if . .
You encourage students to work out why things seem to go wrong, why they are stuck and how to find a way through difficulty. You emphasise making an effort over achievement (from Find Out 1).
And as a result, the majority of your students are interested in why they have gone wrong, why they are stuck (from Find Out 2).
These ideas will help you to keep the emphasis on finding their own way through things, the value of mistakes and how to get round tricky problems.
You introduced these ideas some time ago, possibly as long as 18 months to 2 years but it’s always a good idea to bring these essential ideas back into focus and ensure they are working at their best. So emphasising the value of mistakes or how to get round tricky learning are things that should always bubble along in the background.
Step 3. Enable students to value and learn from their mistakes and getting round tricky problems.
Create a challenge wall
Make the Challenge wall the focal point for your challenge culture. Make sure you add and refer to it frequently. For example:
Invite students to post up the most challenging questions they can think of. Allocate time to discuss them. The wall becomes a challenging talking point.
Cover the wall with challenges. questions, extension tasks, riddles, puzzles etc. These could be used by students who have finished their tasks early. Alternatively, set aside lesson time to for the whole class to discuss a challenge they select.
Display students’ work which shows mistakes they have learned from. This would include problems which students have persisted with or work that has been revised and edited to improve it.
What we notice and what we talk about matters. Students are ever-alert to the underlying culture of the classroom – ‘does this teacher really want me to make mistakes, or is she more interested in me getting it right?’
What’s more, you can say you want them to make mistakes as often as you like, but if your reward systems are tilted towards ‘correct’ answers, they will readily sense the inconsistency.
How do you / will you show your sustained commitment to students making mistakes and learning from them?
Sharing Mistakes
Make mistakes useful. Create a ‘Beware board’ in the classroom and invite students to share their mistakes on Post-its. Talk about why the mistake was made, what thinking led to the confusion and how it could be avoided in the future. Bringing mistakes into the open and discussing them helps other students to avoid them while recognising their value.
Teacher talk
That’s an interesting mistake – I wonder why that happened?
Who else made that mistake?
What can you learn from this mistake?
What have you misunderstood here I wonder?
Can you bring this up to standard?
of course there must be lots of Magic in the world” he said wisely one day, “but people don’t know what it is like or how to make it. perhaps the beginning is just to say nice things are going to happen until you make them happen i am going to try and experiment.” ― Frances Hodgson Burnett, The Secret Garden
Teacher talk
How many mistakes can you find here?
Who can find the most errors?
How would you change this for the better?
What made you think this was not quite right?
Change something – have another go
What could you look at to check your answer?
Step 4. Start here if . . .
Your practice is informed by reassessing failure. You view mistakes as valuable learning opportunities, feedback concentrates on what was right and why, more than on what was incorrect (from Find Out 1).
And as a result, the majority of your students view mistakes as valuable learning experiences (from Find Out 2).
These ideas will help you to focus on emphasising success rather than having a concern for failure
Your emphasis here is on ways to be successful rather than a concern with failure. By becoming familiar with the detail of the learning charts all aspects of your teaching will become more focused. Furthermore the detailed learning charts offer ideas that you might share with parents and encourage them to support at home.
Step 4. Concentrate on emphasising success and encourage parental support.
Identify high level learning capacities in the learning grids
Frame in the form of ‘nudging learning’ statements and use through giving feedback and expand the classroom’s learning language.
Higher level Reasoning skills include:
creating sound arguments backed by evidence;
balancing differing possibilities;
using ‘if . . . then . . . ‘ type reasoning;
detecting flaws in logic.
Higher level Imagining skills include:
visualising the future to enhance performance;
breaking the ‘rules’ to achieve novel outcomes;
being willing and prepared to follow one’s intuition;
disregarding conventional wisdom.
Higher level Link Making skills include:
keeping an open mind;
seeing connections between different disciplines;
using analogies make links between new and older learning;
applying ‘school learning’ to real world problems.
Prize second and third attempts over the first
Give students opportunities to make improvements and refinements to ‘completed’ work. Importantly, value the improvements at least as much as the first attempt. Discuss with students whether the ‘mark’ should be for the first attempt or the final attempt.
Teacher talk
Are you happy with this?
How could it be even better?
Almost there . . . .
Reporting progression in learning behaviours
Reports to parents generally convey an accurate evaluation of student attainment levels, but are often less precise in reporting how students’ learning behaviours are developing.
Give consideration to using phrases drawn from the learning progression charts to form the basis of a bank of learning-specific statements that sharpen teacher comments.
Teacher reporting talk
‘Works well in a group’ could become ‘adopts a variety of team roles’ or ‘shares their ideas with others’ etc.
‘Is imaginative’ could become ‘creates novel, creative outcomes’ or ‘uses their intuition to explore possibilities’ etc.
‘Is attentive’ could become ‘asks questions about what they notice’ or ‘spots trends, connections and patterns’ etc.
Step 5. Start here if . . .
Your classroom climate focuses on particular learning strategies, attitudes or behaviours that lie behind students’ progress needs. This approach is also shared with parents (from Find Out 1).
And, as a result, the majority of your students are making progress in addressing their individual learning development goals (from Find Out 2).
The ideas below will help you to secure this and further ensure your classroom has a well established culture of learning.
Creating a culture of thinking and making students’ thinking visible has not just been a matter of using VTRs in units of study; rather it’s been an ongoing process of development in which both your’s and your students’ expectations and ideas about learning have deepened over time. Research shown below has identified common stages through which you can ensure your classroom has a well established culture of learning.
Step 5. Ensure your classroom has a well-established cuture of learning.
Stages of development in the use of Thinking Routines
Creating a culture of thinking and making students’ thinking visible is not just a matter of inserting a VTR into a unit of study; rather it’s an ongoing process of development in which both teachers’ and students’ expectations and ideas about learning shift and deepen over time. Research has identified common stages through which both teachers and their students pass as they work through an extended period of time. These stages can be helpful in charting and recognising your own growth in using these routines.
Getting started: The initial stage.
At this initial stage, the aim, for both teachers and students, is to become familiar with the routine.
In this first ‘try out’ stage, the routine is like a stand alone activity, planned and carried out in a deliberate step by step manner. The intention is to stick closely to the prescribed steps, become familiar with them, and get comfortable with the language.
For example, you might decide to use the Visible Thinking Routine ‘See, Think, Wonder’. Depending on your group of students, you might even need to build up to the routine slowly – firstly practising ’What do you See’ before broadening out to include ‘What do you Think?’ and only once this is secure introducing the ‘Wonder’ aspect.
Getting comfortable: The Developing Stage.
At this Developing stage, teachers are beginning to finesse the routine, making subtle changes to enrich it:
Teachers might change ‘See’ to ‘See, Hear and Feel’ to emphasise the idea of Noticing using all of the senses rather than just ‘looking’;
They might change ‘Think’ to ‘Think and Explain’ to emphasise that Thoughts need to be Explained rather than simply stated;
They might change ‘Wonder’ to ‘Give me your best Wonder’ to emphasise the need to prioritise important questions over random musings.
Getting confident: The Advanced Stage.
At this stage, teachers are adapting the See/Think/Wonder routine for their own purposes. They are integrating ideas from other VTRs, making fundamental adaptations rather than relatively superficial enhancements to fit their specific curriculum needs:
Teachers who are using the S/T/W activity to remind students of prior learning might choose to ‘tweak’ the routine by adding, after the ‘See’ stage, ‘How does this Connect with what you already know?’ (imported from the Connect/Extend/Challenge VTR);
If they are looking to encourage evidence based reasoning, they might add the VTR ‘What Makes you Say That?’ after the ‘Think’ stage;
If they are seeking to use S/T/W as a springboard to further enquiry, they might add, after the ‘Wonder’ stage, ‘How might you Explore your questions?’ (imported from Think/Puzzle/Explore).
At this Advanced stage, teachers are creating their own VTRs to suit their learners’ needs and the learning skills that the curriculum is seeking to exercise/strengthen.
The language of ownership and community
How are you most likely to describe your usual classroom?
My classroom?
Our classroom?
Their classroom?
And does it make any difference?
In his book, ‘Creating Cultures of Thinking’, Ron Ritchhart argues that the pronouns we use, like my/your/our and 1/you/we/us, betray our deep-seated views and belief systems. Most of us are completely oblivious to how we talk in terms of the pronouns we use, but our choices, he argues, convey a powerful if hidden message to students.
Consider for a moment the teacher who asks:
What are you noticing?
[This may be a question of an individual (the singular ‘you’) or of more than one person (the plural ‘you’). Some students even interpret it as a question for other people, but not for them.]
Contrast that with essentially the same question:
What are we noticing?
[This time it is definitely plural, and includes the teacher. It is a clear invitation to shared endeavour.]
Likewise the phrases ‘your success criteria’ or ‘the success criteria’ are very similar to, but subtly different from, ‘our success criteria’
Will marginal shifts in language like this make a significant difference on their own? Almost certainly not, Ritchhart argues. But if we are serious about beginning to share responsibility with students we need to make sure that our language reflects that commitment rather than, unintentionally, undermining it.
We’ve seen this routine spread easily through a school within weeks, both in age range and subjects.
SEE…through, say, the close examination of political cartoons or animal habitats using nature photos. It’s easy to fit with most content and offers a good introduction to most topics.
THINK…based on these observations, students begin to make interpretations with justifications as they say what they ‘think’.
WONDER…here students pose questions and wonder about their observations and interpretations.
This routine can spread quickly throughout a school due to its ability to engage students in open ended exploration. It’s non threatening so students are prepared to take risks with their responses and it works for both strong and weak students, often giving weaker students a voice.
But you might also add a line
See. What do you see in this picture?
Think. What do you think this means?
Justify. What makes you say that?
Wonder. What do you wonder about what you see?
This addition of ‘justify’ represents not so much a modification of the routine but rather makes an inherent part of the routine explicit for students. Many teachers have found that making this simple question of elaboration and justification increases their understanding of students’ responses and enhances class discussion.
This simple routine is giving students a way to structure, understand and reflect on their own thoughts. It is helping teachers to recognise the ‘deep level of thinking’ that many, not just the so-called brightest, students can achieve.
Stages of development in the use of Thinking Routines.
Creating a culture of thinking and making students’ thinking visible is not just a matter of inserting a VTR into a unit of study; rather it’s an ongoing process of development in which both teachers’ and students’ expectations and ideas about learning shift and deepen over time. Research has identified common stages through which both teachers and their students pass as they work through an extended period of time. These stages can be helpful in charting and recognising your own growth in using these routines.
Getting started: The initial stage.
In this first try out stage, the routine will feel like a stand alone activity, planned and carried out in a deliberate step by step manner. Stick closely to the steps and get comfortable with the language.
As students experience the routine for the first time it’s not unusual for them to have a sense of confusion about expectations and to wonder aloud what they are meant to do. This is to be expected. Being asked to think and to offer one’s ideas can feel quite different from the familiar script of classrooms. Some students will be concerned with being wrong or appearing “dumb”. Some may freeze up, others may give narrow, superficial, or simplistic responses. Others may wonder “Why are we doing this?”
To avoid these feelings its better to:
establish the purpose of using a thinking routine;
let students know how using the routine will advance their individual and collective understanding;
try out the content of the routine yourself to see how it will play and what examples may be given.
Analyse student responses to determine how you might promote better and deeper thinking in the future.
Getting comfortable: The Developing Stage.
Share your experience with other teachers and learn from each other.
Teachers’ thinking generally moves from a focus on the routine as an activity to a tool they will use to explore content and enhance understanding. ‘I used to begin my planning by thinking about which routines I could use in a unit. Now I think about what kinds of thinking I want them to do and choose a routine to scaffold and support those kinds of thinking. This may not sound much but the shift is huge.
For students, additional exposure to and use of the routines provides them with a growing confidence in the power and importance of their own ideas. With this comes greater independence in working with routines and an increased richness and depth of thinking.
Getting confident: The Advanced Stage.
With practice and reflection comes confidence. Now teachers are able to fit think routines seamlessly into their orchestration of the learning process. Sometimes teachers modify and adapt the routines slightly to better fit their needs and objectives
Routines are a great starting point but teachers find their attention broadens and shifts from “How do I use these thinking routines?” to “How do I create a culture for thinking in my classroom?”
Ownership of routines is also felt by students as they become more practiced. This is because they aren’t just classroom structures but ways of thinking which, over time you should expect and look for in your students.
Pitfalls and struggles.
Don’t let shared or exciting moments evaporate. Make students’ thinking visible. Prominently displaying the ideas for all to see not only guards against rich ideas being lost but communicates a sense of value for students’ thinking. Make invisible thinking visible.
Later, after Post-it note mania ask yourself “How am I using my classroom space to be an archive of the history and power of ideas that have happened in this place?”, “What ideas and thoughts do I want students to come back to over and over again, change them around, add to them, revise some, as we develop and deepen our understanding of a topic?”.
Finally, recognise that you once encountered these tools as new and foreign practices that needed to be tried out, reflected on and then retried. Allow yourself to make mistakes and learn from your students. And importantly, find colleagues with whom you can share and discuss your efforts and ongoing learning. With a broader goal of promoting deeper learning and understanding for your students you will find yourself well on the way to making thinking a valued, visible and actively promoted part of your classroom.
Creating a culture of thinking and making students’ thinking visible is not just a matter of inserting a VTR into a unit of study; rather it’s an ongoing process of development in which both teachers’ and students’ expectations and ideas about learning shift and deepen over time. Research has identified common stages through which both teachers and their students pass as they work through an extended period of time. These stages can be helpful in charting and recognising your own growth in using these routines.
Getting started: The initial stage.
At this initial stage, the aim, for both teachers and students, is to become familiar with the routine.
In this first ‘try out’ stage, the routine is like a stand alone activity, planned and carried out in a deliberate step by step manner. The intention is to stick closely to the prescribed steps, become familiar with them, and get comfortable with the language.
For example, you might decide to use the Visible Thinking Routine ‘See, Think, Wonder’. Depending on your group of students, you might even need to build up to the routine slowly – firstly practising ’What do you See’ before broadening out to include ‘What do you Think?’ and only once this is secure introducing the ‘Wonder’ aspect.
Getting comfortable: The Developing Stage.
At this Developing stage, teachers are beginning to finesse the routine, making subtle changes to enrich it:
Teachers might change ‘See’ to ‘See, Hear and Feel’ to emphasise the idea of Noticing using all of the senses rather than just ‘looking’;
They might change ‘Think’ to ‘Think and Explain’ to emphasise that Thoughts need to be Explained rather than simply stated;
They might change ‘Wonder’ to ‘Give me your best Wonder’ to emphasise the need to prioritise important questions over random musings.
Getting confident: The Advanced Stage.
At this stage, teachers are adapting the See/Think/Wonder routine for their own purposes. They are integrating ideas from other VTRs, making fundamental adaptations rather than relatively superficial enhancements to fit their specific curriculum needs:
Teachers who are using the S/T/W activity to remind students of prior learning might choose to ‘tweak’ the routine by adding, after the ‘See’ stage, ‘How does this Connect with what you already know?’ (imported from the Connect/Extend/Challenge VTR);
If they are looking to encourage evidence based reasoning, they might add the VTR ‘What Makes you Say That?’ after the ‘Think’ stage;
If they are seeking to use S/T/W as a springboard to further enquiry, they might add, after the ‘Wonder’ stage, ‘How might you Explore your questions?’ (imported from Think/Puzzle/Explore).
At this Advanced stage, teachers are creating their own VTRs to suit their learners’ needs and the learning skills that the curriculum is seeking to exercise/strengthen.
From Find Out 1 (the green tables) you’ve developed an idea of where your classroom culture is in relation to Celebrating Learning, and from Find Out 2 (the blue quiz) you have considered how your students are responding to the changes you have made.
Look below at the 5 Steps and identify the step that best fits your current classroom culture and how the majority of your students are responding.
If in doubt, start at the step that most accurately reflects how the majority of your students are responding.
Step 1. Start here if . . .
Your sole focus is on helping students to improve their knowledge and understanding of the curriculum content and how they need to improve it (from Find Out 1).
And as a result, the majority of your students do not think about or understand how they are learning (from Find Out 2).
The ideas below will help you to become familiar with and begin to track how learning powers grow.
In other sections of this course you have become familiar with the learning behaviours and the sort of teaching ideas that will ensure their use. In this section we look more closely at the learning behaviours themselves and explore how they grow and develop. This first step involves you in becoming familiar with the growth pattern of the foundational four behaviours and using this to become more aware of how your students learn. This closer attention to the detail of learning behaviours leads you to ask fascinating questions such as…. What does improvement in perseverance or questioning look like? Are my students making any progress? What might I do differently to ensure progress in their learning behaviours?
STEP 1. Build your awareness of learning growth patterns.
The building story.
The whole point of building better learners is to do just that, to build the learning behaviours, not simply to name them or indeed use them. The diagram alongside – Learning: Poles Apart – offers an outline view of this journey showing the reluctant learner on the left and the learning powered learner on the right. It represents a long but exciting journey from what can sometimes be negative behaviours on the left to rich, skilled and positive attitudes on the right. This journey covers students’ emotional learning habits, their cognitive/thinking habits, their social learning habits and their ability to manage the learning process itself.
There are three key facets to the progression of learning behaviours;
the frequency/how often the behaviour is being used (How much)
the range/scope of contexts in which it is used (Where)
the skilfulness with which it is employed. (How well)
Our understanding of what the journey might look like in practice has emerged and taken shape over the past ten years. The stages of the journey are ‘borrowed’ from Bloom’s taxonomy of the affective domain of learning. It is this scaling of the learning dispositions that will help you make sense of the journey as you track, and influence, your learners’ progress over time.
Learning journeys for the foundational four behaviours
The specifics of the growth pattern
In putting together a universal growth pattern we’ve borrowed ideas from Benjamin Bloom’s Taxonomy of Objectives of the Affective Domain to generate a very condensed version of the five main phases of growth, and for each phases we added a phrase which encapsulates its feeling or sentiment namely;
Receiving. (purple)…this is when you give attention to something; become aware, not avoiding or rejecting it; being alert to something. Show me,tell me.
Responding. (blue)…which involves going beyond merely attending to actively attending; complying; taking more responsibility for and enjoyment in initiating action. I’ll try.
Valuing. (green)...which involves accepting the worth of something; preferring something; being committed to the value of something. I see why.
Organisation. (yellow)…which involves adding to, formulating and organising their values into how they live their life. I make sure.
Embodies. (Characterisation in Bloom’s original)(orange)…which involves behaving consistently in accordance with their values, living what they stand for. I can’t not.
We’ve added a negative phase labelled Lacks (grey) where learners are unaware, show no interest in or avoid or reject the learning behaviour. I can’t. I won’t.
Growth in the foundational four learning behaviours
It’s useful to remember the essentials of building powerful learners include:
recognising that learning is a learnable craft; you can get better at it.
learning how to learn involves attitudes, values, interests and beliefs.
developing better learners is done with and by learners rather than to learners;
it involves cultivating dispositions and values rather than training skills;
it is not an inevitable by-product of ‘traditional effective teaching’;
it is about making students ready and willing as well as able to learn.
So now ask yourself…
What sort of learning characteristics do my learners have?
What sort of learning characteristics do my more successful learners have?
Which characteristics or behaviours do my struggling learners have?
Which learning behaviour contributes to the success of most of my learners?
Which learning behaviour is used less than any of the others?
How do the answers to these, and similar questions, apply to my teaching and the curriculum?
Learning development stages for the foundational four behaviours.
What do learning profiles reveal about my learners?
Your students as learners
At this early stage you could turn your attention to some of the learners in your class just to get an idea of how useful such profiles can be.
Begin by identifying 4 students you wish to focus on. Choose 1 lower achieving boy, 1 higher achieving boy, 1 lower achieving girl, and 1 higher achieving girl.
Download and print 4 copies of the behaviour chart opposite.
Using your knowledge of these 4 students, colour in and create a learning profile for each student.
Now ask...
which learning behaviours are particularly strong or weak?
are the profiles of the girls different from the boys?
are the profiles of the higher attainers different from the profiles of the lower attainers? How?
what questions is this raising for me?
has this exercise changed or sharpened my understanding of these students as learners.
Understanding what growth looks like and becoming aware of student growth will now begin to shape your development as a learning power practitioner.
Make reflecting on using learning habits part of everyday lessons.
Here is a practical way in which you and your students can keep an eye on the what, when and how of using a learning behaviour.
Learning mats are usually A4 laminated sheets that show various aspects of a learning habit. Keep them on desks/tables or as part of a wall display.
Students can refer to them during lessons as prompts about the finer aspects of a habit and later for self-reflection on what they have used, whether it was successful and how to improve it.
Below are downloads for the learning mats of the other 3 key learning behaviours.
I have begun to shape my classroom practice around the use of the foundational four learning behaviours and observe how students respond, benefit and grow (from Find Out 1).
And as a result, the majority of your students are beginning to understand how they use the 4 key learning behaviours (from Find Out 2).
The ideas below will help you to continue to track the growth of the foundational four learning behavioursand begin to track the impact of introducing new learning behaviours to students.
You will of course continue with your existing work with the 4 key learning behaviours, tracking how your students’ Perseverance, Questioning, Collaboration and Revising skills are developing and maturing. But, this stage represents a massive leap forward because now you’re beginning to add more learning behaviours into the mix.
Firstly you are just keeping an eye on what effect adding a new learning behaviour seems to have on students. But as you add more behaviours to the mix it’s really important to ensure you stay true to the basics of a learning culture. Make yourself a list of key characteristics and check it out from time to time as you add more learning behaviours to the mix. Later you could ask …what beneficial effect has adding planning, for example, had on your students’ learning? In short, what’s been the impact of adding planning or reasoning or imagining?
Step 2. Begin to track the growth of the original four key learning behaviours and the impact of introducing further learning behaviours.
Tracking the growth of four key learning behaviours
a) A tracking tool for teachers
Your work on integrating and tracking the growth of Perseverance, Questioning, Collaboration and Revising should continue even as you look to add in more learning behaviours.
Use the checklist (opposite) to keep an eye on how your students’ Perseverance skills are continuing to develop. The skills in the checklist become more sophisticated as you move down the list and you should see these skills becoming more secure in more students over time.
Begin with a quick snapshot of your students’ skills at present. For each statement, estimate and record whether this is a behaviour that is displayed by Most, Some or Few of your students. Date and keep your completed checklist for use later.
Repeat this analysis a few months later on another copy of the checklist. The differences between your initial checklist and second one give an indication of your students’ growing learning behaviours.
If these 2 checklists show ongoing improvements, reflect on why this might be. What have you done during this period to support these improvements?
If they show minimal progress, ask yourself how you might renew your focus on growing Perseverance.
Repeat for Questioning, Collaboration and Revising.
Alternatively / additionally, you might choose to encourage your students to track their own learning development in these 4 areas.
The first tool (opposite) covers all 4 of the key learning behaviours, with 5 ‘prompts’ for each behaviour.
Begin by getting your students to evaluate their learning behaviours at present. For each statement, estimate and record whether this is a behaviour that is rarely like me / sometimes like me / often like me / usually like me.
Repeat a few months later. The differences between the initial self-assessment and the second one is an indication of the student’s growing learning behaviours.
The deeper tracking tools (opposite) are a variation on the tracking tools for teachers (above in part a). Written for more sophisticated / older learners, use them to create a conversation about learning behaviour growth, to inform your own judgements, and to support learners to set and agree their own development targets.
[Using these 4 tracking tools can have spin-offs across all four areas of classroom culture – shifting responsibility to learners; building understanding of the learning process; integrating learning behaviours into lessons and reflecting on their use; tracking and displaying learning growth.]
Tracking the impact of introducing further learning behaviours
a) Tracking the impact of introducing the learning behaviour ‘Planning’
As you begin to think about adding a new learning behaviour, in this case Planning, think about where your students are now. Which planning habits do they already exhibit? Which ones are still at best embryonic?
Consider the 6 planning related behaviours in the tracking sheet (opposite). For each behaviour, what proportion of your students already exhibit them – All/Most; Many; Some; Few/None?
Treat this as your baseline measure. Keep your completed sheet to one side, and repeat it after you have spent some time, at least a term, working on Planning with your students.
As with a) above, the differences between your initial and second assessments evidence the changes in your students’ planning behaviours. Use this to find which behaviours are already improving, and which might need further attention.
To understand how to produce your own tracking tool for other learning behaviours, let’s explore how the tracking tool for Planning in a) above was produced:
Firstly go to ‘Find Out 4’ towards the end of the Celebrating Learning unit;
Open it, navigate to the Planning section, open the toggle box for Planning and explore it, taking your time to understand Planning and the range of skills, attitudes and beliefs that comprise being an effective planner;
Do not rush to implement ideas in your own classroom yet – treat this as preparatory learning for yourself before you introduce Planning to your students;
Pick up the progression chart for Planning from part c);
Since you have yet to introduce your students to the subtleties of Planning, it is reasonable to assume that their current skill set will be fairly limited. This is why we chose to focus the tracking tool on countering the negative aspects of the Grey cell and teasing out the positive skills and attitudes in the Purple and Blue cells;
Take your time to compare the tracking tool for Planning with the Planning progression chart – you will readily see how the tool was informed by the lower half of the progression chart.
Given that you can see how the tracking tool for Planning was generated, you are now in a position to do the same for other learning behaviours for yourself.
[It may, however, be worth considering as a school whether it would be advantageous to generate these tracking tools together rather than individually. The upside is that you would end up with tracking tools that are used consistently across all classrooms. The downside is that as an individual you might miss the opportunity to delve deeply into all of these learning behaviours for yourself.]
When you have produced your own tracking tools for other learning behaviours, you can download the template below should you wish to put your ideas into the same format that we have used.
You enable, encourage and monitor the growth of students’ use of a broadening range of learning behaviours re. thinking, feeling, relating and managing learning (from Find Out 1).
And as a result, the majority of your students are aware of how they are learning across a wide range of learning behaviours(from Find Out 2).
The ideas below will help you to deepen the approach and ensure students know/feel they are improving.
Step 3 is all about deepening the approach across the whole curriculum and really ensuring that students know and can feel when they are improving and making valiant steps in recognising their progress in becoming a stronger learner. This may be proclaimed loudly through wall displays or quietly through discussion and feedback.
Give each student a coloured piece of A4 paper on the classroom wall. Attach an envelope to the paper containing a piece of card cut up into five pieces. Each piece of card has a student generated ‘learning how’ goal. For examples:
I can take turns in a group.
I can explain why I think something.
I can listen carefully to what others are saying.
I can take my time to notice details.
I can look for patterns.
I can think ahead and plan what I should do next.
I can ignore things that distract me.
I can keep calm when I get stuck.
I can look for a way of getting unstuck.
I can improve something after making a mistake.
I can build on other people’s ideas.
When a student achieves a stated behaviour the card is taken out of the envelope and stuck to their piece of paper. The aim is to have all five pieces of card making up a completed jigsaw on the wall in a given time. e.g. a fortnight.
This is an example of public recognition being given to learning behaviour goals.
Celebrate growth in the skill
Many schools have found intriguing ways of celebrating and depicting the growth in learning habits. The display shown here is actually about the growth of questioning skills. Each aspect of the learning behaviour is explained on a leaf and students put a small picture of themselves onto the leaf when they feel they are using this skill effectively. In this way students become aware and conscious of their development and of their next step.
Use the progression grids to help you to structure what goes on your displays.
Teacher talk
How are you using your questioning skills?
What really worked for you?
What might you try next time?
Question & Answer sessions
Q&A sessions happen quite frequently in classrooms. Teachers may be trying to gauge understanding, to conduct a plenary or review point, to move thinking forward etc. The effectiveness of such points in the lesson relies on students listening to what each other has to say, otherwise it is one student ‘on the spot’ as answerer and 25 others having a bit of intellectual down-time until it is their turn to answer a question.
To encourage students to listen carefully to what their peers are saying, ‘bounce’ their answers on to other students for comment. Use supplementary questions like:
Do you agree (or disagree) with that?
Can you add anything to what xxx said?
Who can build on that?
Are you convinced by what xxx said?
Can you explain what xxx meant?
Can you find a flaw in that argument?
Can you defend that view?
How would you challenge that viewpoint?
Could you summarise what xxx just said?
Do you think (s)he is right / wrong?
No repetition of the student response, just passing one answer on to another student for comment. And because the teacher does not repeat the original answer, students have to listen to their peers’ answers or put themselves at risk of being caught out.
Step 4. Start here if . . .
Your learning language and view of students is enriched by the progression maps. They offer you and students a rich understanding of learning and what getting better looks like (from Find Out 1).
And as a result, the majority of your students are aware of how they are improving across a wide range of learning behaviours (from Find Out 2).
The ideas below will help you to prompt students in the finer points of learning behaviours as hinted at in progression charts.
It often happens that you see students struggling to do something and, short of telling them how to, you wonder just how you might help. What is it that the student could be doing but they’re not? A lack of confidence or understanding in a critical aspect of a learning behaviour can make a big difference to progress. For example it might be being able to visualise what they want to achieve (an aspect of Imagining), make or create or being confident to justify and say why we are thinking something (an aspect of Reasoning). So by this stage, as you see your students learning by using more and more learning behaviours, you will need to become far more familiar with the learning behaviour progression charts. They now come into their own in helping you to remember the finer points of helping students to improve.
The first question in this routine is flexible: it is useful when looking at objects such as works of art or historical artefacts, but it can also be used to explore a poem, make scientific observations and hypotheses, or investigate more conceptual ideas (i.e. democracy). The first question invites students to describe what they notice, see or know, but it is the supplementary question (What makes you say that?) that requires them to build explanations. It promotes evidence-based reasoning and when the students share their interpretations it encourages them to understand alternatives and multiple perspectives.
Have students work out a questioning hierarchy
Here are 10 statements relating to asking questions drawn from the progression map for questioning. Offer them to students in no particular order.
Ask students to categorise them into 3 groups for a classroom display
basic questioning skills
developing questioning skills
higher level questioning skills
I ask closed questions to gather factual information.
I can tell the difference between open and closed questions.
I ask questions when I want to find something out.
I am good at finding information on the internet.
I ask open questions to encourage others to tell me what they think.
I think about how I am asking questions to make sure I don’t upset anyone.
I am not afraid of asking questions in class.
I ask ‘what if . . . ‘ type questions to explore possibilities
I ask myself if the answer is true and if it tells me what I need to know.
I can use a book index to help me find information.
Use these categorised lists to:
display in your classroom
to ‘set and agree intentions for developing students’ learning behaviours’?
change each of these statements into an If / Then target?
create something similar for a different learning behaviour – say for Collaboration? Or for Reasoning?
Teacher talk
How will you go about this?
How will you resolve disagreements?
Do we all now agree?
Getting better at Making Links
Just to get your students tuned in – encourage them to have a quick think about their link making habits at this stage. Using the chart alongside, they refer to it in lessons and consider how often they display these characteristics.
As a result of their self-evaluations, challenge / support students to create a target for their own development as a link maker by identifying something that they do sometimes that they would like to do more frequently.
These behaviours tend to become more subtle and challenging as you move down this list, so it is better to set targets relating to doing more of what they currently ‘sometimes’ do, rather than trying to jump towards the bottom of the list and tackle a behaviour they currently ‘never’ employ.
Which of these link making behaviours are your strengths?
What makes you say that?
What would you like to get better at?
Who do you know who does this well?
What will you do differently in future?
[You could, of course, create such checklists for all of the learning behaviours – just pick out some key ideas from the relevant progression charts.]
Step 5. Start here if . . .
Students agree their learning development goals and you give time to improving the nuances of students’ learning growth across 12 behaviours (from Find Out 1).
And, as a result, the majority of your students work towards agreed development goals across 12 learning behaviours(from Find Out 2).
The ideas below will help you to secure this and further their development as independent learners
By this stage your students are very aware of the range and development of their learning behaviours. They should now be able to take control of their own learning journey. One way to help students take control is by introducing them to motivation research and an effective solution called ‘if-then’ planning.
Step 5. Further students’ development as independent learners.
Effective learning targets – a quick reminder
Advice about ‘making more effort’ or ‘asking more questions in class’ are almost never effective because they are ill-defined and beg more questions than answers – how much more effort? what kind of effort? / how many more questions? what type of questions?
If we want students to grow their learning behaviours we need to help them to think much more closely about the ‘hows’ and the ‘whats’. Motivation research proposes an effective solution to this called ‘if-then’ planning.
‘Ifs’ are the situations you want to remind yourself about. It is the bit that reminds you about the target.
‘Thens’ are what you will do about something, the action you will take.
Naturally it is possible to use the progression charts to design If / Then targets for all of the other learning behaviours.
A Thinking Routine
How do you want / need to improve as a learner?
The question itself is deep and searching. It requires the student to have an accurate assessment of their existing learning strengths and weaknesses, and to have identified particular aspects on which they wish / need to work.
Supplementary questions along the lines of ‘what are you actually going to do to achieve that?’ forces the move from wishful thinking to action planning. Such questions, asked to Yellow or Orange phase students, should elicit fluent responses. But at the Green phase, you will need to be prepared to scaffold the conversation, to provide suggestions and to offer strategies that might be employed.
It is at the Green phase that students really begin to get the idea that their learning is their responsibility.
From Find Out 1 (the green tables) you’ve developed an idea of where your classroom culture is in relation to Constructing Learning. From Find Out 2 (the blue quiz) you have considered how your students are responding to the changes you have made.
Each of the 5 Steps below offer a range of practical ideas to help you shift and develop the learning language of your classroom.
Identify the step that best fits your current classroom culture and how the majority of your students are responding.
If in doubt, start at the step that most accurately reflects how the majority of your students are responding.
Step 1. Start here if . . .
You use a range of tried and tested teaching strategies that achieve consistency and enable learners to access the curriculum with ease (from Find Out 1).
And as a result, the majority of your students are able to access a curriculum that is heavily scaffolded(from Find Out 2).
The ideas below show how to make the learning behaviours you want to instil in students shape how you teach.
Perhaps at this early stage the most important learning capacity students need to understand and strengthen is perseverance; being able to keep going, not simply to produce ‘right answers’ but to be able to grapple productively with a problem. Using low-stakes grapple tasks, maybe early in a lesson, helps students to enjoy wrestling with a problem, to try things out, to notice what works and what doesn’t and then to discuss what happened and why. It’s the beginning of students taking control of their own learning.
Step 1. Make learning behaviours shape how you teach.
Start lessons with a grapple task
A good grapple problem is challenging. It’s something that the students might have an idea about but might entail something they haven’t come across or done before. A good grapple task centres on learning that is just beyond the students’ reach/experience. They give students a chance to wrestle with the problem before they have been taught methods for tackling it. They are allowed to solve it in any way they want and in doing so they are discovering their own approaches and exposing their own tricky bits.
You could blend grapple tasks with Think Pair Share…giving time to think by themselves, share ideas with a partner before discussing it more widely. By using grapple tasks you are getting the students to:
build resilience;
develop problem solving skills;
enhance collaboration and listening;
cultivate ‘having a go’;
lessen fear of mistakes.
Don’t forget to discuss which strategies were used, which were successful/effective and why.
Give being stuck status
Plan to get students stuck
Start some lessons with something like:
‘In this lesson I want to make sure that you do get stuck’.
‘When you get stuck take a look at the unsticking prompts on your table to see if these help you to get unstuck’.
‘Later we will spend a few minutes talking about what we learned from being stuck and decide which unsticking idea worked best.’
The explicit message is that students need to expect being stuck during any lesson. The implicit message is that being stuck is a good thing – something you want to see. Using this technique regularly means students come to accept being stuck as a natural part of learning. It begins to build their curiosity about the why and possible patterns to stuckness.
Teacher talk
Encourage students to become more interested in difficulty and develop strategies to deal with stuckness. Use phrases like:
Have a go yourself. I think you can do this.
Which of your friends might you ask?
Have you looked at the stuck prompts?
Well done for sticking at it by yourself.
What have you already tried? What else might work?
Which ideas on the stuck prompts might work here?
There are some good ideas on the learning wall you could try
Emphasise learning together
Think Pair Share
The basic building block of collaboration is pair work. Through brief and focused conversations, peers get the opportunity to voice their thoughts and start a dialogue about them.
TPS is a well-known strategy for ensuring that students build up to learning in a team.
One way of using this might be to;
Pose a question or problem, give students 1 minute to think individually about their own personal response; give 2 minutes in pairs to compare their first reactions with a partner; give fours 3 minutes to share their views in a group.
Use as a simple strategy to prepare students for working together in teams.
As an alternative, try Think/Link/Together which achieves the same outcomes.
Pair up with a partner. Explain your answer and listen to your partner’s response.
Share your answer (or your partner’s) if called upon.
This structure promotes the sort of talk and interaction needed for collaboration.
Step 2. Start here if . . .
You use low-stakes grapple tasks to introduce students to thinking about what they do when consciously using a learning behaviour (from Find Out 1).
And as a result, the majority of your students are beginning to enjoy accessing more challenging activities(from Find Out 2).
The ideas below help you design lessons where students need to use more learning behaviours.
Basically this is about strengthening your students’ ability to help themselves as a learner. In this phase you are bringing more learning behaviours into play and you need to be careful not to overwhelm students with the realisation that they have lots of ways to grow as a learner. Hence here we are just suggesting that you don’t neglect the basics and continue building in basic self-help features like, trying things out or checking success criteria or even helping students to understand what it means to ‘make an effort’.
Step 2. Bring in activities that require the use of more learning behaviours.
Strengthen students ability to help themselves by exploring the meaning of effort
Effort is a word that you probably use frequently, without giving it much thought. How might students decode this word and begin to act on it purposefully?
Explore what is meant by ‘effort’ with your students, and discuss with them the ways in which they might apply it.
Encourage students to come up with a definition of effort and specific examples of what it might look like in the classroom – for example by;
trying different strategies to solve a problem,
using a Visible Thinking Routine (VTR)
aiming to achieve challenging goals, or
using different un-sticking techniques when something is tricky.
paying attention to whoever is speaking.
Targeted Effort is now seen as a path to mastery. Students need to be aware of a connection between effort and improvement; that their effort is causing their improvement. This is why it is important to give effort meaning. Meaning often underpins motivation which in turn drives behaviour.
Targeted effort is effort that has direction and purpose. It is underpinned by clear guidance and the specific goal to be achieved.
What you are doing here is giving effort a size and direction. What students need to understand is that their effort has a size and a purpose.
Give students an idea of what effort looks like in practice.
Demonstrate a task which you expect them to complete later in the lesson.
Explain what you are doing, in terms of effort, as you go along.
Your commentary might include:
referring to success criteria to plan and direct your actions
using an unsticking strategy when you come across something tricky
looking for feedback from the class on your efforts, and adjusting your course in the face of that feedback
reminding yourself to refocus when a distraction comes along.
Introduce new learning behaviours
A classic test of creativity from psychologist Ellis Paul Torrance, way back in the sixties, as a way to administer a more creatively inclined IQ test.
Give students images similar to those above and ask them to finish the picture.
Discuss and explore the results for;
rich imagery
implied narrative
humour or
fantasy.
An interesting and thought provoking lesson starter.
Connecting new and prior learning
Mind Maps
Use mind maps to encourage students to link and explain how information and ideas seem to be associated.
Use mind mapping at the beginning, middle and end of a unit of study to show how links and understanding change as knowledge grows.
Use a ‘thought shower mind map’ at the outset of a lesson to connect with prior learning and activate link making.
Use at the end of a module of learning as a synthesising tool.
Teacher Talk
What is the central ‘idea’?
What are the big ideas around that?
How are these connected?
What other ideas spring to mind?
Where is it best to place them?
Why/how are they connected?
In other words . . .
To help students to link new learning to their existing understandings, encourage them to paraphrase or summarise what they have learned. Ask questions like ‘How does this change what you were thinking?’ to encourage them to reflect on how previous understandings may need to be adjusted in light of new learning.
Teacher Talk
What have you just discovered?
So, put simply . . . .
How could you summarise that idea?
What I think you are saying is ‘. . . . . . ‘
Step 3. Start here if . .
You explore what ‘effort’ means, encouraging use of different strategies to meet various levels of challenge. You praise perseverance/ effort rather than ability (from Find Out 1).
And as a result, the majority of your students are expanding the range of strategies they possess to tackle challenge(from Find Out 2).
The ideas below will help you to give your students more chances to take control of their learning.
As a teacher of course you want to design lessons to develop knowledge and effective learning behaviours in your students. Frequently your lessons will be carefully structured to ensure the curriculum is ‘covered’ and the ‘right’ knowledge, and understandings are offered. Sometimes learning activities might be more open ended.
Here we invite you to consider the range of activities that you routinely plan for your students and challenge you to expand your repertoire.
It is about balancing lesson structures and giving students more room to manoeuvre, more chances to take control of their learning. It’s about thinking about how different activity types trigger and require varying levels of learner independence.
Step 3. Offer students opportunities to take control.
Lesson types
All teachers design activities to help their students to access and understand the content of the lesson. These activities lie at the heart of lesson planning, linking what is to be learned with how it will be learned. While it is impossible to list all such activities, it is possible to discern some different types of activities, to identify some overarching categories or groups of activities.
Our list of activity types run from highly teacher-focused activities at the bottom that demand little more than attentive listening from the learner, through to ‘Finding’ type activities at the top that depend on both high levels of learner independence where learners are capable of accessing the content with minimal direct instruction. The activities that you choose will be critical to how students will learn how to learn and their love of learning itself.
[The ‘See’ part invites careful noticing, the ‘Think’ part invites a combination of Reasoning and Imagining, while the ‘Wonder’ part activates Questioning.]
Invite students to make an observation about an object (artwork, image, artefact) or topic. Follow up with what they think might be going on. Encourage backing up their interpretation with reasons.
Ask students to think about what this makes them wonder about the object or topic.
The routine works best when a student responds by using the three stems together at the same time, i.e., “I see…, I think…, I wonder…”. If not you need to scaffold each response with a follow-up question for the next stem.
This routine encourages careful observations and thoughtful interpretations. It helps stimulate curiosity and sets the stage for inquiry. Use it at the beginning of a new unit to motivate student interest. Try it with an object that connects to a topic during the unit of study. Use the routine with an interesting object near the end of a unit to encourage students to further apply their new knowledge and ideas.
Go to the Visible Thinking Websitefor more examples and information about visible thinking routines.
To download See Think Wonder from the Visible Thinking Website as a pdf:
Summer Shenanigans – An ‘Assembling’ type activity
The task is to solve a mystery.
Form groups of around 6/7 students.
One group member to observe the activity, the others combine to solve the mystery.
Distribute the 33 information cards equally between the group.
They may share this information orally, but they may not show their cards to other participants.
One person can act as scribe for the group if they wish.
They have 20 mins to finish the task.
They need to decide:
what was stolen
how it was stolen
who the thief was
what the thief’s motive was
when the crime took place
When the task has been completed, discuss the process with the help of the observers.
A few thoughts about the Summer Shenanigans Mystery:
This mystery will be appropriate for older students only. It is offered as an example of how an Assembling type activity could be constructed;
While the information cards are sufficient to solve the mystery, the inclusion of ‘red herrings’ in relation to a missing dog and a ‘lost’ ring mean that students have to judge the relevance of the information presented. It is what lifts it from being a Manipulating task into an Assembling task;
Observe the groups as they work through the challenge. Reflect on how a relatively simple activity can stimulate / require such a wide range of learning behaviours.
[For information – The answer to the mystery:
The painting by Artisimisso was stolen by Mr Handsome, who took it with him when he left the party at 9.50.
He took the painting because he was a kleptomaniac. [Or is there perhaps another motive?]
We cannot know for certain how he took the painting!]
Enable students to select their own levels of challenge
Provide tasks that are designed to offer low, medium and high challenge (or cool, spicy, hot.) Allow students to decide on the level of challenge that they wish to undertake, and use it as an opportunity to encourage them to aim high.
Use the Nando’s Peri-ometer as a visual aid to support the ranking of tasks by level of challenge, and allow students to select the level of challenge that they wish to undertake.
Teacher talk
What level of challenge have you chosen?
What made you select that one?
How does achieving this challenge make you feel?
What could you do to make that challenge harder for yourself?
Why do you think this challenge is trickier than that one?
I can see from your working out that you have chosen the right challenge for you. Not too difficult and not to easy!
Step 4. Start here if . . .
You offer a wide range of activity types, including Visible Thinking Routines, so using more learning behaviours and enhancing challenge (from Find Out 1).
And as a result, the majority of your students are becoming familiar with a wide range of activities with differing levels of challenge (from Find Out 2).
The ideas below will help you to begin to take a risk, carefully, and give your students opportunities to undertake their own enquiries.
Sometimes it’s worth taking the risk of using learning activities at the top of the Activity Design chart (introduced at step 3) where students are likely to know little about how to do it. Only you can judge when you think your students will be ready to undertake their own enquiries or set up an investigation. This step is about putting your toe in the water and seeing what happens. Where in the curriculum might you have a go and give things over to students?
In the toggle box you’ll find a heart-warming story from a teacher who decided to give more control to his students.
Step 4. Add opportunities for students to undertake their own enquiries.
A science teacher described one of the enquiries thus:
“I’ve got my kids to do the experiment where they make salt from rock salt for years. Thus far I would tell them all they need to know to be successful, demonstrate the experiment to the whole class, and then ask them to repeat the experiment exactly as I had done it. It gave me control, took care of safety issues, and was as boring as it can get! Why, if you have just seen someone else do the experiment, would anyone be motivated to repeat it for themselves?
I explored my rationale for teaching in this way, and realised that, control aside, I believed that it enabled me to ‘deliver the course’, to ‘make sure’ they all had the revision notes they need, and to ‘convince myself’ that I had taught it well so that they simply must have learned it well. On reflection, this strategy was failing on all counts. Either I would have to re-double my efforts and ‘teach’ even more/better, or maybe there was another way . . . .
With trepidation, I went in with a lump of rock salt and a bowl of salt, and set them the challenge ‘I want you to find out how to make this (salt) from that (rock salt)’. I then sat down, refused to answer any further questions or offer guidance – and it was agony for someone so used to being the font of information in the classroom!
(I admit to making a couple of interventions relating to the safe use of Bunsen burners, but that aside I just let them get on with it.)
What a revelation! They all devised ways to make salt; they discovered the science behind it; they needed minimal external control; and I got a bit of a rest.
The students reported increased enjoyment levels, I reported reduced stress levels, and tests revealed a deeper scientific understanding than was previously the case.
My kids are challenging and frequently disruptive, so much so that mainstream schooling cannot handle them. How amazing that I gained more control and they achieved deeper learning when I stopped teaching for control and started letting them learn.
I realised that these kids need challenge and engagement, not control and instruction. I was afraid this change of approach would slow content learning down, but I was wrong. The learning was deeper and faster because they had done it for themselves, rather than observed it through the eyes of a science teacher. My kids were being scientists, not learning science.”
A To Do list to help students create their own plans for seeking and engaging with challenge:
What’s the goal?
What are the success criteria?
What is the timeframe?
Gather information about the tasks
Link new information to what I already know
Where am I expecting difficulties – blocks and obstacles?
Are there any dependencies? If this….then that….
Use the expert knowledge of others to help distil and refine my ideas
Review where I’ve got to and check my thinking against the original success criteria
Evaluate emerging outcomes against my expectations
Amend the plan or goal if necessary
Hand in on time!
Teacher talk
What do you want to have at the end?
How do you want to express that as a goal
Is that going to be possible?
Is your goal SMART?
Looking for clues . . .
Abduction / Inferential Reasoning
A ‘Finding’ type activity that blends Inferential Reasoning and Noticing.
These two photographs were taken at different times, but which one was taken first? What time elapsed between the first and the second one?
We don’t have sufficient information to make a definitive answer, but there are lots of clues to signpost the way. In order to answer as best we can, we need to look very carefully to identify subtle differences and infer what they might mean.
Who can come up with the most convincing line of argument to support their hypothesis?
Can we agree, on the balance of the available evidence, the time that has elapsed?
Step 5. Start here if . . .
You extend the variety of task types to include open-ended experiments, trickier challenges, active inquiry and reflection (from Find Out 1).
And, as a result, the majority of your students enjoy open-ended, challenging activities (from Find Out 2).
The ideas below attempt to help you to be brave and experiment with and for your learners.
There has to be time in timetables and bravery in teachers to sometimes step outside the confines of the curriculum and try something bold, fascinating and worthwhile. It might be about doing more enquiry based learning in one subject or with one teacher in one class or it might be something much more adventurous as shown below. By this stage it is about having belief in experimenting and a belief in your students that they will value the experience.
Developing curiosity, independence, and transferable research skills is at the heart of ‘enquiry-based learning’. This intent can be explained as:
‘committed to creating a challenging environment where innovation and flexibility are celebrated. An approach to learning that focuses on student enquiry provides both teachers and students with an opportunity to think outside the normal confines of the curriculum. Teachers are encouraged to work collaboratively to break free from content-driven curriculum planning, and to focus on the skills that they would like their learners to develop.’
Here are some examples from schools we have worked with, where students in KS2/3 experienced several weeks each term when different curriculum areas come together to provide investigative work designed to generate a spirit of enquiry and experimentation.
The humanities come together for an eight-week block to explore issues of migration under the driving question: Why don’t people stay at home? Science, PE and Mathematics combined for a unit called A Question of Sport where students investigate the science and maths of certain sports. They experimented, for example, with the ways tennis would change if ball weight and racquet sizes changed. RE and Humanities came together to consider a wide range of disastrous events—a tsunami, the Holocaust, the crucifixion, and explore the question: Does every cloud have a silver lining? After two weeks of research, groups present their findings to their peers, parents and teachers.
These and other similar ideas are explored in chapter 6 of The Learning Powered School.
Build teams using Appreciative Inquiry
Engaging in Appreciative Inquiry
“Appreciative inquiry” in which people are invited to;
inquire into their best experiences
imagine what might be if more of these occurred
innovate by identifying how to get more
implement changes in this cycle.
Its four stages are Discover, Dream, Design, and Destiny (Do it). The AI model is normally used by organisations but could also apply to improving team learning. AI assumes that teams have many strengths which can be harnessed to meet new challenges. The trick, therefore, is to for the team to ask themselves;
‘What are we most proud of?’
‘What do we do best in terms of how we develop our learning?’ ‘
What is it that we do that most helps to develop ourselves as a powerful team?’
‘What is the most empowering team quest we have undertaken recently?’
Rather than problematising issues, AI begins by trying to identify what happens when the team and individuals in it are working really well. This process could involve a series of interviews, the outputs of which are stories, pictures, and key-words describing things that are already going well in the desired direction of travel.
The only rule for such enquiry is that it has to begin by being wholly positive. For some people this is surprisingly difficult; it often tends to be easier to talk about problems than strengths. It’s not that people are forbidden to talk about what is not going well; rather, discussions are framed so that when they do move into a more critical mode they do so in a spirit of pride and optimism, having confirmed all the many good things they are already doing. And this can make a huge difference.
After ‘Discover’ you Dream: creating a wish-list of what the team would like to do (with current constraints removed). This frees people’s minds to think more creatively. After these first two stages, the team has an agenda for action and change that isn’t encumbered by the usual excuses for inaction. From here the team moves into familiar territory—Design, a key element of any development work, and Doing that is reflective and optimistic.
Appreciative inquiry could also be applied to any aspect of teachers’ professional practice or to school practice.
There are numerous ways of linking subjects and ideas together and how you do this will probably be linked to your students and locality. A project around ‘Where we are in the world’ might integrate art, design technology, local history, geography, literacy, ICT and drama, and develop a host of skills. It could involve students:
Visiting places in the area round the school, taking photos and making sketches of what they see;
Interviewing local people and carrying out research in the library, developing communication skills and writing up their findings;
Discussing how the information they have gathered connects and so enhancing their understanding;
Discussing how an abstract form, a sculpture, could connect with and represent their new knowledge, then designing and making the sculpture;
Visiting a village in a rural community; interviewing residents, visiting the village school and drawing comparisons with their own.