

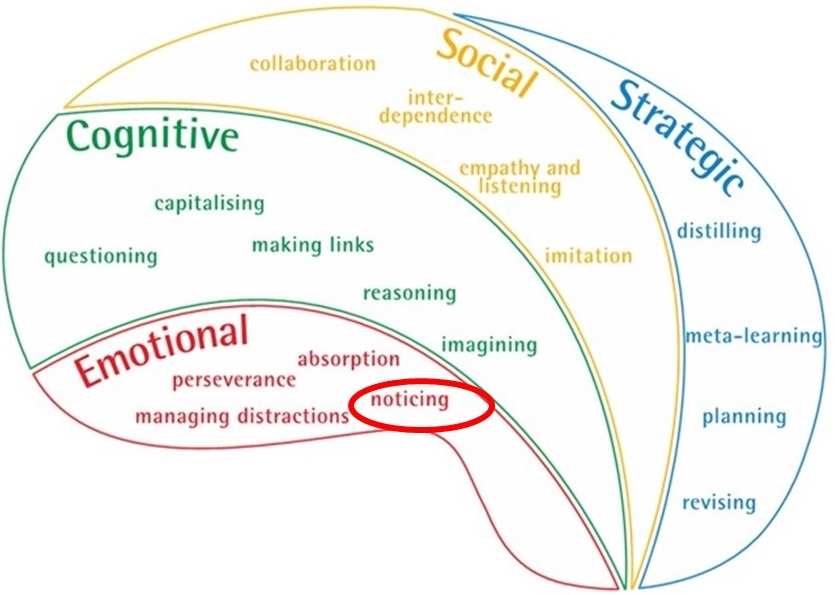
 Noticing
When you use this learning muscle, you …
- notice how things look, what they are made of, or how they behave
- are patient, knowing that details may take time to emerge
- can identify significant detail
- get a clear sense of what, before starting to think why or how
See below to find out more about Noticing . . .
Find Out more about Noticing ⬇️
Below are 5 short sections:
- What do we mean by Noticing? Read more about Noticing, explore what a good noticer does, and reflect on the noticing behaviours of your students.
- Creating a classroom culture for Noticing. Take time to think about the aspects of classroom culture that encourage the Noticing habit.
- How does Noticing grow? Explore a progression chart for Noticing, and consider how your students’ Noticing skills are growing.
- Some teaching ideas to encourage a Noticing frame of mind. Explore some teaching ideas to introduce and extend the language of Noticing to students, and some ideas for starting a lesson with a Noticing activity.
- Develop your learning language for Noticing. Explore how you might talk in ways that stimulate your students’ Noticing behaviours.
1) What do we mean by Noticing?
Learning often relies on being able to pay attention to what you are interested in: not necessarily thinking about it, just really noticing how it looks, what it is made of, or how it behaves. Many professionals, from poets to scientists to business managers, rely on this quality of attentive noticing: being able to identify the significant detail, or to let an underlying pattern of connections emerge into their minds. Sometimes you have to be patient before the detail or the pattern will reveal itself to you, like looking for sea creatures in a rock pool.
This is a skill that can be strengthened with practice. We often pick up this skill from people around us. Babies very soon learn to work out what their mother is focusing on, and to ‘share joint attention’ with her. It helps to be around people who are demonstrating this ability to watch carefully and turn their observations into accurate descriptions. Getting a really clear sense of what, before starting to think about how or why, is very useful.
What does being a good Noticer involve?
If you have a well formed Noticing habit you will be ready, willing, and able to:
- be attentive to details and subtleties in order to understand things;
- seek underlying patterns patiently, understanding that connections take time to emerge;
- actively use all your senses to gather information to build understanding of the world around;
- gain a clear sense of the ‘what’ of something before considering the ‘why’ and ‘how’;
- recognise that learning is often complex and difficult and takes time and effort to accomplish.
Spot the Noticers in your classes
Just to get you tuned in – have a quick think about ‘noticers you may know’. Make a note of students you know who display these characteristics.
Becoming a teacher who develops students’ learning power means developing a keen awareness of the subtleties of your students’ learning behaviours.
2) Creating a classroom culture for Noticing
Cultivating learning habits ultimately involves:
- Providing rich and varied occasions for exercising learning habits
- Infusing learning habits into lessons to enhance content understanding
- Recognising and celebrating the use and growth of learning habits
- Expecting students to take ownership of and responsibility for their own learning habits
- Exploring the development of learning habits with students over time
As a teacher you are an influential character builder and so need to be mindful of how you help students form, replace, re-form and strengthen their learning habits.
But don’t worry you are not expected to be there yet. It takes most teachers between 2 and 3 years to become really fluent with this way of teaching. So, go easy on yourself. Feel determined because small steps often prove to be big levers for change. Have a think about what you might do…
What to stop and start
Here are a few ideas you might want to try. Take it steady, this way of teaching can be a big but exciting shift so it’s worth doing it slowly and thoughtfully.
Look first at the Stop/avoid ideas. Some of these are far from trivial but it’s best to try to remove them before starting on the Start/do more of, Start slowly and Experiment with ideas.
3) How does Noticing grow?
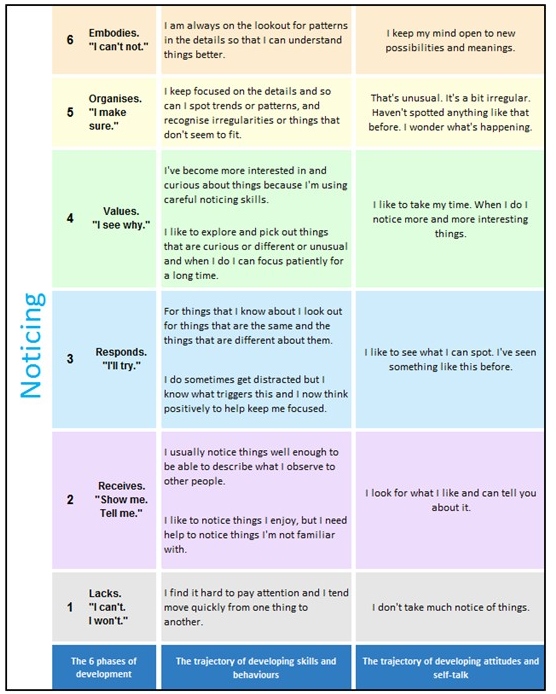
 Get a handle on progression
As with all learning behaviours, Noticing is not a case of ‘either you do, or you don’t’. Few learners are oblivious to detail in every circumstance, and equally few are hugely attentive to detail in every situation. Most lie somewhere between these 2 extremes.
The chart below offers a glimpse of how Noticing may grow. Column 1 identifies 6 phases of development, column 2 describes how the skills and behaviours may grow over time, column 3 shows the self-talk; what students may quietly say/explain to themselves at each phase of development.
Which colour best describes the majority of your students’ current noticing behaviours? What do they? What can they not yet do?
Download as a pdf
4) Some teaching ideas to encourage a Noticing frame of mind.
In the early stages of building your students’ learning power your role is to; make them aware of the behaviour; talk about it (what, how, why, when, if); celebrate its use; give opportunities to practise it, both in lessons and elsewhere; reflect on it to improve it. This staged start is reflected below…
- Firstly… make students aware of the use and importance of noticing…when, where, why, how they are or could be doing it
- Then… explore noticing a little more through the language of noticing
- Try… using noticing as a lesson starter to tune students into using it
4a. Make students aware of Noticing
How you make your students aware of the words that describe the behaviour and why it is important to use it.
Younger students
Give noticing a high profile

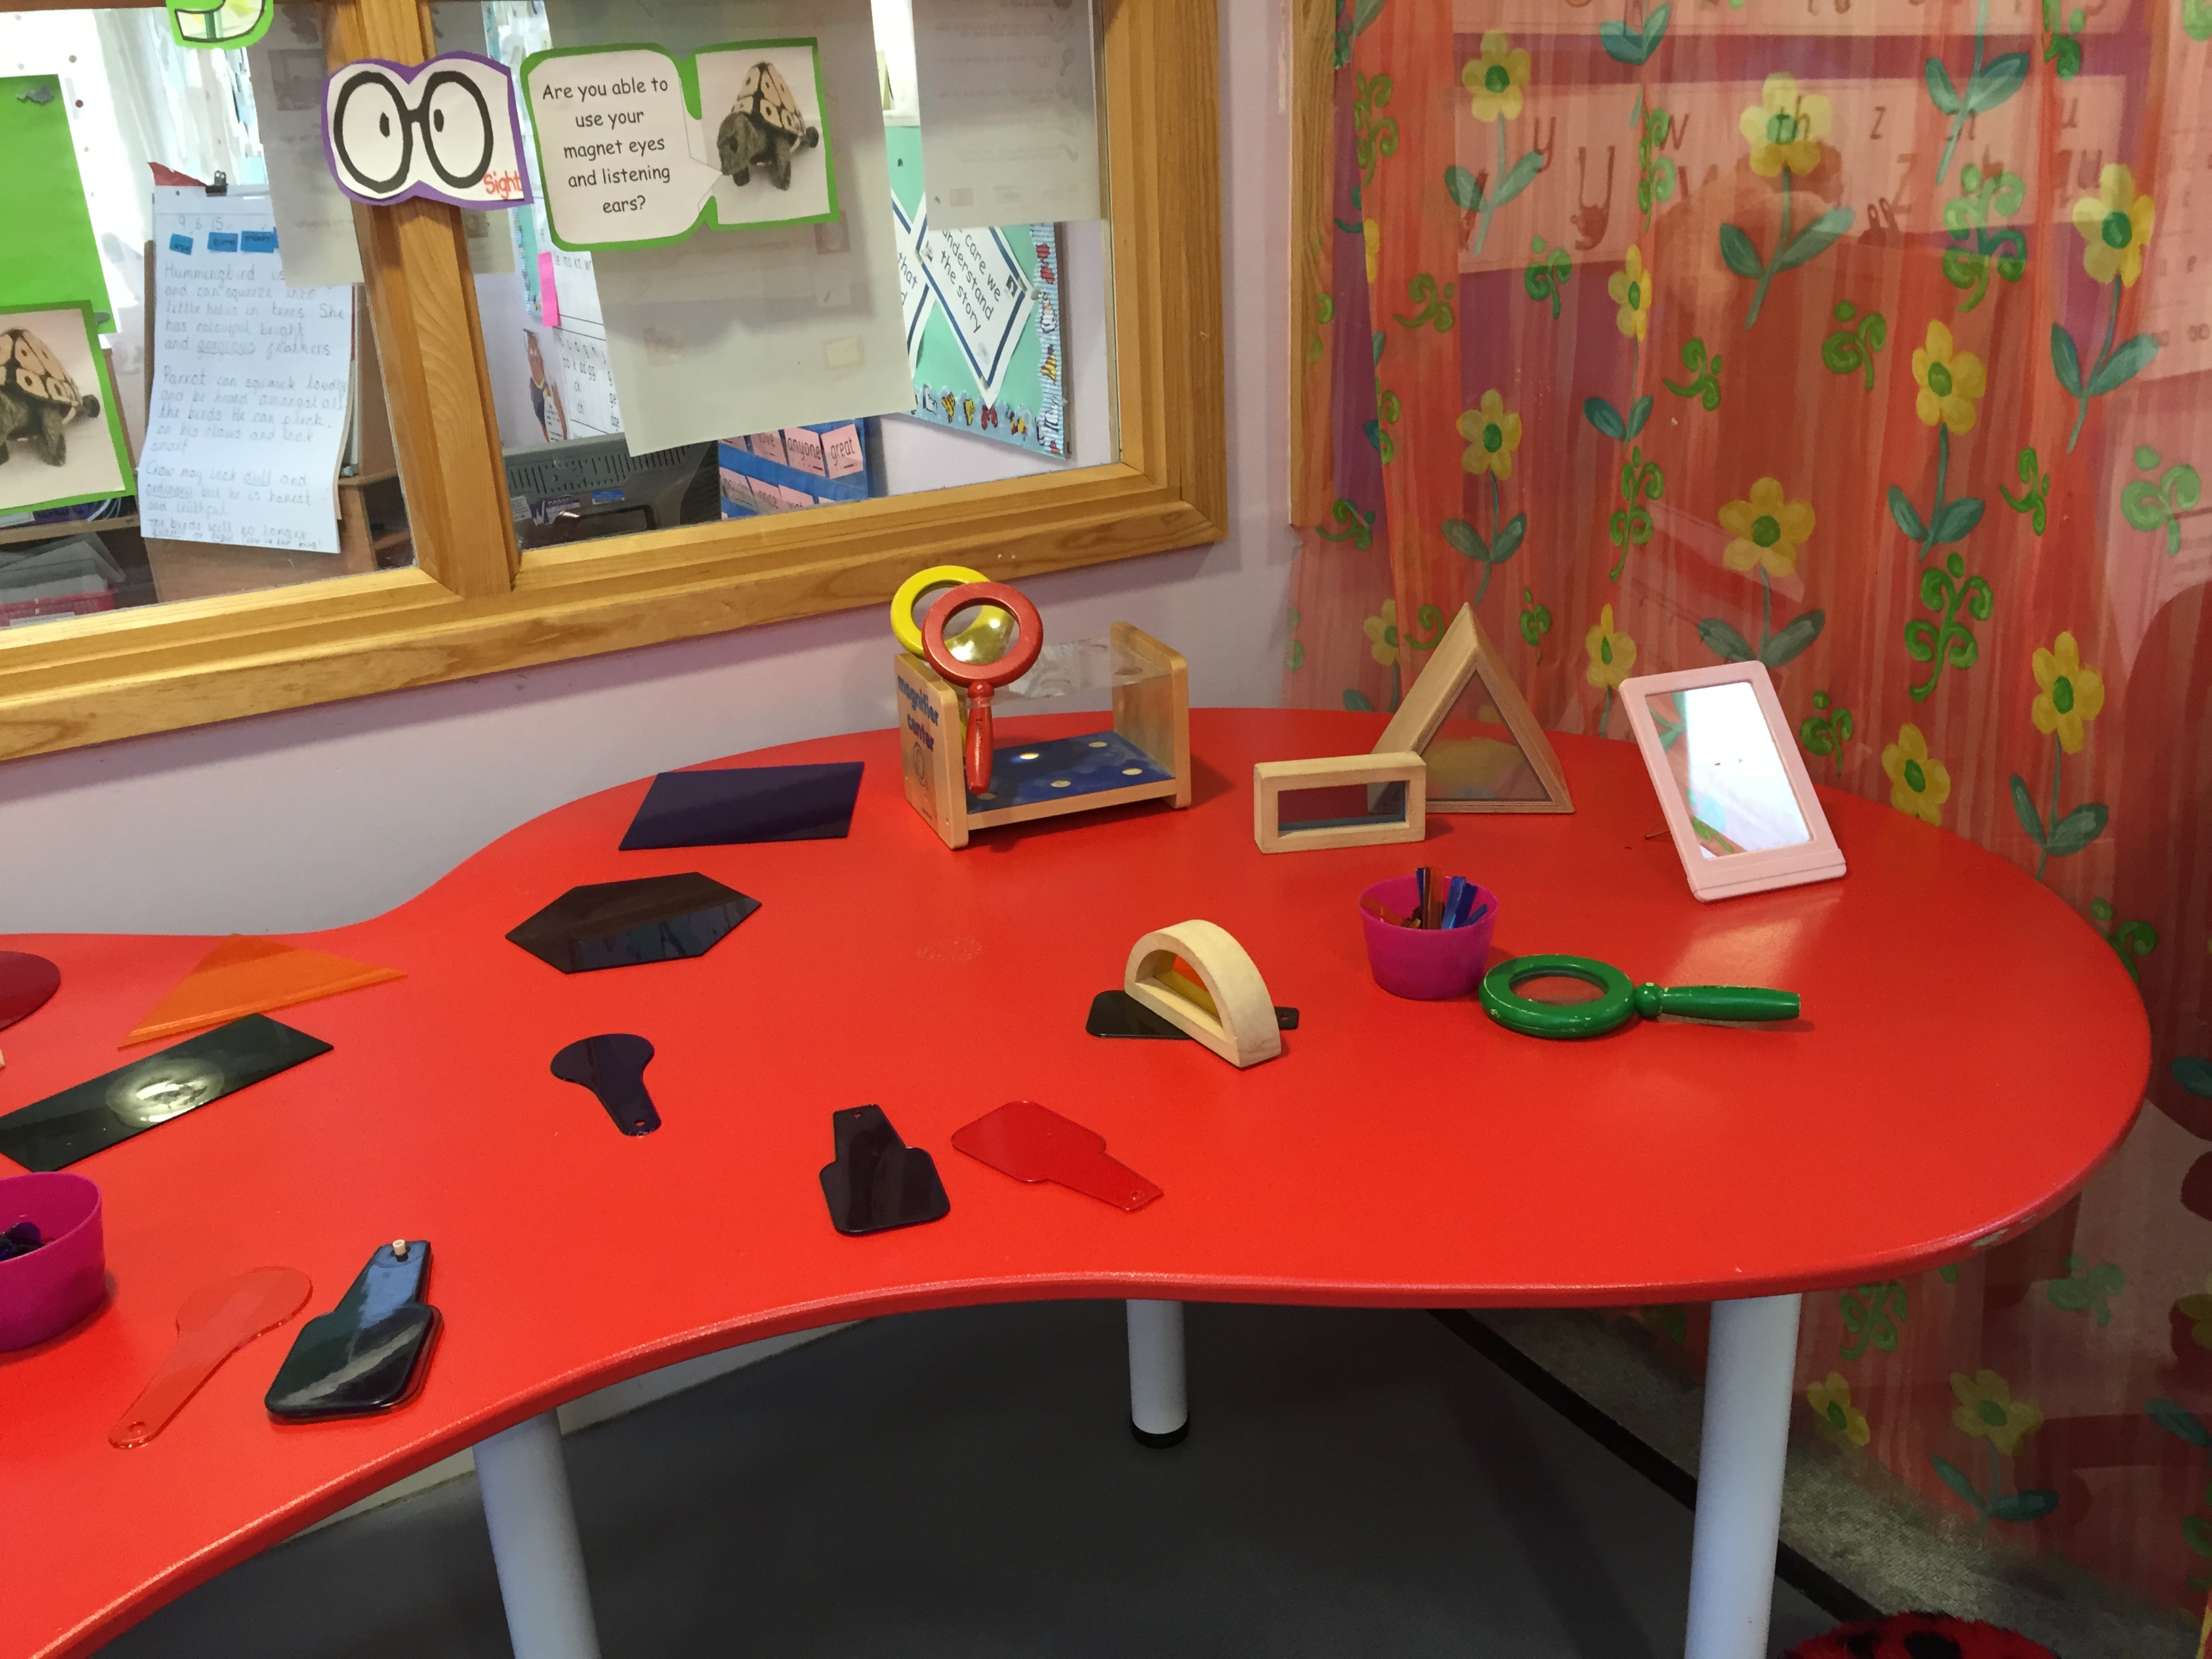
For example, create a Noticing table with magnifying glasses and interesting objects …. shells, coins, dead insects, flowers …… and lots more! Spend a few minutes each day for children to report on what new things they have noticed about the objects.
Older students
Give time to think … and share ideas

What do experts notice? – A painter will notice subtle differences in colour, shape or texture. What about other experts … gardeners, doctors, musicians, drivers, sports-people, actors, cooks, mechanics?
Choose a couple of experts from the list or from your own ideas and think about what they notice and how and why they might have learned this.
Younger students
Introduce games that require noticing behaviours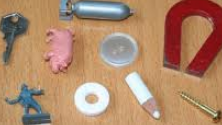

For example… use the familiar Kim’s game where students have to look carefully for a given time and then try to remember the group of articles. This simple format has numerous variations…what’s missing, what’s been added, what’s the odd one out?
Older students
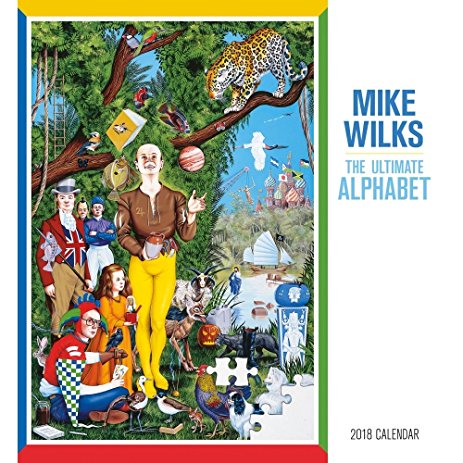
Introduce intriguing pictures to provoke noticing
4b. Explore the language of Noticing
How you might extend the language and understanding of this behaviour
Younger students
Discuss noticing others

Invite some students to be Learning Detectives. Task them with watching how children play team games. Their job is to watch out for how to do the activity best, what works and what doesn’t work. You will need to model this regularly, it won’t matter whether they are throwing bean bags into buckets, jumping through hoops or balancing on bars, the noticing and coaching will make a real difference to their learning. If possible capture examples of effective learning on camera / video. Build the outcomes into a display that helps all students to become more aware of the effective habits of others.
Older students
Extend the language of noticing


Collect words that tell you how people learn to notice detail.
Relate noticing to well known sayings
What do we mean when we say …
Eagle-eyed.
I’ve gone through it with a fine-tooth comb.
Keep your eyes peeled
4c. Use Noticing as a lesson starter
Use a quick starter to key your students into the learning behaviour you want to concentrate on in the lesson. i.e. here you are starting up their noticing behaviour.
Younger students
Intriguing Images
 For example have an intriguing picture ready on the whiteboard before the lesson starts. Students look forward to looking carefully at pictures where all is not as it seems.
Older students
Finding shapes


Offer students a random set of dots (or picture of the night sky). Invite them to seek items such as:
- A letter of the alphabet
- An animal
- A regular shape
- A face
- Or something linked to the content of the forthcoming lesson
5. Develop your learning language for Noticing
Here is a range of things you could say to nudge Noticing. When you use this kind of language you are talking as a learning coach; encouraging students to think for themselves. Using such statements encourages your students to:
- imitate you
- start to think in this way
- become conscious of these phrases and their meaning.
Gradually you will hear some of the statements pop up in students’ self-talk….in speech or even in writing from time to time, but mostly this will go on inside their heads. As your work on noticing gathers pace see if you can detect students who talk, or think, in these ways.
Learning-talk nudges that encourage Noticing
Teacher talk – as a learning coach
Here are 10 ideas to ensure your students do the thinking for themselves
- What do you notice about the way… is doing that?
- Just watch/listen for a while. What’s happening? Wait a little longer. What’s really going on?
- Be patient for a bit longer. Do you notice any patterns here?
- Great! Your patience is rewarded. You noticed some (unusual) patterns/really useful details there.
- Do you notice any differences between xxx and yyy?
- Is there more to this than you are seeing now?
- Had you noticed that before?
- What seems to be going on here?
- Do you notice [something different/unusual] about this?
- Have you missed anything?
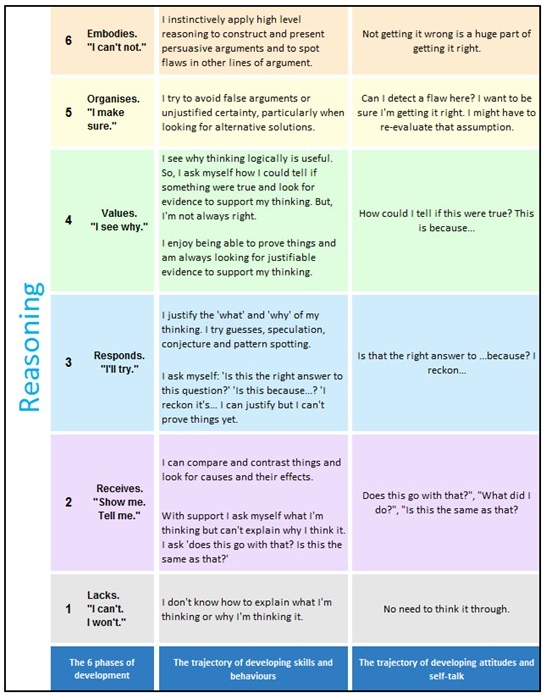
Reasoning

When you use this learning muscle, you …
- engage in disciplined thinking
- create logical arguments
- spot flaws in other people’s arguments
- deduce what might happen next
- look for valid evidence
See below to find out more about Reasoning . . .
Find Out more about Reasoning ⬇️
Below are 5 short sections:
- What do we mean by Reasoning? Read more about reasoning, explore what a good reasoner does, and reflect on the reasoning behaviours of your students.
- Creating a classroom culture for Reasoning. Take time to think about the aspects of classroom culture that encourage the reasoning habit.
- How does Reasoning grow? Explore a progression chart for Reasoning, and consider how your students’ Reasoning skills are growing.
- Some teaching ideas to encourage a Reasoning frame of mind. Explore some teaching ideas to introduce and extend the language of Reasoning to students, and some ideas for starting a lesson with a Reasoning activity.
- Develop your learning language for Reasoning. Explore how you might talk in ways that stimulate your students’ Reasoning behaviours.
1) What do we mean by Reasoning?
Reasoning—the kind of logical, analytical, explicit disciplined thinking that schools often focus on. There is a lot of interest at the moment in ways of teaching thinking, and in building students’ Learning Power, such ‘Show your working’ kinds of thinking are a very important part of the good learner’s toolkit, although not the be-all and end-all of learning. In fact, research suggests that secondary schools have not been very successful at developing students’ ability to think logically in real life.
It turns out to be quite difficult to free any kind of thinking or learning skill from its ties to the particular setting and subject matter in which it was originally practised.
Nevertheless, being able to construct logical arguments or make practical use of Venn diagrams, for example, is very useful, and good learners need practice at using such tools in the context of their real-life concerns.
What does being a good Reasoner involve?
A well formed Reasoning habit involves being ready, willing, and able to:
- Resist jumping to conclusions;
- Seek justifiable evidence to shape sound, well-honed arguments;
- Scrutinise your assumptions;
- Seek evidence and counter evidence, look for false steps and carefully draw conclusions;
- Remain suspicious, doubting and self-doubting in order to avoid unwarranted certainty;
- Convey your logical thinking clearly, through dialogue, symbols, analogies, prose and pictures.
So, at a less abstract level, students need to learn the inclination to resist impulsive responses; to respond logically and thoughtfully; to apply logic by explaining, justifying and, ultimately, proving what they think; to utilise a range of reasoning tools; and to develop strategies for presenting their reasoning to others persuasively. When looked at from these diverse angles growing reasoning moves well beyond encouraging a student to ‘think it through’.
Spot the Reasoners in your classes
Just to get you tuned in – have a quick think about ‘Reasoners you may know’. Make a note of students you know who display these characteristics.
Becoming a teacher who develops students’ learning power means developing a keen awareness of the subtleties of your students’ learning behaviours.
2) Creating a classroom culture for Reasoning
Cultivating learning habits ultimately involves:
- Providing rich and varied occasions for exercising learning habits;
- Infusing learning habits into lessons to enhance content understanding;
- Recognising and celebrating the use and growth of learning habits;
- Expecting students to take ownership of and responsibility for their own learning habits;
- Exploring the development of learning habits with students over time.
As a teacher you are an influential character builder and so need to be mindful of how you help students form, replace, re-form and strengthen their learning habits. But don’t worry, you’re not there yet. It takes most teachers between 2 and 3 years to become really fluent with this way of teaching. So, go easy on yourself. Feel determined because small steps often prove to be big levers for change. Have a think about what you might do…
What to stop and start
Here are a few ideas you might want to try. Take it steady, this way of teaching can be a big but exciting shift so it’s worth doing it slowly and thoughtfully. Look first at the Stop/avoid ideas. Some of these are far from trivial but it’s best to try to remove them before starting on the Start/do more of, Start slowly and Experiment with ideas.
3) How does Reasoning grow?
Get a handle on progression
As with all learning behaviours, Reasoning is not a case of ‘either you do, or you don’t’. Few learners are consistently illogical in every circumstance, and equally few are always totally logical in every situation. Most lie somewhere between these 2 extremes.
The chart below offers a glimpse of how Reasoning may grow. Column 1 identifies 6 phases of development, column 2 describes how the skills and behaviours may grow over time, column 3 shows the self-talk; what students may quietly say/explain to themselves at each phase of development.
Which colour best describes the majority of your students’ current reasoning behaviours? What do they? What can they not yet do?
Download as a pdf
4) Some teaching ideas to encourage a Reasoning frame of mind.
In the early stages of building your students’ learning power your role is to; make them aware of the behaviour; talk about it (what, how, why, when, if); celebrate its use; give opportunities to practise it, both in lessons and elsewhere; reflect on it to improve it. This staged start is reflected below…
- Firstly… make students aware of the use and importance of reasoning…when, where, why, how they are or could be doing it
- Then… explore reasoning a little more through the language of reasoning
- Try… using reasoning as a lesson starter to tune students into using it
4a. Make students aware of Reasoning
How you make your students aware of the words that describe the behaviour and why it is important to use it.
How you make students aware of the words that describe the behaviour and why it is important to use it.
Primary
Get a feel for thinking logically using Mazes
Have a go at solving some simple mazes with small groups of children. Finding the way through a maze is a fun approach to helping young children with logical thinking.
You could also ask your Y5 or Y6 colleagues to engage their children in planning and designing 3D mazes for the younger children to solve. This would be an excellent open ended design DT project guaranteed to need lots of planning and revising!
You might also be lucky enough to find real mazes near enough for a visit with your class.
Secondary
Draw out reasoning in Strategy Games

Use games that require strategy and logical thinking. From noughts and crosses to chess, from hangman to backgammon, such games help to develop and refine reasoning skills.
Many appear in the form of maths investigations and problems: Frogs; Tower of Hanoi; Nim; Connect 4; etc.
Primary

Secondary
Code Breaking
Present students with coded messages and require them to work them out using their deductive skills.
Start with simple substitution codes where, for example, each letter is replaced by the one after it in the alphabet. (i.e. b replaces a, c replaces b etc. etc.) Increase difficulty by using more complex ciphers.
4b. Explore the language of Reasoning
How you might extend the language and understanding of this behaviour
Primary
Draw out the language of reasoning through jigsaws

Sit at the jigsaw table with groups of children and work on the jigsaws together. Model your reasoning out loud to the children explaining what you did first second, third, etc. so that they begin to understand a methodical, step by step approach. Explain why you put a piece in a certain place and why it couldn’t go elsewhere. Develop conversations around…What can we see? Why does this fit here? What tells you it is right? Does this make sense? and so on.
Secondary
Explore the meaning of reasoning
 Collect words that tell you how people learn to Reason.
Relate reasoning to well known sayings
What do we mean when we say …
On the one hand . . .
One step at a time
It adds up
4c. Use Reasoning as a lesson starter
Use a quick starter to key students into the learning behaviour you want to concentrate on in the lesson. i.e. here you are starting up the Reasoning behaviour
Primary
Sequencing
Cut up;
- a cartoon,
- series of pictures of a production process,
- a flow diagram,
- a mathematical proof,
- a story line,
- a musical score,
- a poem,
- a sequence of events, and so on.
Invite students to reassemble the pieces in what they think is a viable order and explain their reasons for this. Model and listen for the language of reasoning to strengthen the process.
[Lift the level of challenge by omitting one or two of the pieces, or by including a red herring or two, or by interleaving two sequences that need to be separated before the sequencing can be completed.]Secondary
Ranking
Offer students pieces of information or ideas or pictures or statements as a set of separate items, usually on cards.
The subject could be: possible causes of global warming; the sayings of a religious leader; discoveries of the last 20 years; the music of Gershwin; causes of WW1; poems of Sylvia Plath; healthy lifestyle indicators; famous people etc.
The criterion for ranking the cards is given or negotiated with students. For example rank the cards in order of;
- importance
- appeal
- relevance
- how controversial
- any other appropriate criterion.
The point of the activity is to debate the relative merits, place them in rank order according to the chosen criterion, and to be able to explain and justify the ranking based on evidence rather than opinion.
5. Develop your learning language for Reasoning
Here is a range of things you could say to nudge Reasoning. When you use this kind of language you are talking as a learning coach; encouraging students to think for themselves. Using such statements encourages your students to:
- imitate you
- start to think in this way
- become conscious of these phrases and their meaning.
Gradually you will hear some of the statements pop up in students’ self-talk….in speech or even in writing from time to time, but mostly this will go on inside their heads. As your work on reasoning gathers pace see if you can detect students who talk, or think, in these ways.
Learning-talk nudges that encourage Reasoning
Teacher talk – as a learning coach
Here are 10 ideas to ensure your students do the thinking for themselves
- What assumptions are you making? Are they sound?
- Can you think it through in clear steps from start to finish?
- How many reasons can we find for that?
- Can you spot the false step there? Is the argument water tight?
- What evidence can you find to support your case/argument? What’s the counter evidence?
- How have you reached that conclusion? What are the implications?
- Which thinking tool would help us solve this?
- Are you convinced?
- One the one hand . . . , but on the other . . .
- Why do you think that?

 Imagining
When you use this learning muscle, you …
- picture how things might look, sound, feel, be
- let your mind explore and play with possibilities and ideas
- build up stories around objects, facts, theories or other stimuli
- rehearse things in your mind before doing them for real
See below to find out more about imagining . . .
Find Out more about imagining ⬇️
Below are 5 short sections:
- What do we mean by imagining? Read more about imagining, explore what a good imaginer does, and reflect on the imagining behaviours of your students.
- Creating a classroom culture for imagining. Take time to think about the aspects of classroom culture that encourage the imagining habit.
- How does imagining grow? Explore a progression chart for imagining, and consider how your students’ imagining skills are growing.
- Some teaching ideas to encourage a imagining frame of mind. Explore some teaching ideas to introduce and extend the language of imagining to students, and some ideas for starting a lesson with a imagining activity.
- Develop your learning language for imagining. Explore how you might talk in ways that stimulate your students’ imagining behaviours.
1) What do we mean by imagining?
Imagination is not just a cute faculty that children use to weave fantasies: it is one of the most effective tools in the learner’s toolbox. Scientists, designers and executives need a powerful imagination just as much as painters and novelists, and it can either be developed, through appropriate experience and encouragement, or left to shrivel up. Good learners are ready and able to look at things in different ways. They like playing with ideas and possibilities, and adopting different perspectives (even though they may not have a clear idea of where their imagination is leading them). They use pictures and diagrams to help them think and learn.
There are two kinds of imagination: active and receptive. In active imagination, you deliberately create a scenario to run in your mind’s eye. Sports people use this kind of mental rehearsal, and experiments have shown it to be very effective at improving their level of skill.
The second kind of imagination is more receptive, like daydreaming: letting a problem slip to the back of your mind, and then just sliding into a kind of semi-awake reverie, where the mind plays with ideas and images without much control on your part. Successful learners and inventors know how to make good use of this kind of creative intuition. They are interested in inklings and ideas that just bubble up into their minds.
What does being a good Imaginer involve?
If you have a well formed Imagining habit you will be ready, willing, and able to:
- Use the mind as a theatre in which to play out ideas and possible actions experimentally;
- Use a rich variety of visual, aural and sensory experiences to trigger creative and lateral thinking;
- Explore possibilities speculatively, saying ‘What might …’, ‘What could …’ and ‘What if …?’ rather than being constrained by what is;
- Retain a childlike playfulness when confronted with challenges and difficulties;
- Be aware of intended outcomes whilst adopting a flexible approach to realising goals;
- Rehearse actions in the mind before performing them in reality.
Spot the Imaginers in your class
Just to get you tuned in – have a quick think about ‘imaginers you may know’. Make a note of students you know who display these characteristics.
Being a teacher who develops students’ learning power means developing a keen awareness of the subtleties of your students’ learning behaviours.
2) Creating a classroom culture for imagining
Cultivating learning habits ultimately involves:
- Providing rich and varied occasions for exercising learning habits;
- Infusing learning habits into lessons to enhance content understanding;
- Recognising and celebrating the use and growth of learning habits;
- Expecting students to take ownership of and responsibility for their own learning habits;
- Exploring the development of learning habits with students over time.
As a teacher you are an influential character builder and so need to be mindful of how you help students form, replace, re-form and strengthen their learning habits.
But don’t worry, you are not expected to be there yet. It takes most teachers between 2 and 3 years to become really fluent with this way of teaching. So, go easy on yourself. Feel determined because small steps often prove to be big levers for change. Have a think about what you might do…
What to stop and start
Here are a few ideas you might want to try. Take it steady, this way of teaching can be a big but exciting shift so it’s worth doing it slowly and thoughtfully.
Look first at the Stop/avoid ideas. Some of these are far from trivial but it’s best to try to remove them before starting on the Start/do more of, Start slowly and Experiment with ideas.
3) How does imagining grow?
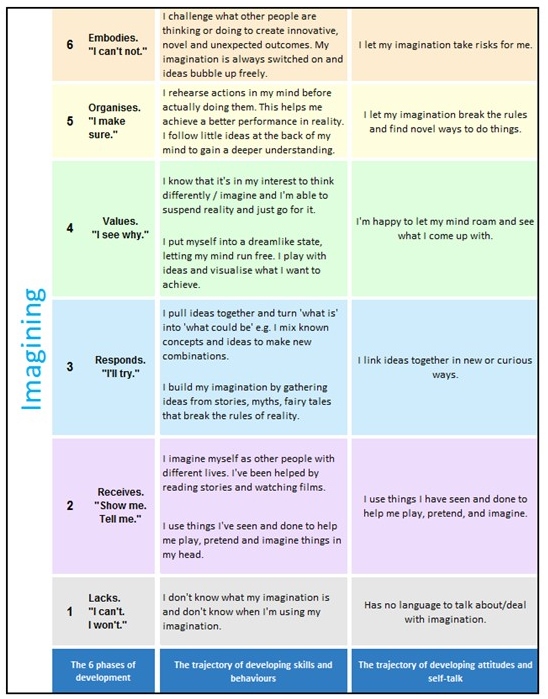
 Get a handle on progression
As with all learning behaviours, imagining is not a case of ‘either you do, or you don’t’. Few learners lack imagination in every circumstance, and equally few are hugely imaginative in every situation. Most lie somewhere between these 2 extremes.
The chart below offers a glimpse of how imagining may grow. Column 1 identifies 6 phases of development, column 2 describes how the skills and behaviours may grow over time, column 3 shows the self-talk; what students may quietly say/explain to themselves at each phase of development.
Which colour best describes the majority of your students’ current imagining behaviours? What do they? What can they not yet do?
Download as a pdf
4) Some teaching ideas to encourage a imagining frame of mind.
In the early stages of building your students’ learning power your role is to; make them aware of the behaviour; talk about it (what, how, why, when, if); celebrate its use; give opportunities to practise it, both in lessons and elsewhere; reflect on it to improve it. This staged start is reflected below…
- Firstly… make students aware of the use and importance of imagining…when, where, why, how they are or could be doing it
- Then… explore imagining a little more through the language of imagining
- Try… using imagining as a lesson starter to tune students into using it
4a. Make students aware of imagining
How you make your students aware of the words that describe the behaviour and why it is important to use it.
Primary
The Mind’s Eye

- Introduce pupils to the idea of the mind’s eye: Talk about the fact that we all have 2 eyes which we use all the time but that everyone also has a third, hidden, mind’s eye. Talk about how we can use this secret third eye to imagine and create pictures and ideas inside our minds.
- Invite pupils to close their eyes and imagine they are using their third eye. Describe something in great detail and ask them to try and see it with their third eye.
- For example: Close your eyes tightly and imagine my alien. It has a large, round, green body with lots of arms and legs. On the top of the round, green body is a huge pink and purple head with spiky yellow hair and 4 great big blue eyes. It has long, pink fingers on its hands and short, purple toes on its big feet. When it walks along it makes a high squeaky sound and it smells just like fish and chips!
- You could ask pupils to draw their idea of the alien, concentrating on their ideas rather than an exact representation of your description.
- Ask pupils to imagine something for themselves- unprompted by you. Invite them to describe what they are imagining.
- Talk about what seems to happen in their mind when they imagine.
- Talk about when our ability to imagine can be useful.
- Ask, “When do you use your imagination?”
Secondary
Guided Visualisation

Invite students to visualise, for example, a snowy mountain peak until the image fades – discuss how long this could be sustained.
Now visualise hovering over the mountain and exploring the terrain by helicopter – the experience will have lasted longer.
Now provide students with a guided visualisation of the mountain that triggers their imaginative faculties – discuss the features of this experience.
Enable students to identify the ways of triggering their own imaginations when provided with stimuli. Invite them into a city at night, or the alimentary canal, . . .
Stimulating the imagination
Use music to create atmosphere and stimulate imaginative thinking.
Provide varied, unexpected and ever-changing visual experiences — on whiteboards, classroom walls, in ideas banks, through web-links, etc.
Read vivid prose and poetry that captures details, moods and atmospheres.
Primary
Capture ideas

Encourage pupils to brainstorm or mind-map and keep notebooks or Post-its of interesting ideas to feed their creativity. Do this collectively and individually.
Elect one pupil as ‘Plant of the Day’, whose job it is to suggest unlikely ideas.
Secondary
Play the prediction game, emphasise mental rehearsal

Show video clips of e.g. rugby or football heroes preparing to kick a ball, as well as other sports and entertainment people rehearsing ahead of action.
Discuss what they are doing to ‘play the movie’ in their heads before they act.
Explore occasions when this could be useful in students’ own lives. Identify the triggers and habits required when anticipating the right action.
4b. Explore the language of imagining
How you might extend the language and understanding of this behaviour
Primary
Talk about how things might look, feel, sound.

Give pupils a familiar object – a pencil, hairbrush, scissors, toilet roll, cushion – whatever comes to hand.
Then pose the question: ‘What else could it be?’ or ‘What could this become’
Discuss and praise the most imaginative ideas.
What you are trying to develop in young learners is:
- An awareness of the power of imagination;
- The ability to use their imagination to picture how things might look, sound, feel or be;
- The willingness to talk imaginatively about situations, events, characters, etc.
Secondary
Expand the vocabulary of imagining
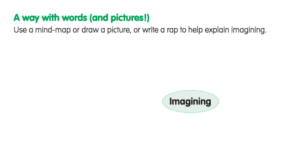
Click to enlarge
Collect words that tell you how people learn to imagine.
Relate imagining to well known sayings
What do we mean when we say …
In my mind’s eye
Thinking outside the box
4c. Use imagining as a lesson starter
Use a quick starter to key your students into the learning behaviour you want to concentrate on in the lesson. i.e. here you are starting up their imagining behaviour
Primary
Extend imaginative thinking by telling stories

Provide a stem statement…
A man walks into a room with a suitcase in his hand…
Invite one student to carry it on. Each student continues from where the previous one left off.
Or . .
Create a scenario…There are no windows, water drips into a bucket, two people are seated back to back…what might be happening? What might happen next? Can you improvise the dialogue between the people?
Secondary
Trigger imagination with ‘What if …’ challenges

Provoke students to think ‘What if… we ran out of oil in 25 years… we lived in a two-dimensional world… we all lived for exactly 70 years… tennis balls were heavier… we had two moons…’
Encourage students to build collaborative spider diagrams that explore the possible ramifications of such eventualities. Extend the imagining in creative presentations using a variety of media.
5. Develop your learning language for imagining
Here is a range of things you could say to nudge imagining. When you use this kind of language you are talking as a learning coach; encouraging students to think for themselves. Using such statements encourages your students to:
- imitate you
- start to think in this way
- become conscious of these phrases and their meaning.
Gradually you will hear some of the statements pop up in students’ self-talk….in speech or even in writing from time to time, but mostly this will go on inside their heads. As your work on imagining gathers pace see if you can detect students who talk, or think, in these ways.
Learning-talk nudges that encourage imagining
Teacher talk – as a learning coach
Here are 10 ideas to ensure your students do the thinking for themselves
- What would happen if …
- Try to picture … in your mind. Tell me about . . . .
- Can you use your mind’s eye to see what that might look like?
- Are there any other possible explanations?
- Close your eyes – what can you see? Hear? Feel?
- What do you feel might be happening?
- What could this be?
- How might you do this differently?
- Imagine yourself doing it before you do it for real.
- Can you imagine how xxx feels now even though you disagree with their views?

 Making Links
When you use this learning muscle, you …
- look for connections between experiences or ideas
- find pleasure in seeing how things fit together, make patterns
- connect new ideas to how you think and feel already
- look for analogies in your memory that will give you a handle on something complicated
See below to find out more about Making Links . . .
Find Out more about Making Links ⬇️
Below are 5 short sections:
- What do we mean by Making Links? Read more about Making Links, explore what a good Link Maker does, and reflect on the Link Making behaviours of your students.
- Creating a classroom culture for Making Links. Take time to think about the aspects of classroom culture that encourage the Link Making habit.
- How does Making Links grow? Explore a progression chart for Making Links, and consider how your students’ Link Making skills are growing.
- Some teaching ideas to encourage a Link Making frame of mind. Explore some teaching ideas to introduce and extend the language of Making Links to students, and some ideas for starting a lesson with a Link Making activity.
- Develop your learning language for Making Links. Explore how you might talk in ways that stimulate your students’ Link Making behaviours.
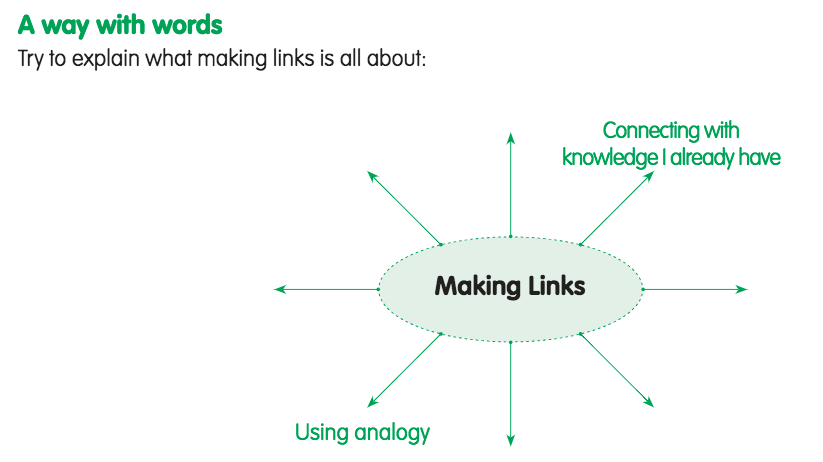
1) What do we mean by Making Links?
Making links is about integrating or making connections between different things. It comprises not only the ability to see or make relationships but also the inclination to look for them.
Trying to hook up new experiences with what you already know is what some people call ‘making meaning’.
New ideas become meaningful to the extent that we can incorporate them within our own mental webs of associations and significances. Good learners get pleasure from seeing how things fit together. They are interested in the big picture, and how new learning expands it.
Good learners can make all kinds of different links. They can link together this lesson’s physics topic with what they were doing in maths last week. They can look for links to their own goals and interests, to discover the relevance of the new learning to their own lives. They find links to their own real-life experience—using new ideas or theories to make sense of past impressions. They weave new events into their developing autobiographical story relating them to their sense of self. They can connect new learning with their own opinions and beliefs, so that they come out not just knowing something new, but looking at the world in a different way. And—very importantly for creativity—they may look for analogies in their own memory that give them a handle on a complicated new domain. ‘What’s it like?’ they ask themselves.
What does being a good Link Maker involve?
A well formed Making Links habit involves being ready, willing, and able to:
- Connect new ideas to what you know and feel already;
- Match and categorise ideas, techniques and concepts to ones that are already understood;
- Link ideas across different academic disciplines and in varying contexts;
- Looking for similarities, differences, the unusual and absurd;
- Seek novel and inventive ways of connecting apparently unconnected ideas, events or techniques.
Spot the Link Makers in your class
Just to get you tuned in – have a quick think about ‘Link Makers you may know’. Make a note of students you know who display these characteristics.
Becoming a teacher who develops students’ learning power means developing a keen awareness of the subtleties of your students’ learning behaviours.
2) Creating a classroom culture for Making Links
Cultivating learning habits ultimately involves:
- Providing rich and varied occasions for exercising learning habits;
- Infusing learning habits into lessons to enhance content understanding;
- Recognising and celebrating the use and growth of learning habits;
- Expecting students to take ownership of and responsibility for their own learning habits;
- Exploring the development of learning habits with students over time.
As a teacher you are an influential character builder and so need to be mindful of how you help students form, replace, re-form and strengthen their learning habits.
But don’t worry, you’re not expected to be there yet. It takes most teachers between 2 and 3 years to become really fluent with this way of teaching. So, go easy on yourself. Feel determined because small steps often prove to be big levers for change. Have a think about what you might do…
What to stop and start
Here are a few ideas you might want to try. Take it steady, this way of teaching can be a big but exciting shift so it’s worth doing it slowly and thoughtfully.
Look first at the Stop/avoid ideas. Some of these are far from trivial but it’s best to try to remove them before starting on the Start/do more of, Start slowly and Experiment with ideas.
3) How does Making Links grow?
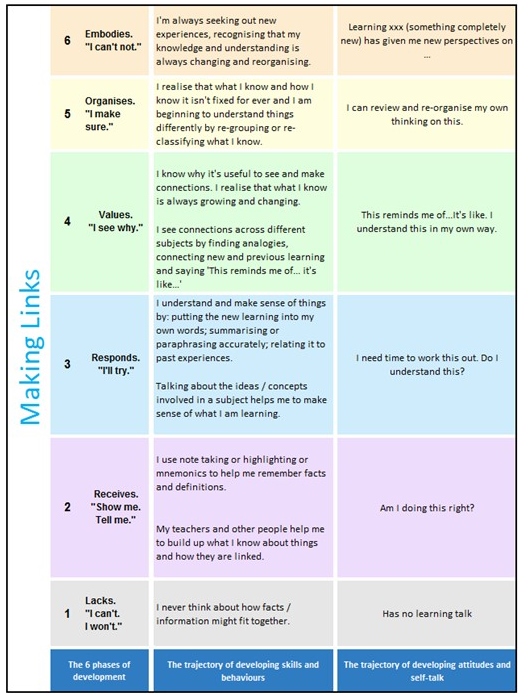
 Get a handle on progression
As with all learning behaviours, Making Links is not a case of ‘either you do, or you don’t’. Few learners are adept at spotting connections in all aspects of their learning, and equally few are unable to sense links in any situation. Most lie somewhere between these 2 extremes.
The chart below offers a glimpse of how Making Links may grow. Column 1 identifies 6 phases of development, column 2 describes how the skills and behaviours may grow over time, column 3 shows the self-talk; what students may quietly say/explain to themselves at each phase of development.
Which colour best describes the majority of your students’ current Making Links behaviours? What do they? What can they not yet do?
4) Some teaching ideas to encourage a Making Links frame of mind.
In the early stages of building your students’ learning power your role is to; make them aware of the behaviour; talk about it (what, how, why, when, if); celebrate its use; give opportunities to practise it, both in lessons and elsewhere; reflect on it to improve it. This staged start is reflected below…
- Firstly… make students aware of the use and importance of Making Links…when, where, why, how they are or could be doing it
- Then… explore Making Links a little more through the language of Making Links
- Try… using Making Links as a lesson starter to tune students into using it
4a. Make students aware of Making Links
How you make your students aware of the words that describe the behaviour and why it is important to use it.
Primary
My Grandma went shopping . . .
Recommend group of no more than 12-15
- Start by saying “My grandma went shopping and she bought…” and say an item. Let pupils take turns and each time one of them adds another item, they have to explain their link to everyone else.
- Encourage the children to think of lots of different ways of linking items and reward their ingenuity.
- To take the learning a little bit further, it could be useful to share a real shopping list with your children and discuss the links that help you when actually shopping.
- For example, perhaps you list all the fruit and vegetables first, if they are found in the first aisle etc. Or perhaps you list all the breakfast foods together…
Secondary
Mind Maps for link making
Use mind maps to encourage students to link and explain how information and ideas seem to be associated.
Use mind mapping at the beginning, middle and end of a unit of study to show how links and understanding change as knowledge grows.
Use a ‘thought shower mind map’ at the outset of a lesson to connect with prior learning and activate link making. Use in the middle to monitor shifts in understanding. Use at the end of a module of learning as a synthesising tool.
Primary
Think and Link
Organisation: For groups of 5/6 children.
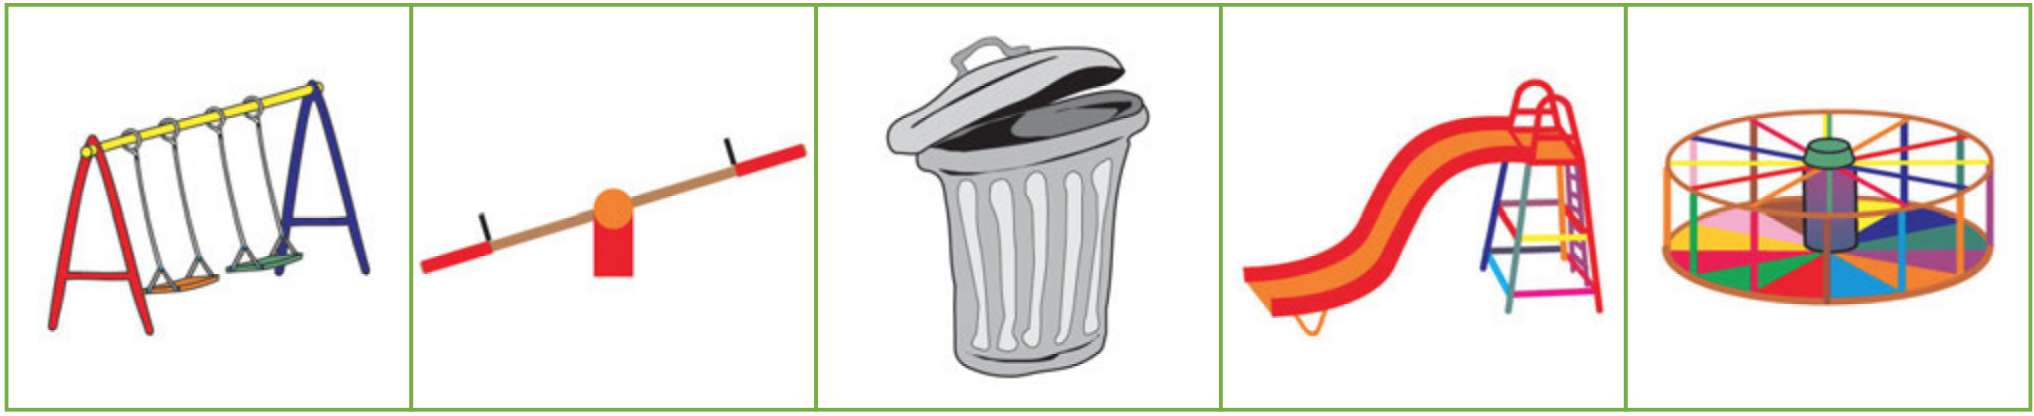
Print out and photocopy the Odd One Out series of pictures. (see resource).
- Each row has 5 pictures in it. Four can be linked together easily but one doesn’t fit readily with the others.
- Encourage the children to find an odd one out and perhaps invent a reason or story about how/why the odd one could be made to ‘fit’.
- Spend plenty of time discussing why the pictures fit together and what the links are. It’s fine if the children can think of different ways to link them as long as they can explain their rationale to you and the other children.
- Keep praising and rewarding the ‘making links’ bit of the activity rather than focusing on getting it right.
- To extend this activity a little and assess their understanding, ask the children to devise a row of pictures of their own and give them to each other as a fresh challenge.
- Join in yourself and model your link making by thinking aloud.
Secondary
Match Them Up

Offer students a set of cards that need to be matched up or linked in some way.
It might be:
- a set of pairs of cards like ‘It has been raining’ and ‘The river is flowing fast’ where the student is challenged to decide whether there Must be a connection between the two events, Could be a connection, or No possible connection;
- a problem to select a substance (metal, clay, wax, salt, ice, …) and a change (freezes, dissolves, melts, burns, …) and decide if the change is Reversible or Irreversible;
- a set of cards that students are required to match into pairs – it could be 5 graphs and 5 equations; 5 characters and 5 attitudes; 5 words and 5 definitions etc.
4b. Explore the language of Making Links
How you might extend the language and understanding of this behaviour
Primary
Discuss making links
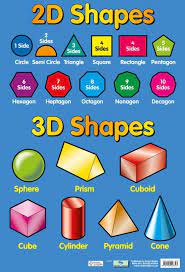
Gather together a really good assortment of shapes: 2D and 3D shapes and different sizes and colours. Using small hoops or different coloured paper circles ask pupils to take turns to sort the shapes by putting them in the hoops and explain their reasoning for sorting them this way. It should be possible to rearrange the shapes in several different ways as different children take a turn. This can help the children understand that there are often many different ways to link things together.
Secondary
Extend the language of Making Links
Collect words that tell you how people learn to make links.
Relate link making to well known sayings
What do we mean when we say …
Chain reaction
Cause and effect
Seeing the wood and the trees
4c. Use Making Links as a lesson starter
Use a quick starter to key your students into the learning behaviour you want to concentrate on in the lesson. i.e. here you are starting up their Making Links behaviour.
Primary
Similarity and Difference

Find two images with both similarities and differences. Invite students to work in pairs to identify at least 5 of each, and then work as a four to decide the 3 most important similarities and differences.
Timings could be around 1 minute for the pair work, and 2 minutes for the work in fours.
This will also support the skills of noticing, collaborating, and distilling.
Secondary
Odd One Out

Identify four ‘things’ related to your own subject area – this could be 4 images, 4 words, 4 techniques, or anything else that links to your own subject and/or what students are currently learning about.
Invite them to identify the odd one out, and to explain why they think this.
When you can, construct lists where it is possible to justify that each of the items are, in fact, the odd one out.
5. Develop your learning language for Making Links
Here is a range of things you could say to nudge Making Links. When you use this kind of language you are talking as a learning coach; encouraging students to think for themselves. Using such statements encourages your students to:
- imitate you
- start to think in this way
- become conscious of these phrases and their meaning.
Gradually you will hear some of the statements pop up in students’ self-talk….in speech or even in writing from time to time, but mostly this will go on inside their heads. As your work on Making Links gathers pace see if you can detect students who talk, or think, in these ways.
Learning-talk nudges that encourage Making Links
Teacher talk – as a learning coach
Here are 10 ideas to ensure your students do the thinking for themselves
- What do you know already that might help?
- Can you say how . . is like . . .?
- What conclusions can you draw?
- Does the analogy… help us to get a handle on this?
- Now that you know… has it changed how you think about…?
- Can you see a link between what we did in… and what you do…?
- How can you apply what you know about xxx to this problem?
- Have you seen/done/felt something like this before?
- Do you need to re-think ‘X’ in light of ‘Y’?
- Can you relate this information to what you know already?

 Capitalising
When you use this learning muscle, you …
- learn from many different sources — people, books, the Internet, music, the environment, experience …
- make intelligent use of all kinds of strategies and things to aid learning
- notice the approach and detail of how others do things
- adopt and adapt the successful strategies of others
See below to find out more about Capitalising . . .
Find Out more about Capitalising ⬇️
Below are 5 short sections:
- What do we mean by Capitalising? Read more about Capitalising, explore what a good Capitaliser does, and reflect on the Capitalising behaviours of your students.
- Creating a classroom culture for Capitalising. Take time to think about the aspects of classroom culture that encourage the Capitalising habit.
- How does Capitalising grow? Explore a progression chart for Capitalising, and consider how your students’ Capitalising skills are growing.
- Some teaching ideas to encourage a Capitalising frame of mind. Explore some teaching ideas to introduce and extend the language of Capitalising to students, and some ideas for starting a lesson with a Capitalising activity.
- Develop your learning language for Capitalising. Explore how you might talk in ways that stimulate your students’ Capitalising behaviours.
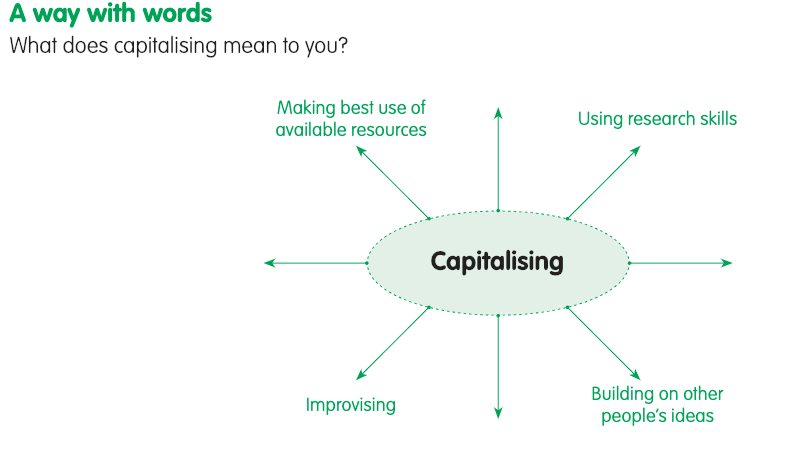
1) What do we mean by Capitalising?
Capitalising on resources means being on the lookout for strategies, materials, resources and forms of support in the environment that can help you in your current learning or problem- solving. Traditional schooling assumes that intelligence is all in the head. But recent studies show that it is much fairer and more accurate to see good learners as people who are ready and able to make intelligent use of all kinds of things around them – books, phones, social media, e-mail, the internet, and, of course, a range of learning strategies and other people. Everyone needs to be good at finding and using the learning resources available in the world, so it is obviously a good idea to start developing this habit at school.
The forms of assessment we use in schools have a powerful influence on the kinds of learning that students do, and the kinds of teaching their teachers use. If the good learner is essentially the person plus their resources (and their ability to draw on them), our methods of testing should encourage teachers and students to value and practise capitalising. In today’s world, it makes as much sense to sit 15-year-olds down at solitary desks and ask them to display their knowledge and skill as it would to take away Lionel Messi’s football and tell him to perform.
What does being a good at Capitalising involve?
A well formed Capitalising habit involves being ready, willing, and able to:
- Recognise that we learn from many different sources – other people, books, the internet, music, the environment, experience…
- Select appropriately from a range of learning strategies;
- Keep a purposeful look-out for useful learning aids;
- Adapt and adopt the successful habits and values of others into their own learning repertoire;
- Make intelligent use of all kinds of things to aid learning;
- Use resources in novel ways to solve problems.
Spotting the Capitalisers in your class
Just to get you tuned in – have a quick think about ‘capitalisers you may know’. Make a note of students you know who display these characteristics.
Becoming a teacher who develops students’ learning power means developing a keen awareness of the subtleties of your students’ learning behaviours.
2) Creating a classroom culture for Capitalising
Cultivating learning habits ultimately involves:
- Providing rich and varied occasions for exercising learning habits;
- Infusing learning habits into lessons to enhance content understanding;
- Recognising and celebrating the use and growth of learning habits;
- Expecting students to take ownership of and responsibility for their own learning habits;
- Exploring the development of learning habits with students over time.
As a teacher you are an influential character builder and so need to be mindful of how you help students form, replace, re-form and strengthen their learning habits. But don’t worry, you’re not there yet. It takes most teachers between 2 and 3 years to become really fluent with this way of teaching. So, go easy on yourself. Feel determined because small steps often prove to be big levers for change. Have a think about what you might do…
What to stop and start
Here are a few ideas you might want to try. Take it steady, this way of teaching can be a big but exciting shift so its worth doing it slowly and thoughtfully. Look first at the Stop/avoid ideas. Some of these are far from trivial but it’s best to try to remove them before starting on the Start/do more of, Start slowly and Experiment with ideas.
3) How does Capitalising grow?
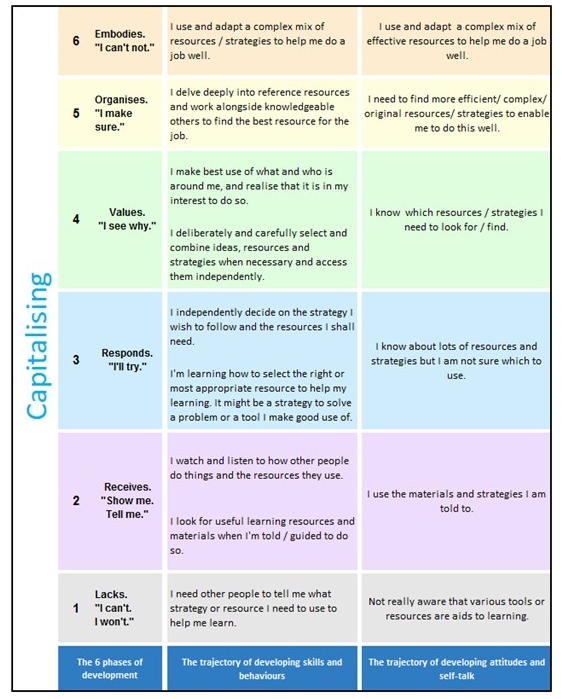
 Get a handle on progression
As with all learning behaviours, Capitalising is not a case of ‘either you do, or you don’t’. Few learners are totally dependent on others to tell them what to do and how to do it, and equally few are enterprising and resourceful in every situation. Most lie somewhere between these 2 extremes.
The chart below offers a glimpse of how Capitalising may grow. Column 1 identifies 6 phases of development, column 2 describes how the skills and behaviours may grow over time, column 3 shows the self-talk; what students may quietly say/explain to themselves at each phase of development.
Which colour best describes the majority of your students’ current Capitalising behaviours? What do they? What can they not yet do?
Download as a pdf
4) Some teaching ideas to encourage a Capitalising frame of mind.
In the early stages of building your students’ learning power your role is to; make them aware of the behaviour; talk about it (what, how, why, when, if); celebrate its use; give opportunities to practise it, both in lessons and elsewhere; reflect on it to improve it. This staged start is reflected below…
- Firstly… make students aware of the use and importance of Capitalising…when, where, why, how they are or could be doing it
- Then… explore Capitalising a little more through the language of Capitalising
- Try… using Capitalising as a lesson starter to tune students into using it
4a. Make students aware of Capitalising
How you make your students aware of the words that describe the behaviour and why it is important to use it.
Primary
Organise the classroom for easy access to resources
The obvious starting point is to organise classrooms in such a way that pupils are able to select, get and return the resources they need.
Design tasks that require the use of a range of resources and gradually expect the children to select what they need.
At the beginning of a session talk with the children about the things they might use to help them with their learning.
As the pupils’ understanding grows introduce the idea of “learning tools” and start filling a plastic toolbox with things like a ruler, calculator, notepad and pencil. Keep asking the children for new ideas and regularly look through it together.
Secondary
Learn from expert interviews
![]()
![]()
Set up interviews with people who can do something really well. Develop a series of questions with students to uncover exactly what the ‘expert’ does. E.g. What sort of preparation is there? What resources are needed? What does it feel like? What sort of thinking, habits of mind, values or beliefs are helpful?
Create a checklist of key aspects to imitate.
Extend with students in the role of real or imaginary expert, encouraging them to assess their own subconscious knowledge of how to succeed.
Primary
Use display to share key learning

Set aside an area of display where students are asked to share any strategies or ‘top tips’ that they have found particularly helpful in their own learning.
Set up a Helpful Habit board for tips from students to others about habits which might help them to achieve their long or short term goals. For those offering the ‘top tip’ it is a distilling activity, but the resulting gallery of ‘top tips’ invites students to adopt the successful strategies of others.
Secondary
Explore how things can be used
 Collect a pile of unrelated objects, or ask students to bring in one object each and mix them in random groupings – eg a copper tube, piece of cloth, felt pen, blu-tack.
Challenge students to make as many things as they can from the objects, using all of them but nothing else.
Discuss examples of particularly imaginative / effective use of materials and whether these ideas can be used in another context.
4b. Explore the language of Capitalising
How you might extend the language and understanding of this behaviour
Primary
Discuss capitalising
Use language to encourage thinking about capitalising. Build these into your learning language:
- Have you thought about what would help you to do this?
- Just think about all the things we have in the classroom that might be useful.
- How else might you do it?
- What is everyone else doing?
- Is there anything else that you could use?
- There may be other people who could help you with this.
- Who do you think might know something about this?
- Where could you find out more about this?
- Which of the things you used did you find the most useful?
- If you had to do this again is there anything else you might use to help you?
Secondary
Extend the language of capitalising
click to enlarge
Collect words and phrases that tell you how people learn to Capitalise on what is around them.
Relate capitalising to well known sayings
There is more than one way to skin a cat
Making the best of a bad job
A bit ‘Heath Robinson’
4c. Use Capitalising as a lesson starter
Use a quick starter to key your students into the learning behaviour you want to concentrate on in the lesson. i.e. here you are starting up their Capitalising behaviour.
Primary
How might we tackle this?
 At the beginning of a session talk with the children about the strategies and things they might use to help them with their learning.
Talk to the children frequently about where they might find information or help.
Offer the children a rich and varied curriculum so that they can start to appreciate that they are learning from lots of different sources using a range of learning strategies.
Secondary
How many uses for . . . .

To get students thinking about how resources can be used in many different ways.
5. Develop your learning language for Capitalising
Here is a range of things you could say to nudge Capitalising. When you use this kind of language you are talking as a learning coach; encouraging students to think for themselves. Using such statements encourages your students to:
- imitate you
- start to think in this way
- become conscious of these phrases and their meaning.
Gradually you will hear some of the statements pop up in students’ self-talk….in speech or even in writing from time to time, but mostly this will go on inside their heads. As your work on Capitalising gathers pace see if you can detect students who talk, or think, in these ways.
Learning-talk nudges that encourage Capitalising
Teacher talk – as a learning coach
Here are 10 ideas to ensure your students do the thinking for themselves
- What could we use to help us with this?
- What led you to choose to use that?
- Look very carefully at someone you think is doing …… really well and think about how you can do it like that
- Could you tackle this by imagining someone who does it really well?
- What sort of reference / resource do you need here?
- Look around. See what is available to help. How could you use it?
- Could you work this out for yourself first before looking for more information?
- Who could you turn to for help?
- Think through the strategies you might use.
- Which is the best learning strategy for this job?

 Listening
When you use this learning muscle, you …
- pay attention to other people
- show you are listening by eye contact and body language
- reflect back the main points that someone has said
- stay quiet while the other person speaks
See below to find out more about Listening . . .
Find Out more about Listening ⬇️
Below are 5 short sections:
- What do we mean by Listening? Read more about Listening, explore what a good Listener does, and reflect on the Listening behaviours of your students.
- Creating a classroom culture for Listening. Take time to think about the aspects of classroom culture that encourage the Listening habit.
- How does Listening grow? Explore a progression chart for Listening, and consider how your students’ Listening skills are growing.
- Some teaching ideas to encourage a Listening frame of mind. Explore some teaching ideas to introduce and extend the language of Listening to students, and some ideas for starting a lesson with a Listening activity.
- Develop your learning language for Listening. Explore how you might talk in ways that stimulate your students’ Listening behaviours.
1) What do we mean by Listening?
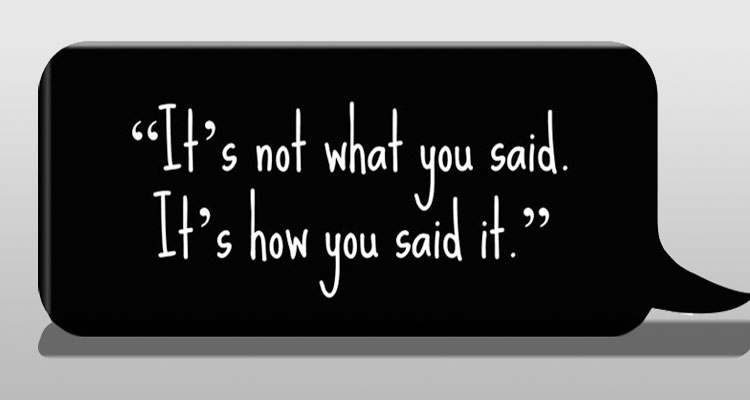
Understanding how to listen effectively is an essential skill that benefits everything from family life to business. It’s one of the most critical skills for working effectively in teams. Hearing and listening are different. There’s all sorts of faulty listening. Sometimes we fake it or pretend to listen; sometimes we only respond to the remarks we are interested in and reject the rest. Sometimes we listen defensively and take innocent remarks as personal attacks. Or, we listen to collect information to use to attack the speaker, or we avoid particular topics, or we listen insensitively and can’t look beyond the words for other meanings, or we turn the conversation to ourselves. So, listening is hard and requires effort. To be a good listener you need to be able to listen for information, listen to judge the quality of the information and listen empathetically to build a relationship and help solve a problem. When looked at from these diverse angles growing Listening moves well beyond encouraging a student to ‘do good listening’.
What does being a good Listener involve?
A well formed Listening habit involves being ready, willing, and able to:
- Be genuinely interested in other people and what they are saying;
- Focus on the current moment, being attentive and responsive to visual cues and atmosphere;
- Notice subtle details and nuances in what is being said;
- Know when to make well-judged interventions to elucidate, probe or challenge;
- Manage distractions constructively;
- Be comfortable with silence and attend actively to what is being said.
Spot the Listeners in your class
Just to get you tuned in – have a quick think about ‘listeners you may know’. Make a note of students you know who display these characteristics.
Becoming a teacher who develops students’ learning power means developing a keen awareness of the subtleties of your students’ learning behaviours.
2) Creating a classroom culture for Listening
Cultivating learning habits ultimately involves:
- Providing rich and varied occasions for exercising learning habits;
- Infusing learning habits into lessons to enhance content understanding;
- Recognising and celebrating the use and growth of learning habits;
- Expecting students to take ownership of and responsibility for their own learning habits;
- Exploring the development of learning habits with students over time.
As a teacher you are an influential character builder and so need to be mindful of how you help students form, replace, re-form and strengthen their learning habits.
But don’t worry, you’re not expected to be there yet. It takes most teachers between 2 and 3 years to become really fluent with this way of teaching. So, go easy on yourself. Feel determined because small steps often prove to be big levers for change. Have a think about what you might do…
What to stop and start
Here are a few ideas you might want to try. Take it steady, this way of teaching can be a big but exciting shift so it’s worth doing it slowly and thoughtfully.
Look first at the Stop/avoid ideas. Some of these are far from trivial but it’s best to try to remove them before starting on the Start/do more of, Start slowly and Experiment with ideas.
3) How does Listening grow?
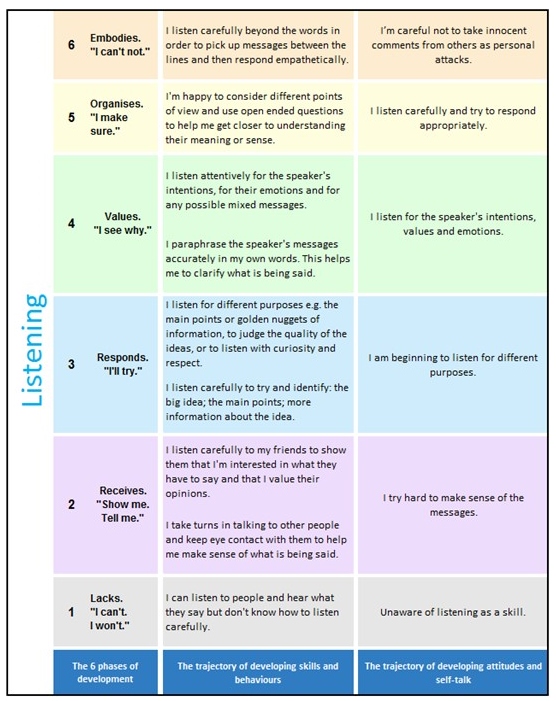
 Get a handle on progression
As with all learning behaviours, Listening is not a case of ‘either you do, or you don’t’. Few learners are unable to listen attentively in most circumstances, and equally few are sufficiently skilful learners who listen in order to develop understanding and empathise with the speaker in every situation. Most lie somewhere between these 2 extremes.
The chart below offers a glimpse of how Listening may grow. Column 1 identifies 6 phases of development, column 2 describes how the skills and behaviours may grow over time, column 3 shows the self-talk; what students may quietly say/explain to themselves at each phase of development.
Which colour best describes the majority of your students’ current Listening behaviours? What do they? What can they not yet do?
Download as a pdf
4) Some teaching ideas to encourage a Listening frame of mind.
In the early stages of building your students’ learning power your role is to; make them aware of the behaviour; talk about it (what, how, why, when, if); celebrate its use; give opportunities to practise it, both in lessons and elsewhere; reflect on it to improve it. This staged start is reflected below…
- Firstly… make students aware of the use and importance of Listening…when, where, why, how they are or could be doing it
- Then… explore Listening a little more through the language of Listening
- Try… using Listening as a lesson starter to tune students into using it
4a. Make students aware of Listening
How you make your students aware of the words that describe the behaviour and why it is important to use it.
Primary
Make pupils aware of listening
Who said “Sausages”?
An activity to encourage good listening skills.
- First, try a quiet activity to help the children focus on the physical sensation of intent listening.
- Ask the children to move round to sit in a circle.
- Ask them to close their eyes and clasp their hands gently on their laps.
- Tell them you are going to chime an Indian bell and that they should listen as carefully as they can and only open their eyes when they can no longer hear the sound.
- Ask them to be very, very quiet so that they do not disturb each other.
- Now move on to a simple listening game.
- Children remain sitting in their circle. They take turns to sit blindfolded in the middle.
- Point to a child in the circle who then says “sausages.” The blindfolded child has to guess whose voice it is.
- As the children become more familiar with this game, they will deliberately alter their voices and it can be a lot of fun.
- Regularly remind the children of the skills they are using and reward really good listening!
- After playing this game, you may be able to agree some good listening tips with the children.
Now think about how you could extend this into other listening activities.
Secondary
Offer ways to focus on listening
What Can You Hear?

A short listening activity to help students to recognise that attentive listening enables them to centre themselves, focus on what is really happening and take possession of themselves as learners.
Coaching notesPrimary
Listening for Inference and Understanding
 Explore sentences spoken with different stress, tone, pace and emphasis, to yield different meanings.
For example:
- ‘I don’t know why you didn’t go.’
- ‘How can I answer that?’
Secondary
Become aware of the effect of sounds
Silent Film Show

Play a two-minute scene from a film, without the visuals.
Listen for clues in sound effects, voices, soundtrack.
Predict / speculate what is happening.
Show the film and attend to the way in which sounds contributed to meaning.
4b. Explore the language of Listening
How you might extend the language and understanding of this behaviour
Primary
Discuss listening and tone of voice.
Model different tones of voice. Start with ones that are easy to recognise and understand, like a cross voice or a scared one. Gradually build up this repertoire of voices and use them in stories and songs. Talk about when we use these different tones of voice and why. Ask the children to listen carefully to the way people talk at different times and spot their feelings.
Expand further by inventing voices that you can use for different activities: imagine the voices for different toys or puppets you may have in the classroom; count like robots of a day; recite a rhyme like the big bad wolf. The children will have fun inventing a wide and wonderful assortment of voices whilst refining their listening skills.
Secondary
Expand the listening vocabulary
Collect words that tell you how people learn to listen attentively.
Relate listening to well known sayings
What do we mean when we say …
Being all ears
Listening between the lines
4c. Use Listening as a lesson starter
Use a quick starter to key your students into the learning behaviour you want to concentrate on in the lesson. i.e. here you are starting up their Listening behaviour.
Primary
Centring Activities
Use centring activities at the beginning of lessons to focus minds before the learning begins. Play music and ask students to focus on the associations that it conjures about places, people, moods and atmospheres.
Something wrong here ?
Read a sentence or statement without expression, then read it again, once, with changes; no further repetition. Students have to spot the changes.
Secondary
Listen for inference and understanding
Play recordings of, for example:
- One end of a telephone conversation: Who’s on the other end… What’s being said… How do you know?
- A dialogue: What’s just happened… What happens next… How do you know?
- Recognisable people: Who are they… What’s the evidence… How do you know?
- Unknown individuals talking: What do you know… Who could they be… How do you know?
5. Develop your learning language for Listening
Here is a range of things you could say to nudge Listening. When you use this kind of language you are talking as a learning coach; encouraging students to think for themselves. Using such statements encourages your students to:
- imitate you
- start to think in this way
- become conscious of these phrases and their meaning.
Gradually you will hear some of the statements pop up in students’ self-talk….in speech or even in writing from time to time, but mostly this will go on inside their heads. As your work on Listening gathers pace see if you can detect students who talk, or think, in these ways.
Learning-talk nudges that encourage Listening
Teacher talk – as a learning coach
Here are 10 ideas to ensure your students do the thinking for themselves
- What does the tone of voice tell you about the person?
- Close your eyes and let the sounds wash over you.
- Can you hear what she’s really saying?
- Listen for the main messages. Can you summarise the key points of what you’ve just heard.
- How does what he’s saying make you feel?
- Wait for your turn to talk.
- How can you help XXX to say what they are thinking?
- Do you think there’s a deeper meaning in what is being said?
- How can you show empathy for the speaker in your responses?
- Do you understand the mood and beliefs of the speaker?
 Planning
When you use this learning muscle, you …
- think about what you want to get out of learning
- assess which resources you may need
- estimate how long it will take you
- plan the steps you might take
- anticipate what might get in the way
See below to find out more about Planning . . .
Find Out more about Planning ⬇️
Below are 5 short sections:
- What do we mean by Planning? Read more about Planning, explore what a good Planner does, and reflect on the Planning behaviours of your students.
- Creating a classroom culture for Planning. Take time to think about the aspects of classroom culture that encourage the Planning habit.
- How does Planning grow? Explore a progression chart for Planning, and consider how your students’ Planning skills are growing.
- Some teaching ideas to encourage a Planning frame of mind. Explore some teaching ideas to introduce and extend the language of Planning to students, and some ideas for starting a lesson with a Planning activity.
- Develop your learning language for Planning. Explore how you might talk in ways that stimulate your students’ Planning behaviours.
1) What do we mean by Planning?
A well formed Planning habit involves being ready, willing, and able to:
- Identify end goals or objectives before considering possible action;
- Consider timescales and possible obstacles in drawing up a realistic plan;
- Make use of a wide variety of skills and tools to gather ideas and information;
- Sequence activity in order to decide what needs to be done;
- Think laterally as well as logically so that the task benefits equally from creative and rational thought;
- Be open-minded and flexible about how things might happen so that opportunities can be seized and fresh directions taken.
Being able to think ahead isn’t the whole story of Planning. Becoming an effective Planner of your own learning needs you need to know something about yourself as a learner, your interests, your needs, your wishes. Training the process of thinking ahead often starts simply by asking students to find the resources they will need to carry out a task. But planning your own learning is a sophisticated task. It involves a personal, silent assessment of your learning skills (‘What can I feasibly achieve? What am I capable of doing? What resources would bolster my chances of success?’) The more timid, less confident or lower achieving students may find such planning a daunting prospect. Introducing and requiring students to work learning out for themselves will take time and careful planning on the part the teacher. When looked at from these diverse angles growing planning moves well beyond encouraging a student to ‘think ahead’
Spotting the Planners in your class
Just to get you tuned in – have a quick think about ‘planners you may know’. Make a note of students you know who display these characteristics.
Becoming a teacher who develops students’ learning power means developing a keen awareness of the subtleties of your students’ learning behaviours.
2) Creating a classroom culture for Planning
Cultivating learning habits ultimately involves:
- Providing rich and varied occasions for exercising learning habits;
- Infusing learning habits into lessons to enhance content understanding;
- Recognising and celebrating the use and growth of learning habits;
- Expecting students to take ownership of and responsibility for their own learning habits;
- Exploring the development of learning habits with students over time.
As a teacher you are an influential character builder and so need to be mindful of how you help students form, replace, re-form and strengthen their learning habits. But don’t worry, you are not expected to be there yet. It takes most teachers between 2 and 3 years to become really fluent with this way of teaching. So, go easy on yourself. Feel determined because small steps often prove to be big levers for change. Have a think about what you might do…
What to stop and start
Here are a few ideas you might want to try. Take it steady, this way of teaching can be a big but exciting shift so it’s worth doing it slowly and thoughtfully. Look first at the Stop/avoid ideas. Some of these are far from trivial but it’s best to try to remove them before starting on the Start/do more of, Start slowly and Experiment with ideas.
3) How does Planning grow?

 Get a handle on progression
As with all learning behaviours, Planning is not a case of ‘either you do, or you don’t’. Few learners think ahead and plan how they are going to proceed in all circumstances, and equally few are impulsive and lacking forethought in every situation. Most lie somewhere between these 2 extremes.
The chart below offers a glimpse of how Planning may grow. Column 1 identifies 6 phases of development, column 2 describes how the skills and behaviours may grow over time, column 3 shows the self-talk; what students may quietly say/explain to themselves at each phase of development.
Which colour best describes the majority of your students’ current Planning behaviours? What do they? What can they not yet do?
Download as a pdf
4) Some teaching ideas to encourage a Planning frame of mind.
In the early stages of building your students’ learning power your role is to; make them aware of the behaviour; talk about it (what, how, why, when, if); celebrate its use; give opportunities to practise it, both in lessons and elsewhere; reflect on it to improve it. This staged start is reflected below…
- Firstly… make students aware of the use and importance of Planning…when, where, why, how they are or could be doing it
- Then… explore Planning a little more through the language of Planning
- Try… using Planning as a lesson starter to tune students into using it
4a. Make students aware of Planning
How you make your students aware of the words that describe the behaviour and why it is important to use it.
Primary
Plan a picnic for teddies
- Ask children to suggest things that might need doing and record on flip chart using picture prompts. They may well come up with ideas like food, games, music, invitations…
- Have different groups to plan each part. Support each group in turn
- Discuss what needs doing for one aspect of the picnic and act as their scribe. Summarise their plan back to them when everything is agreed.
- Bring everyone back together and share each aspect of the plan.
- Ask the children how they think they can work together to get everything ready for the party. Keep referring to the plan.
- This is also a very good exercise in collaboration and will offer lots of opportunities for revising as well when things need changing from the original idea.
Secondary
Jumbled up planning
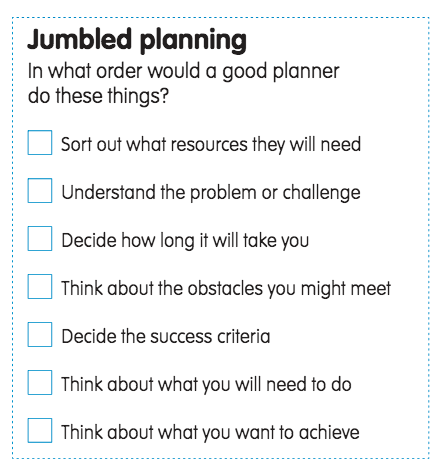
click to enlarge
Can you put these jumbled aspects of planning into a sensible order? Could you use the outcomes to create a planning flowchart with your class to guide future planning?
Primary
Timetables . .
Click to enlarge
Ask the children to think of other things that need a timetable or plan. Start a display table and board of anything the children suggest or collect. You could find some bus and train timetables, a plan of the school and playground or a dinner menu for the term and so on.
Follow a treasure map
Plan a treasure hunt around the school. This could have a seasonal theme or simply be a fun one. Use a small area of the school and make a very simple large scale plan. Attach photographs or drawings to help the children follow the plan. Take them on the treasure hunt in small groups and regularly refer to the Treasure Map as a plan.
Secondary
Structure an extended project
Give students a pack of cards that describe the 10 or so sections in an extended project based on the Driving Question: Where’s the safest place to live? Ask them to sequence the material to make clearest sense. Ask them to give each section a generic heading.
Challenge students to prepare the outline structure for a response to other Driving Questions, for example, ‘Is Planet Earth injury prone?’ ‘Where did the dinosaurs go?’ ‘Why don’t people stay at home?’ ‘Should we choose to end a human life?’ ‘Is the idea of God more trouble than it’s worth?’
Agree with the class the generic headings for an extended piece of work – display it as an aide-memoire in the future.
4b. Explore the language of Planning
How you might extend the language and understanding of this behaviour
Primary
Discuss planning
Design a planning sheet to use with the children when you are planning an activity with them. You might include these and other headings:
- What are we trying to achieve? (agreed goal, outcome)
- How will we know we have been successful? (success criteria)
- What do we need to do? (actions, jobs)
- What will help us? (resources)
- What might be a problem? (traps, obstacles)
- What will we do about it? (What- if or contingency plans)
- Who will do what? (roles) [Simplify according to age range.]
Secondary
Extend the language of planning
Collect words that tell you how people plan.

click to enlarge
Relate planning to well-known sayings …
If you fail to plan, you plan to fail.
Hit the ground running.
Cross that bridge when you come to it.
4c. Use Planning as a lesson starter
Use a quick starter to key your students into the learning behaviour you want to concentrate on in the lesson. i.e. here you are starting up their Planning behaviour.
Primary
Clapping a pattern
Planning a short rhythm
- Sit pupils in a circle. You are going to clap a short rhythm for them, but first of all you are going to plan it.
- Think aloud as you plan what you are going to do. Mention “Beginning”, “Middle” and “End”. Then clap the pattern you have planned.
- Ask if they want to listen again and then have a go with you. Explain you remember it because you planned.
- Pupils to work in pairs to plan a short clapping pattern of their own. Practise with their fingertips on their palms so that they don’t disturb each other too much.
- Ask them to perform their rhythm in pairs for everyone to listen to. Some may also like to try to teach it!
- The emphasis is on planning what they are going to clap rather than just clapping straight off.
- You may want to encourage pupils to make some kind of paper plan with a mark for every clap.
Secondary
‘What will it look like when it’s finished?’
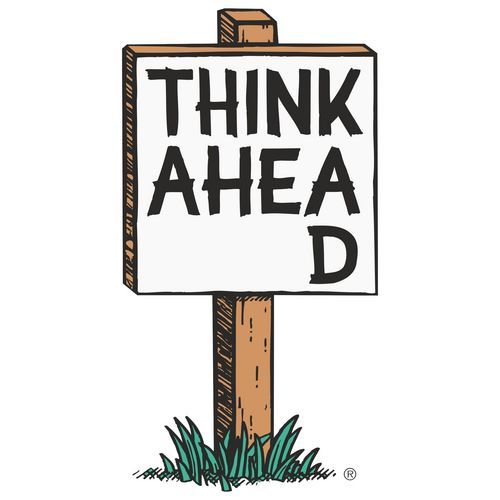
Too often students start a task without giving thought to what it will look like when it has been completed, what a good one will look like. Some find it easier to plan ‘in reverse’ – working backwards from the finished article to where they are now to establish a sensible plan of action.
Make WWILLWIF the regular precursor to any action. Ask students to determine WWILLWIF for themselves in conjunction with others. Help them to visualise this in an appropriate form.
5. Develop your learning language for Planning
Here is a range of things you could say to nudge Planning. When you use this kind of language you are talking as a learning coach; encouraging students to think for themselves. Using such statements encourages your students to:
- imitate you
- start to think in this way
- become conscious of these phrases and their meaning.
Gradually you will hear some of the statements pop up in students’ self-talk….in speech or even in writing from time to time, but mostly this will go on inside their heads. As your work on Planning gathers pace see if you can detect students who talk, or think, in these ways.
Learning-talk nudges that encourage Planning
Teacher talk – as a learning coach
Here are 10 ideas to ensure your students do the thinking for themselves
- What will your end product look like?
- How will you judge the success of what you have done?
- Look at what you have done so far – do you need to make any changes?
- Are you on track to meet your deadline?
- What needs doing? In what order will you tackle it?
- Do you have a contingency plan if that does not work?
- Keep a weather eye on how it is going.
- Are any particular planning tools appropriate here?
- Is the goal manageable?
- How can you make this plan more efficient?
 Meta Learning
When you use this learning muscle, you …
- are interested in how you learn as an individual
- can talk about what skills you need to make progress
- can talk about how learning works for you
- know your strengths and weaknesses as a learner
- are interested in becoming a better learner
See below to find out more about Meta Learning . . .
Find Out more about Meta Learning ⬇️
Below are 5 short sections:
- What do we mean by Meta Learning? Read more about Meta Learning, explore what a good Meta Learner does, and reflect on the Meta Learning behaviours of your students.
- Creating a classroom culture for Meta Learning. Take time to think about the aspects of classroom culture that encourage the Meta Learning habit.
- How does Meta Learning grow? Explore a progression chart for Meta Learning, and consider how your students’ Meta Learning skills are growing.
- Some teaching ideas to encourage a Meta Learning frame of mind. Explore some teaching ideas to introduce and extend the language of Meta Learning to students, and some ideas for starting a lesson with a Meta Learning activity.
- Develop your learning language for Meta Learning. Explore how you might talk in ways that stimulate your students’ Meta Learning behaviours.
1) What do we mean by Meta Learning?
Becoming a meta-learner involves drawing out of your learning experience a more general, explicit understanding of the process of learning, and specific knowledge about yourself as a learner. Let’s take these two aspects of meta-learning in turn.
There is a wealth of research which shows that good learners know a lot about learning.
They possess a vocabulary for talking about the process of learning itself, and are able to articulate how learning works.
Good readers, even quite young ones, are often able tell you half-a-dozen things they can do when they come across an unfamiliar word: they sound it out, break it down into bits, re-read the previous sentence, read on to see if the meaning becomes clear, look at the picture and think about it, and so on. And so, more generally, for good learners. The more able they are to talk about their learning, the more likely they are to be able to apply their knowledge to new domains too: meta-learning increases generalisation.
And good learners also need an accurate sense of themselves as learners. Being a good learner means being able to take your own strengths and weaknesses into account as you are weighing up a learning challenge, or deciding on a course of ‘professional development.’ In the business world, it is common now for people to take a job (if they are lucky enough to have a choice) partly on the basis of what they hope to learn from it. To make that decision well, they need not only to be able to plan their learning career, but also to base their decision on a realistic assessment of what they need and are ready to learn. Again, plenty of practice in thinking and talking about oneself as a learner at school is good preparation for the future.
The skills and dispositions of meta-learning can be cultivated simply by a teacher’s persistent use of questions such as ‘How did you go about finding that out?’ or ‘How would you go about teaching that to other people?’
What does being a good Meta-Learner involve?
A well formed Meta-Learner’s habit involves being ready, willing, and able to:
- Use a well-formed vocabulary to talk about the process of learning and how learning works;
- Understand how you learn, playing to your strengths and improving areas of weakness;
- Learn from learning itself, mulling things over, and learning from experiences in order to avoid mistakes in the future;
- Reflect on and draw out useful lessons from experiences and identify key features that might be useful elsewhere.
Spotting the Meta-Learners in your class
Just to get you tuned in – have a quick think about ‘Me learners you may know’. Make a note of students you know who display these characteristics.
Becoming a teacher who develops students’ learning power means developing a keen awareness of the subtleties of your students’ learning behaviours.
2) Creating a classroom culture for Meta Learning
Cultivating learning habits ultimately involves:
- Providing rich and varied occasions for exercising learning habits;
- Infusing learning habits into lessons to enhance content understanding;
- Recognising and celebrating the use and growth of learning habits;
- Expecting students to take ownership of and responsibility for their own learning habits;
- Exploring the development of learning habits with students over time.
As a teacher you are an influential character builder and so need to be mindful of how you help students form, replace, re-form and strengthen their learning habits.
But don’t worry, you’re not there yet. It takes most teachers between 2 and 3 years to become really fluent with this way of teaching. So, go easy on yourself. Feel determined because small steps often prove to be big levers for change. Have a think about what you might do…
What to stop and start
Here are a few ideas you might want to try. Take it steady, this way of teaching can be a big but exciting shift so it’s worth doing it slowly and thoughtfully.
Look first at the Stop/avoid ideas. Some of these are far from trivial but it’s best to try to remove them before starting on the Start/do more of, Start slowly and Experiment with ideas.
3) How does Meta Learning grow?
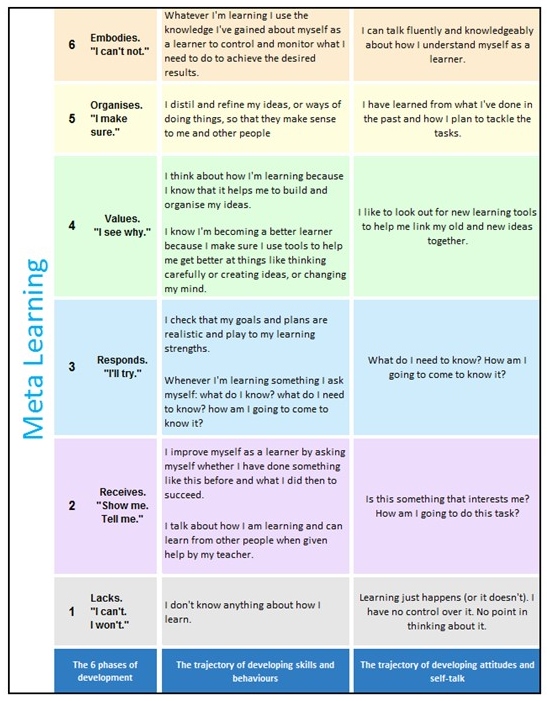
 Get a handle on progression
As with all learning behaviours, Meta Learning is not a case of ‘either you do, or you don’t’. Few learners are completely unaware of how they learn, and equally few have a complete understanding of learniing and their own learning strengths and weaknesses. Most lie somewhere between these 2 extremes.
The chart below offers a glimpse of how Meta Learning may grow. Column 1 identifies 6 phases of development, column 2 describes how the skills and behaviours may grow over time, column 3 shows the self-talk; what students may quietly say/explain to themselves at each phase of development.
Which colour best describes the majority of your students’ current Meta Learning behaviours? What do they? What can they not yet do?
Download as a pdf
4) Some teaching ideas to encourage a Meta Learning frame of mind.
In the early stages of building your students’ learning power your role is to; make them aware of the behaviour; talk about it (what, how, why, when, if); celebrate its use; give opportunities to practise it, both in lessons and elsewhere; reflect on it to improve it. This staged start is reflected below…
- Firstly… make students aware of the use and importance of Meta Learning…when, where, why, how they are or could be doing it
- Then… explore Meta Learning a little more through the language of Meta Learning
- Try… using Meta Learning as a lesson starter to tune students into using it
4a. Make students aware of Meta Learning
How you make your students aware of the words that describe the behaviour and why it is important to use it.
Primary
Give pupils a practical understanding of tools for learning

Discuss learning behaviours and link each one with a practical tool, following children’s ideas about the links. Display pictures of the tools labelled with the behaviour they represent. Collect real tools to be handled in class. When talking about learning behaviours ask pupils which tool would help them to learn something and why.
They will soon able to go and fetch say, a notebook representing planning, before going outdoors to build a rocket, or the mirror of imitation if they were going to learn by watching someone else first.
Secondary
Find out what students know about themselves as learners
A learning fitness quiz
Use this quiz to get students thinking about the process of learning and how they are as learners.
Primary
Introduce learning through story
Our learning friend The purpose of this story is to introduce thinking about learning. It doesn’t by any means introduce all the learning ‘muscles’ but it begins to focus thinking about how we learn and what it is that good learners do. It offers a way to introduce the idea that there are very particular things that we can learn how to do that will help us to become better learners.
Does your class need a ‘learning friend’?
Story Guide & Story: ‘Our Learning Friend’Secondary
Create opportunities for reflection
Pay equal attention to what has been learned and how it has been learned in plenaries and review points. Encourage students to describe and discuss the learning behaviours they have been employing. Build in such moments for reflection whenever possible.
You might use a Rating Wheel to capture their thinking – colour in the segments according to how much they feel they have used the learning behaviour.
Rating Wheel
4b. Explore the language of Meta Learning
How you might extend the language and understanding of this behaviour
Primary
Encourage pupils to see themselves as learners

Invite pupils to make themselves a ‘Things I have Learned in my Life’ scroll or book.
- Encourage them to get as much help as they can from friends and family in order to make the most comprehensive list they could.
- Give them time to share their lists with one another so that one idea inspires another until they feel their list is as complete as it can be.
- Each time they learn something new, in or out of school, they add it to their list.
- This can prove be a super weekly celebration to hear about, talk about and congratulate additions.
Secondary
Explore successful learning
Time to think … and share ideas
In a small group — Think of something that one of you is good at that the others would like to learn … could be a sport or a school subject, playing an instrument, playing a game, making a drawing.
Interview this person about what goes on in their head when they are practising the skill.
Try questions like;
- “ What have you tried that didn’t work? ”
- “ Can you describe what ‘better’ means? ”
- “ What goes on in your head when you are doing it? ”
- “ Do you talk to yourself whilst you are learning? – What do you say? ”
- “ How do you get better at this? ”
- “ What different ways do you try?”
- ” When is it best?”
- “What hinders your learning?”
- “What helps you to learn?”
4c. Use Meta Learning as a lesson starter
Use a quick starter to key your students into the learning behaviour you want to concentrate on in the lesson. i.e. here you are starting up their Meta Learning behaviour.
All students
Linking ‘Learning Objectives’ and ‘Learning Behaviours’
Rather than telling students how they will need to be as learners to be successful, share your Learning Objectives / Success Criteria and invite them to discuss and agree the types of learning behaviours that they expect they will need to use in the upcoming lesson / activity.
Ask:
- Why did they choose those particular behaviours?
- Have they missed any key ones?
- How precisely will they use these key behaviours?
- How will they monitor the use?
- What are their Success Criteria for the use of these key behaviours?
- What are my own?
5. Develop your learning language for Meta Learning
Here is a range of things you could say to nudge Meta Learning. When you use this kind of language you are talking as a learning coach; encouraging students to think for themselves. Using such statements encourages your students to:
- imitate you
- start to think in this way
- become conscious of these phrases and their meaning.
Gradually you will hear some of the statements pop up in students’ self-talk….in speech or even in writing from time to time, but mostly this will go on inside their heads. As your work on Meta Learning gathers pace see if you can detect students who talk, or think, in these ways.
Learning-talk nudges that encourage Meta Learning
Teacher talk – as a learning coach
Here are 10 ideas to ensure your students do the thinking for themselves
- What are the most important things you have found out about yourself as a learner?
- Build in a moment to review what you have done and how you have done it
- Where else could you use this skill/knowledge/idea?
- Think back to when you. . . What did you learn from that?
- What went well? What could be improved? What can we learn from this?
- How can you / do you plan your learning in advance?
- Ask yourself: what you need to know and then how are you going to come to know it?
- How do you get through the boring/difficult bits?
- Are you getting better at regulating your learning environment?
- Can you / do you talk about your learning?
Comments are closed.